- Ultrasonic non-destructive evaluation of porosity in particle-reinforced metal matrix composites with mean grain size
Ahmet Yonetkena,* and Vildan Ozkan Bilicib
aAfyon Kocatepe University, Technology Faculty, Mechatronics Engineering Dept., 03200, Afyonkarahisar, Turkey
bAfyon Kocatepe University, Physics Dept., Afyonkarahisar, TurkeyThis article is an open access article distributed under the terms of the Creative Commons Attribution Non-Commercial License (http://creativecommons.org/licenses/by-nc/4.0) which permits unrestricted non-commercial use, distribution, and reproduction in any medium, provided the original work is properly cited.
The ultrasonic pulse echo method is widely used for non-destructive evaluation of properties of alloys and composites and monitoring of internal damage; however, important characterization parameters such as the pulse echo method for ceramic-metal composites are still unknown. Therefore, in this article, the porosity dependence of transverse and longitudinal sound wave velocities, hardness values, mean grain sizes, densities, elastic (Young’s) modulus were statistically examined in isotropic porous Ni-Fe-WC ceramic-metal composites prepared by powder metallurgy method. The results show that metal and ceramic powders taken in different proportions have various morphologies and complex internal structures, which greatly affects the homogeneity of the longitudinal wave velocity ranging between 4827-6766 m/s and the transverse wave velocity varying between 2176-4198 m/s, and they also It shows that the ultrasonic pulse velocity in the Ni-Fe-WC composite is the main reason for the dispersion effect. It was observed that porosity decreased as ultrasonic wave speed, Young’s modulus, density, average grain size values increased and hardness values decreased. It has also been clearly seen that the porosity, hardness, mean grain size, density and ultrasonic wave velocity of the Ni-Fe-WC composite are strongly related to the sintering temperature. It is concluded that ultrasonic sound wave with ultrasonic pulse echo method is a promising candidate for quantitative non-destructive evaluation of porosity of additive manufacturing components.
Keywords: Porosity, Ultrasonic wave velocity, Hardness, Mean grain size, Young’s modulus.
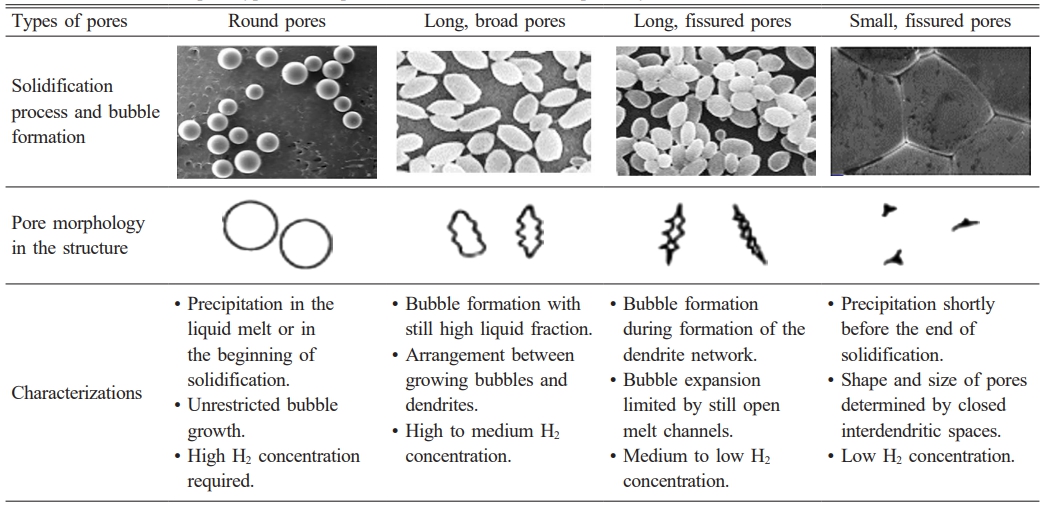
Today, the most reliable metal matrix composites (MMCs) are based on composites and alloys reinforced with heat- and wear-resistant ceramic and intermetallic particles, with different high strengths and hardnesses [1-4]. Nickel coating on ceramics powders can significantly improve the sintering and microstructure properties of ceramics. It can expand the application areas of ceramics, but attention should be paid to the coating process and application conditions to ensure optimum properties [5-14]. One of the important factors affecting the mechanical properties of ceramic and metal matrix composite materials is porosity in the microstructure. Porous structures are encountered in nature and in many engineering applications. Porosity affects a material’s mechanical properties, thermal properties (especially heat transfer), and corrosion and mechanical wear behavior due to the materials present in the environment [15, 16]. In ceramics, alloys and composite materials, porosity is also important depending on the area in which it is used. Table 1 shows the development and characteristics of pores, which are divided into four types in metallographic studies: round pores, long and wide pores, long and cracked pores, and small, cracked pores [17, 18]. It is well known that this porosity, unevenly distributed throughout the composite material, leads to a detrimental reduction in composite strength [19, 20]. Therefore, quantitative nondestructive testing of porosity in metal and ceramic matrix composites prepared by different methods and their subsequent relationship with mechanical tests are of great scientific and practical importance. The results of the studies obtained together are very useful for predicting the material behavior of composite materials and evaluating their durability, that is, their service life. Ultrasonic inspection method, which is one of the important methods of non-destructive testing methods, is a method where the material can be examined volumetrically and the type, size and location of defects can be determined. Nowadays, ultrasonic examination is mostly performed with the pulse echo technique [21, 22]. The velocity of the ultrasonic wave propagating within the material depends on the microstructure, thus the material, pore rate, density, sintering temperature and time, powder type, sintering atmosphere and other variables. Relationships can be established between the propagation velocity of the ultrasonic wave in the composite material obtained by powder metallurgy and the mechanical properties of the material [23]. It is well known that porosity strongly affects the attenuation and velocity of ultrasound, as voids and pores in the material structure are very effective scatterers of ultrasonic waves [24-26]. Nowacki [27] clearly presents the possibility of determining the steel structure by applying a direct method based on the dependence between steel grain size and some ultrasonic wave parameters. Bindumadhavan et al. [28] show that ultrasonic velocity measurement in particulate composites can provide sufficient information about the particle-porosity relationship in the composite. Liu et al. [29] systematically studied the effects of ultrasonic vibration of different strengths on the porosity, microstructure development and mechanical properties. Thus, in this study, ultrasonic pulse technique was used to examine the relationship between porosity and mean grain size and mechanical properties of composite materials through experiment. Changes in the Young’ modulus, ultrasonic longitudinal and transverse velocity values of a heat-treated material at a certain temperature were observed and were correlated with the mean grain size and porosity. WC-containing metal matrix composites (MMK), one of the advanced engineering materials, constitute a very important part of the cutting tool material industry [30]. In this study, the effect of different amounts of Fe and Ni additives as binder phases on microstructure and mechanical properties was investigated. XRD analysis and scanning electron microscope (SEM) photographs of Ni-Fe-WC composite materials were used to express the existence of the interaction between pores, mean grain size and ultrasonic measurements. Such a study could have significant significance in the ongoing development of advanced materials design. In Section 2, the production of metal matrix composite samples using the powder metallurgy technique is mentioned. Based on the theory of internal structure of the material, such as porosity, grain size and hardness are introduced in Section 3. In Section 4, ultrasonic theory, one of the non-destructive testing methods, is introduced. The effects of pore length, pore width, porosity, and intrinsic porosity on the mean grain size parameter based on SEM photographs are discussed with graphs in Section 5. Conclusions are drawn in Section 6.
In this study, we investigate the effect of porosity on the mechanical properties and phase-velocity distribution of longitudinal and transverse ultrasonic waves in particulate MMCs.
|
Table 1 Four different pore types, development and characterization of pores by Chen et al. [5]. |
Sample Preparation
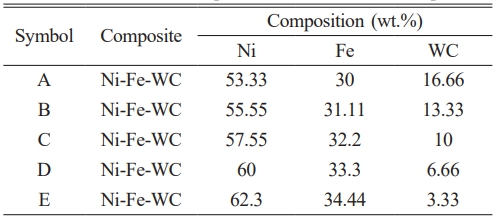
Five nominal powder compositions shown in Table 2 were used in the study: 53.33Ni-30Fe-16.67WC, 55.55Ni-31.11Fe-13.34WC, 57.55Ni-32.2Fe-10WC, 60Ni-33.3Fe-6.66WC and 62.3Ni-34.44Fe-3.33WC (wt%) was mixed directly by powder metallurgy process, respectively. The particle size of all metallic and ceramic powders used in the study is -325 mesh.
WC (tungsten carbide) powder with 99% purity and Ni (nickel) powder with 99.8% purity (metal-based) were obtained from Alfa Asear, and Fe (iron) powder with 97% purity was obtained from Sigma Aldrich. Powders taken in certain proportions by weight were mixed in a mill rotating at 20 rpm for 24 hours to obtain a homogeneous mixture. After the mixing process, the mixtures were cold pressed using a hydraulic press in the form of cylindrical samples (30 mm × 7 mm) at 305.9 kg/cm2 pressure at room temperature (Fig. 1) and then left for natural cooling at 1400 oC in an Argon atmosphere for 2 hours. It was carried out using a RÖNTEC QX2 brand and model detector and a LEO 1430 VP model scanning electron microscope (SEM) device equipped with energy dispersive X-ray spectroscopy (EDX) to analyze micromorphology and composition. Also, the mean grain size was analyzed from SEM images. Phase identification and X-ray diffraction analyzes were performed with the Shimadzu XRD-6000 device. Fig. 2

|
Fig. 1 Schematic image of (a) metal cylindrical mold and (b) composite sample used in the cold pressing process of composite powders. |
|
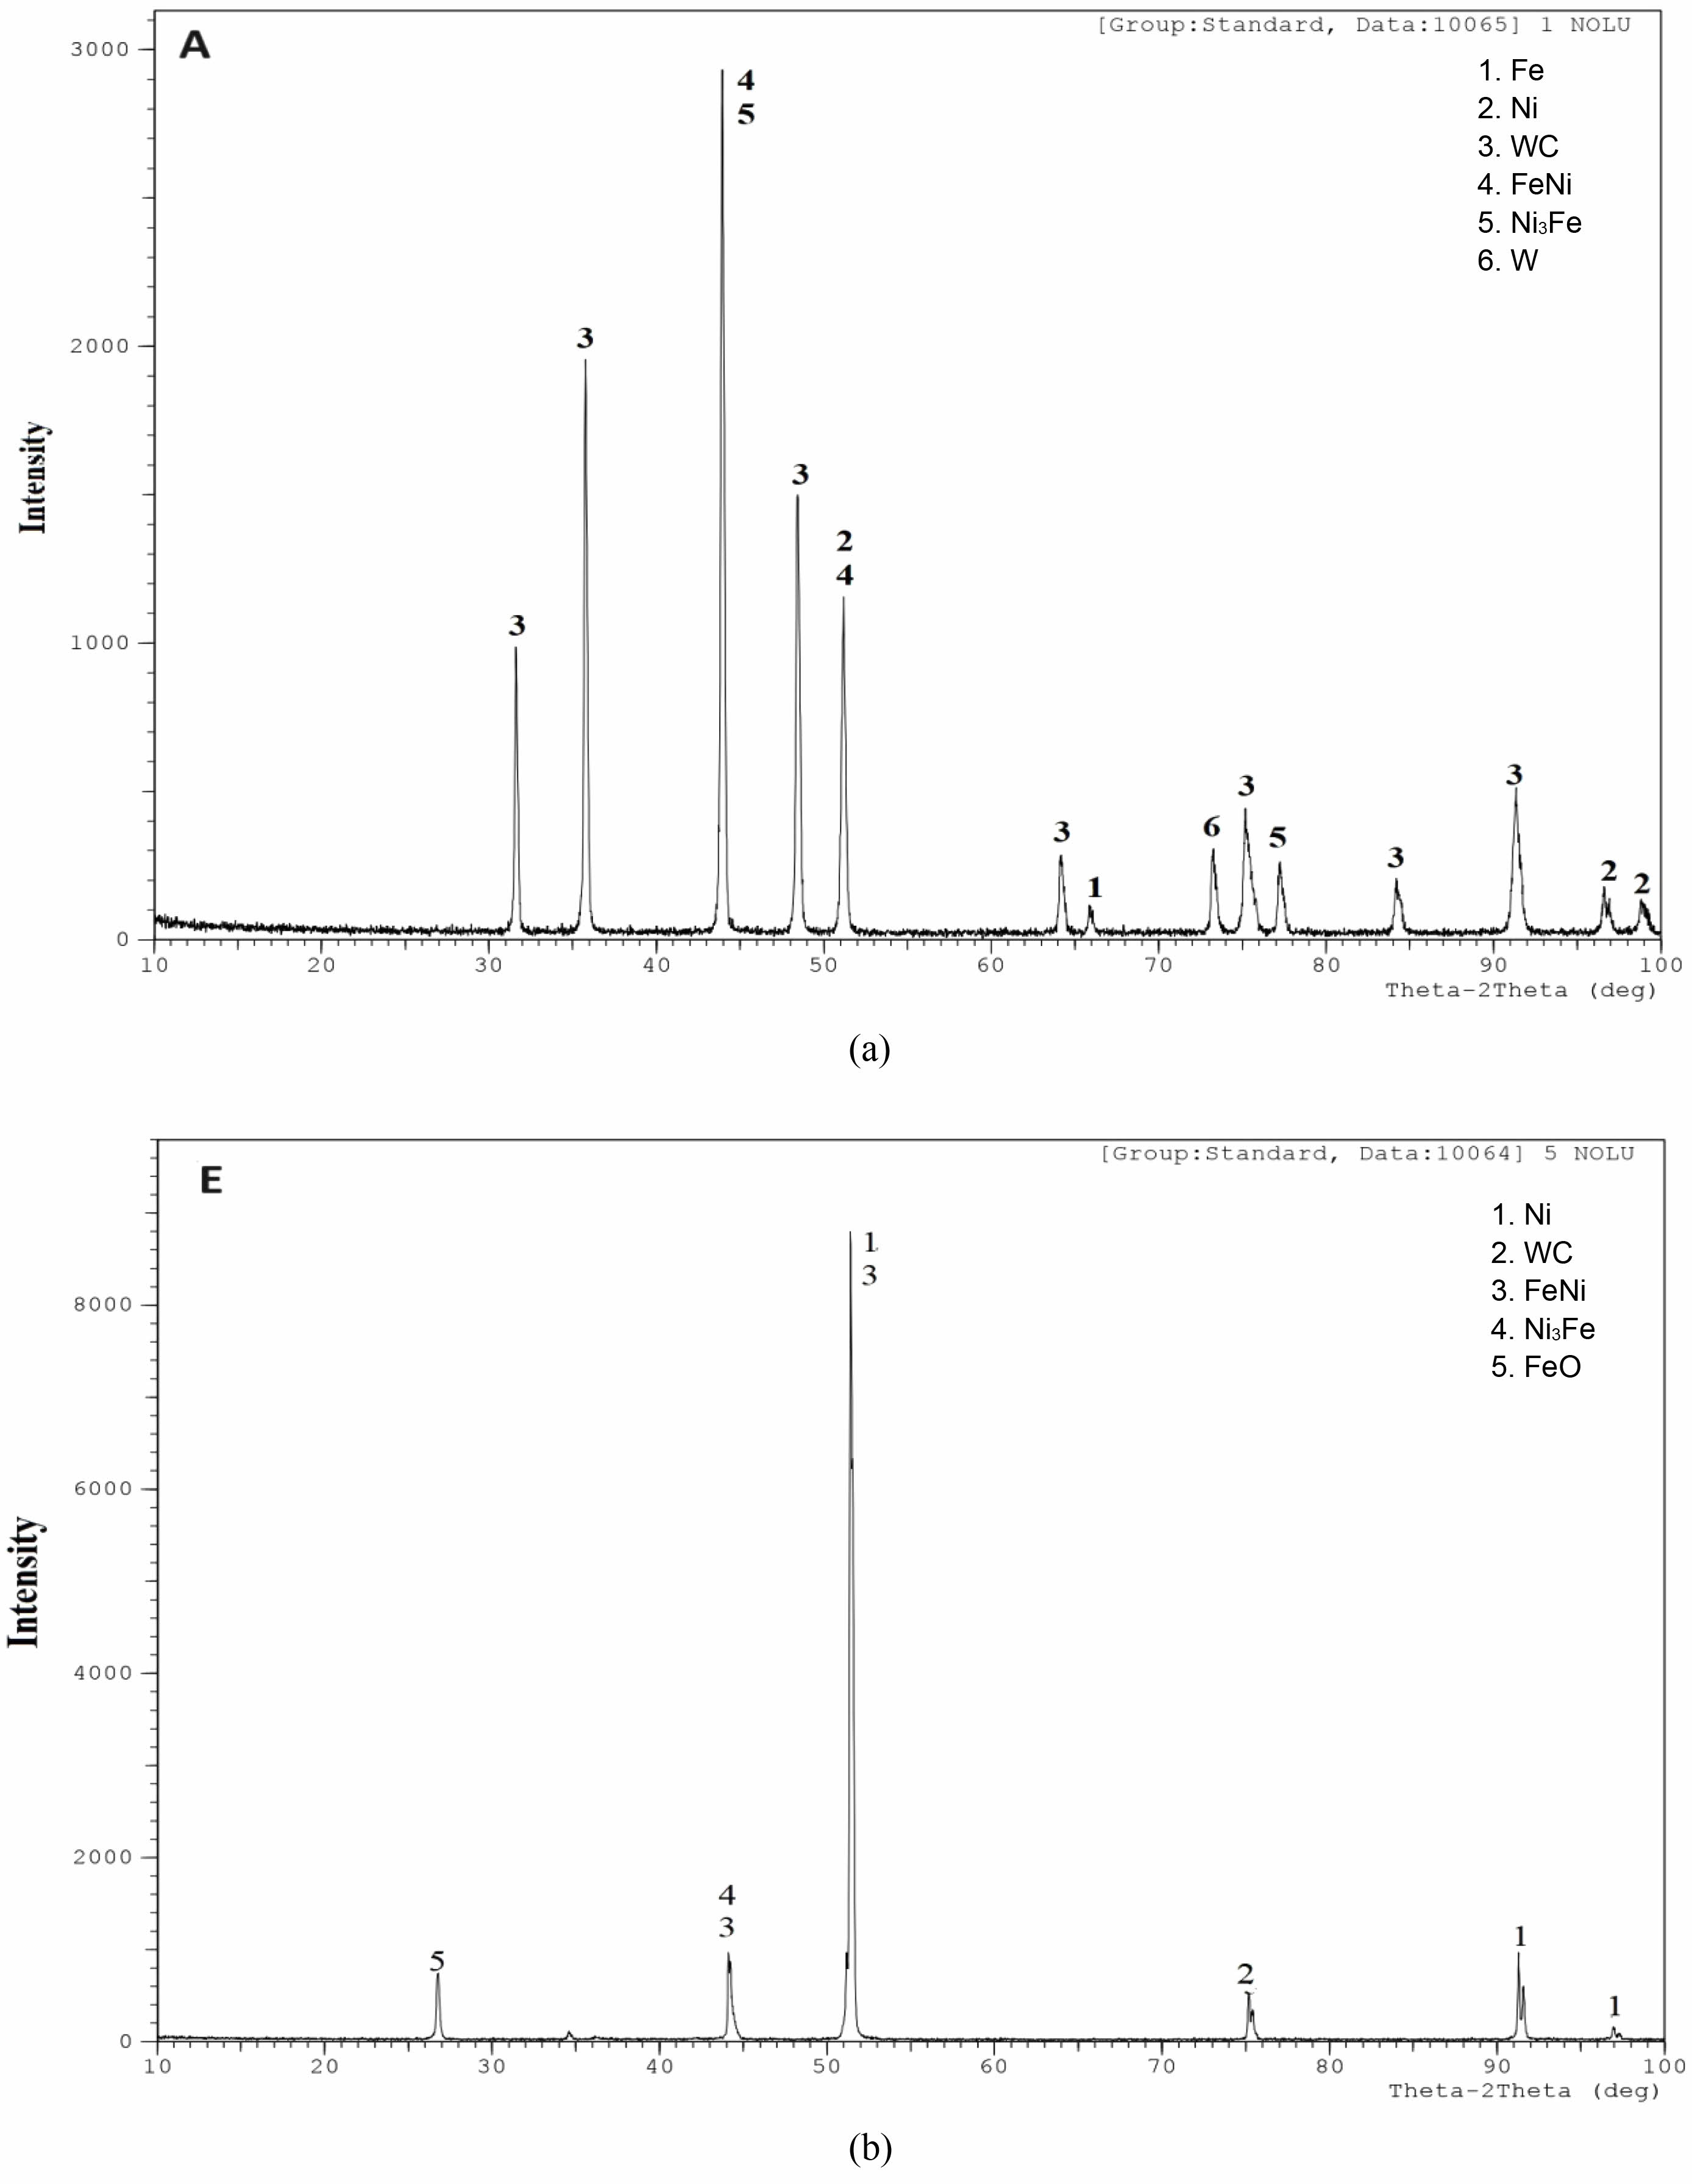
Fig. 2 X-Ray Diffraction analysis of (a) A sample, (b) E sample. |
X-ray diffraction results
X-Ray Diffraction analysis of the A, and E compositions of the compositions consisting of Fe-Ni-WC elements was performed at 1400 °C. In sample A, peaks belonging to Fe, Ni, WC, FeNi, Ni3Fe and W phases were determined. It is the sample with the highest WC ratio in the composition. The average hardness of this sample was measured as 83.63HV. At the same time, the porosity rate is higher than other samples. It can be said that the lack of clear grain boundaries is due to porosity.
X-Ray Diffraction analysis was performed for composition E. In sample E, peaks belonging to Ni, WC, FeNi, Ni3Fe and FeO phases were determined. It is the sample with the lowest WC ratio. The average hardness of this sample was measured as 51.41HV. Sintering was observed to be better in composition E and particle sizes were measured to be higher than other compositions.
SEM images and Grain Size
A Zeiss brand LEO 1430 VP model scanning electron microscope (SEM) operating at 20 kV voltage was used to examine the particle size, particle size distribution and surface morphology of the compounds. From the images obtained, two-dimensional detailed information about the grain size and the arrangement of the particles can be obtained at both micro and nano scales.
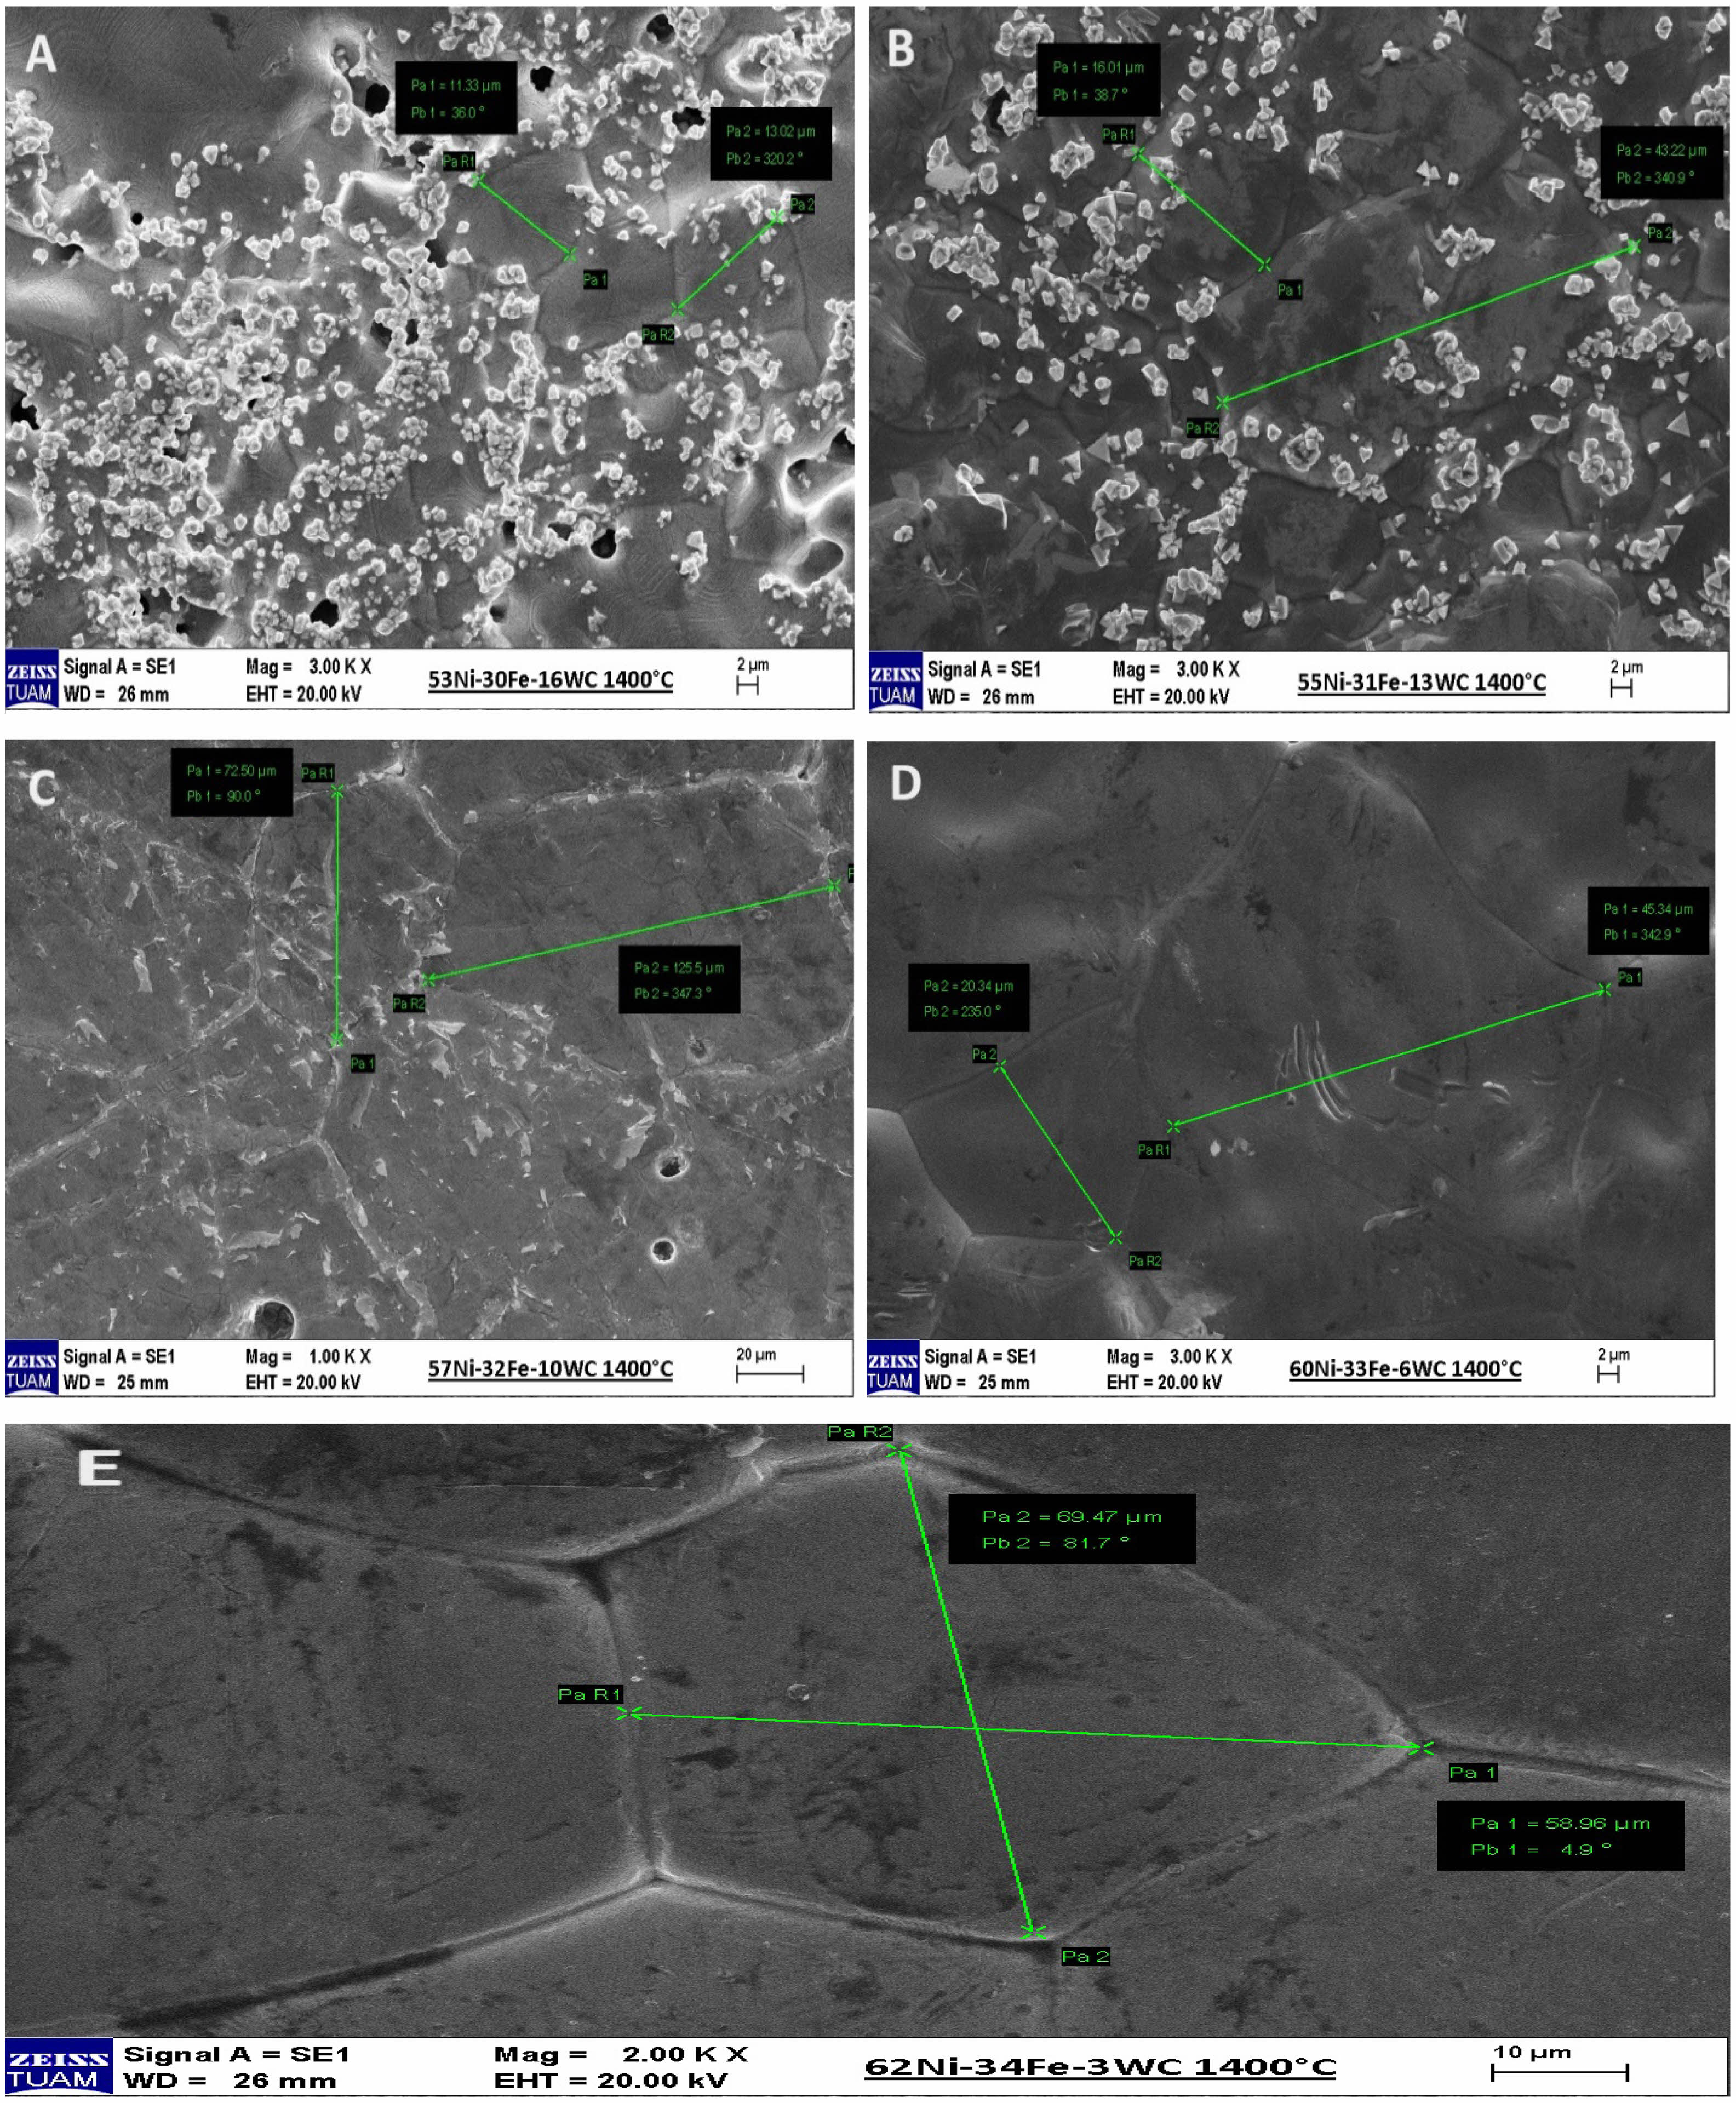
The images obtained from SEM in Fig. 3 belong to samples A, B, C, D, and E, respectively. It is seen that sample A has a porous structure. At the same time, the grain size in the samples of this composition was measured to be around 30-34 μm. This measured value was determined to be smaller than other samples. Grain boundaries are clearly visible in the SEM image of sample E. In sample E, the grain size was measured around 58-69 μm. In this sample, grain growth played an important role in reducing porosity and making grain boundaries clear. Grain coarsening was measured in samples B, C, D. Accordingly, decreases in porosity were observed. In order to minimize the error, the mean grain size values were averaged while examining more than one SEM image of each composite obtained, and one SEM image was given as an example in the study.
Porosity and Hardness
The microhardness values of the samples were measured with the METTEST-HT (Vickers) brand microhardness tester using Vickers hardness at a load of 0.5 kg. At the same time, the mean hardness values of Ni-Fe-WC composite samples are the hardness values taken from 10 different regions.
|
Fig. 3 Scanning Electron Microscopy image of (a) A sample, (b) B sample, (c) C sample, (d) D sample, (e) E sample. |
An experimental study was conducted to characterize Ni-Fe-WC composite materials using ultrasonic pulse echo techniques. The longitudinal and transverse wave velocities of the composite samples and the Young’s modulus values calculated depending on these velocities and density were also measured. A broadband longitudinal transducer with a central frequency of 2 MHz and an element diameter of 10 mm was used to generate longitudinal ultrasonic waves. A broadband transverse transducer with a center frequency of 4 MHz and an element diameter of 14.5 mm was operated to induce transverse ultrasonic waves. The velocities of ultrasonic waves in a sample are determined by measuring the delay time (∆t) between the first and second sub-signals and the distance traveled between the two back wall echoes, 2S, twice the sample thickness [31, 32]:

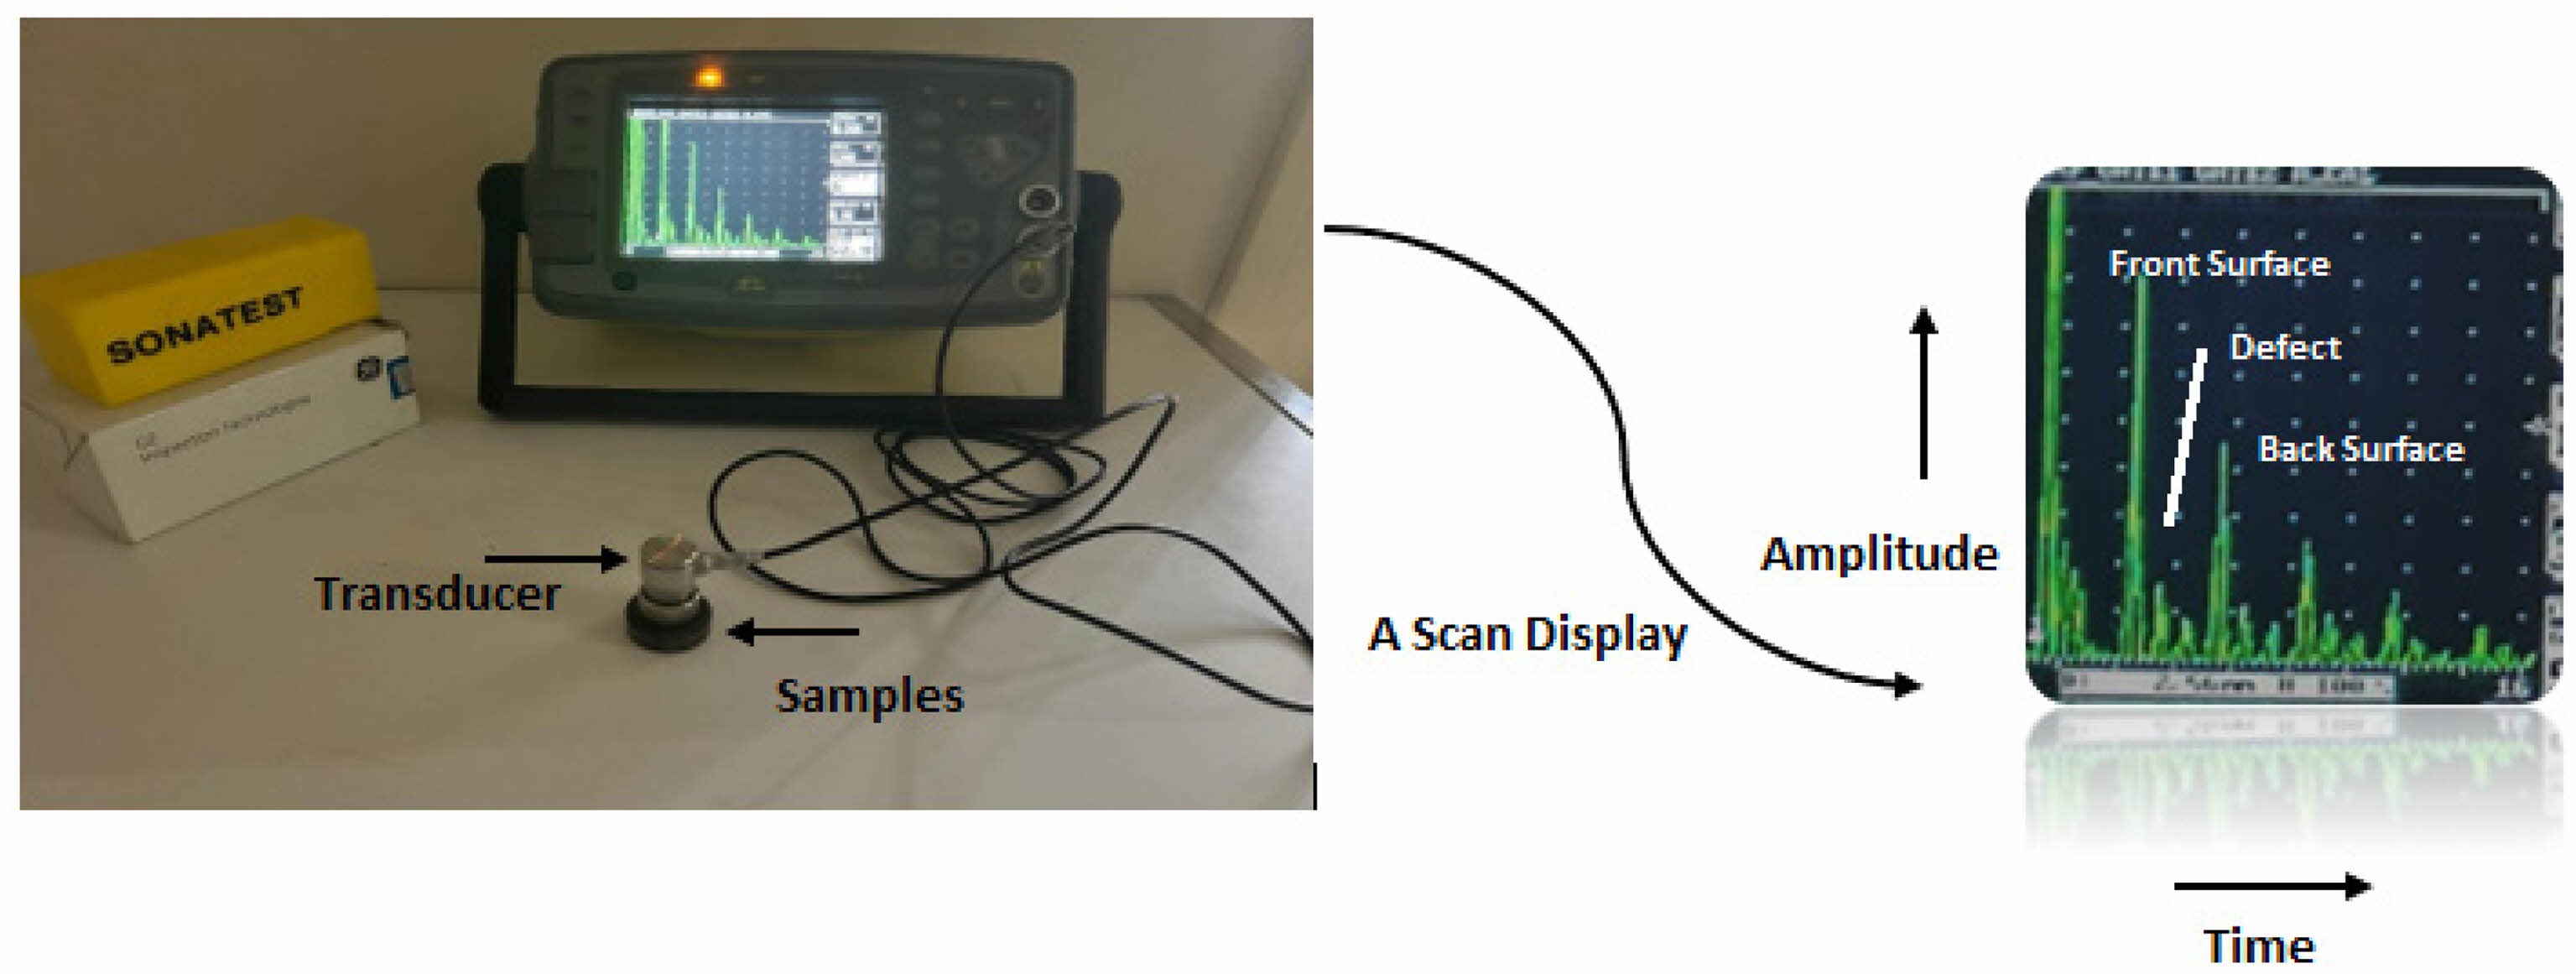
The pulse/receiver unit for all ultrasonic testing of Ni-Fe-WC composite samples prepared by powder metallurgy method was Sonatest Sitescan 150s, as shown in Fig. 4. In order to ensure the accuracy of the measurements made during ultrasonic examination, it was preferred that the sample surfaces were smooth and smooth. Sonatest sonagel-W, which can be used on all kinds of surfaces, was used to form a binder between the sample surface and the transducer. The velocity at which the wave moves from one point to another in a sound environment, that is, oscillatory movements in a mechanical system, depends on the interaction, mass and structure of the medium. Elastic theory shows that sound wave velocities in an infinitely large solid medium can be expressed as a function of Young’s modulus (E) and density (ρ) [33]. The relationships are shown below:

where Vl is the longitudinal wave velocity (m/s), Vs is the transverse wave velocity (m/s), r is the bulk density, E is the Young’s (elastic) modulus (GPa).
|
Fig. 4 Experimental setup of pulse-echo ultrasonic testing. |
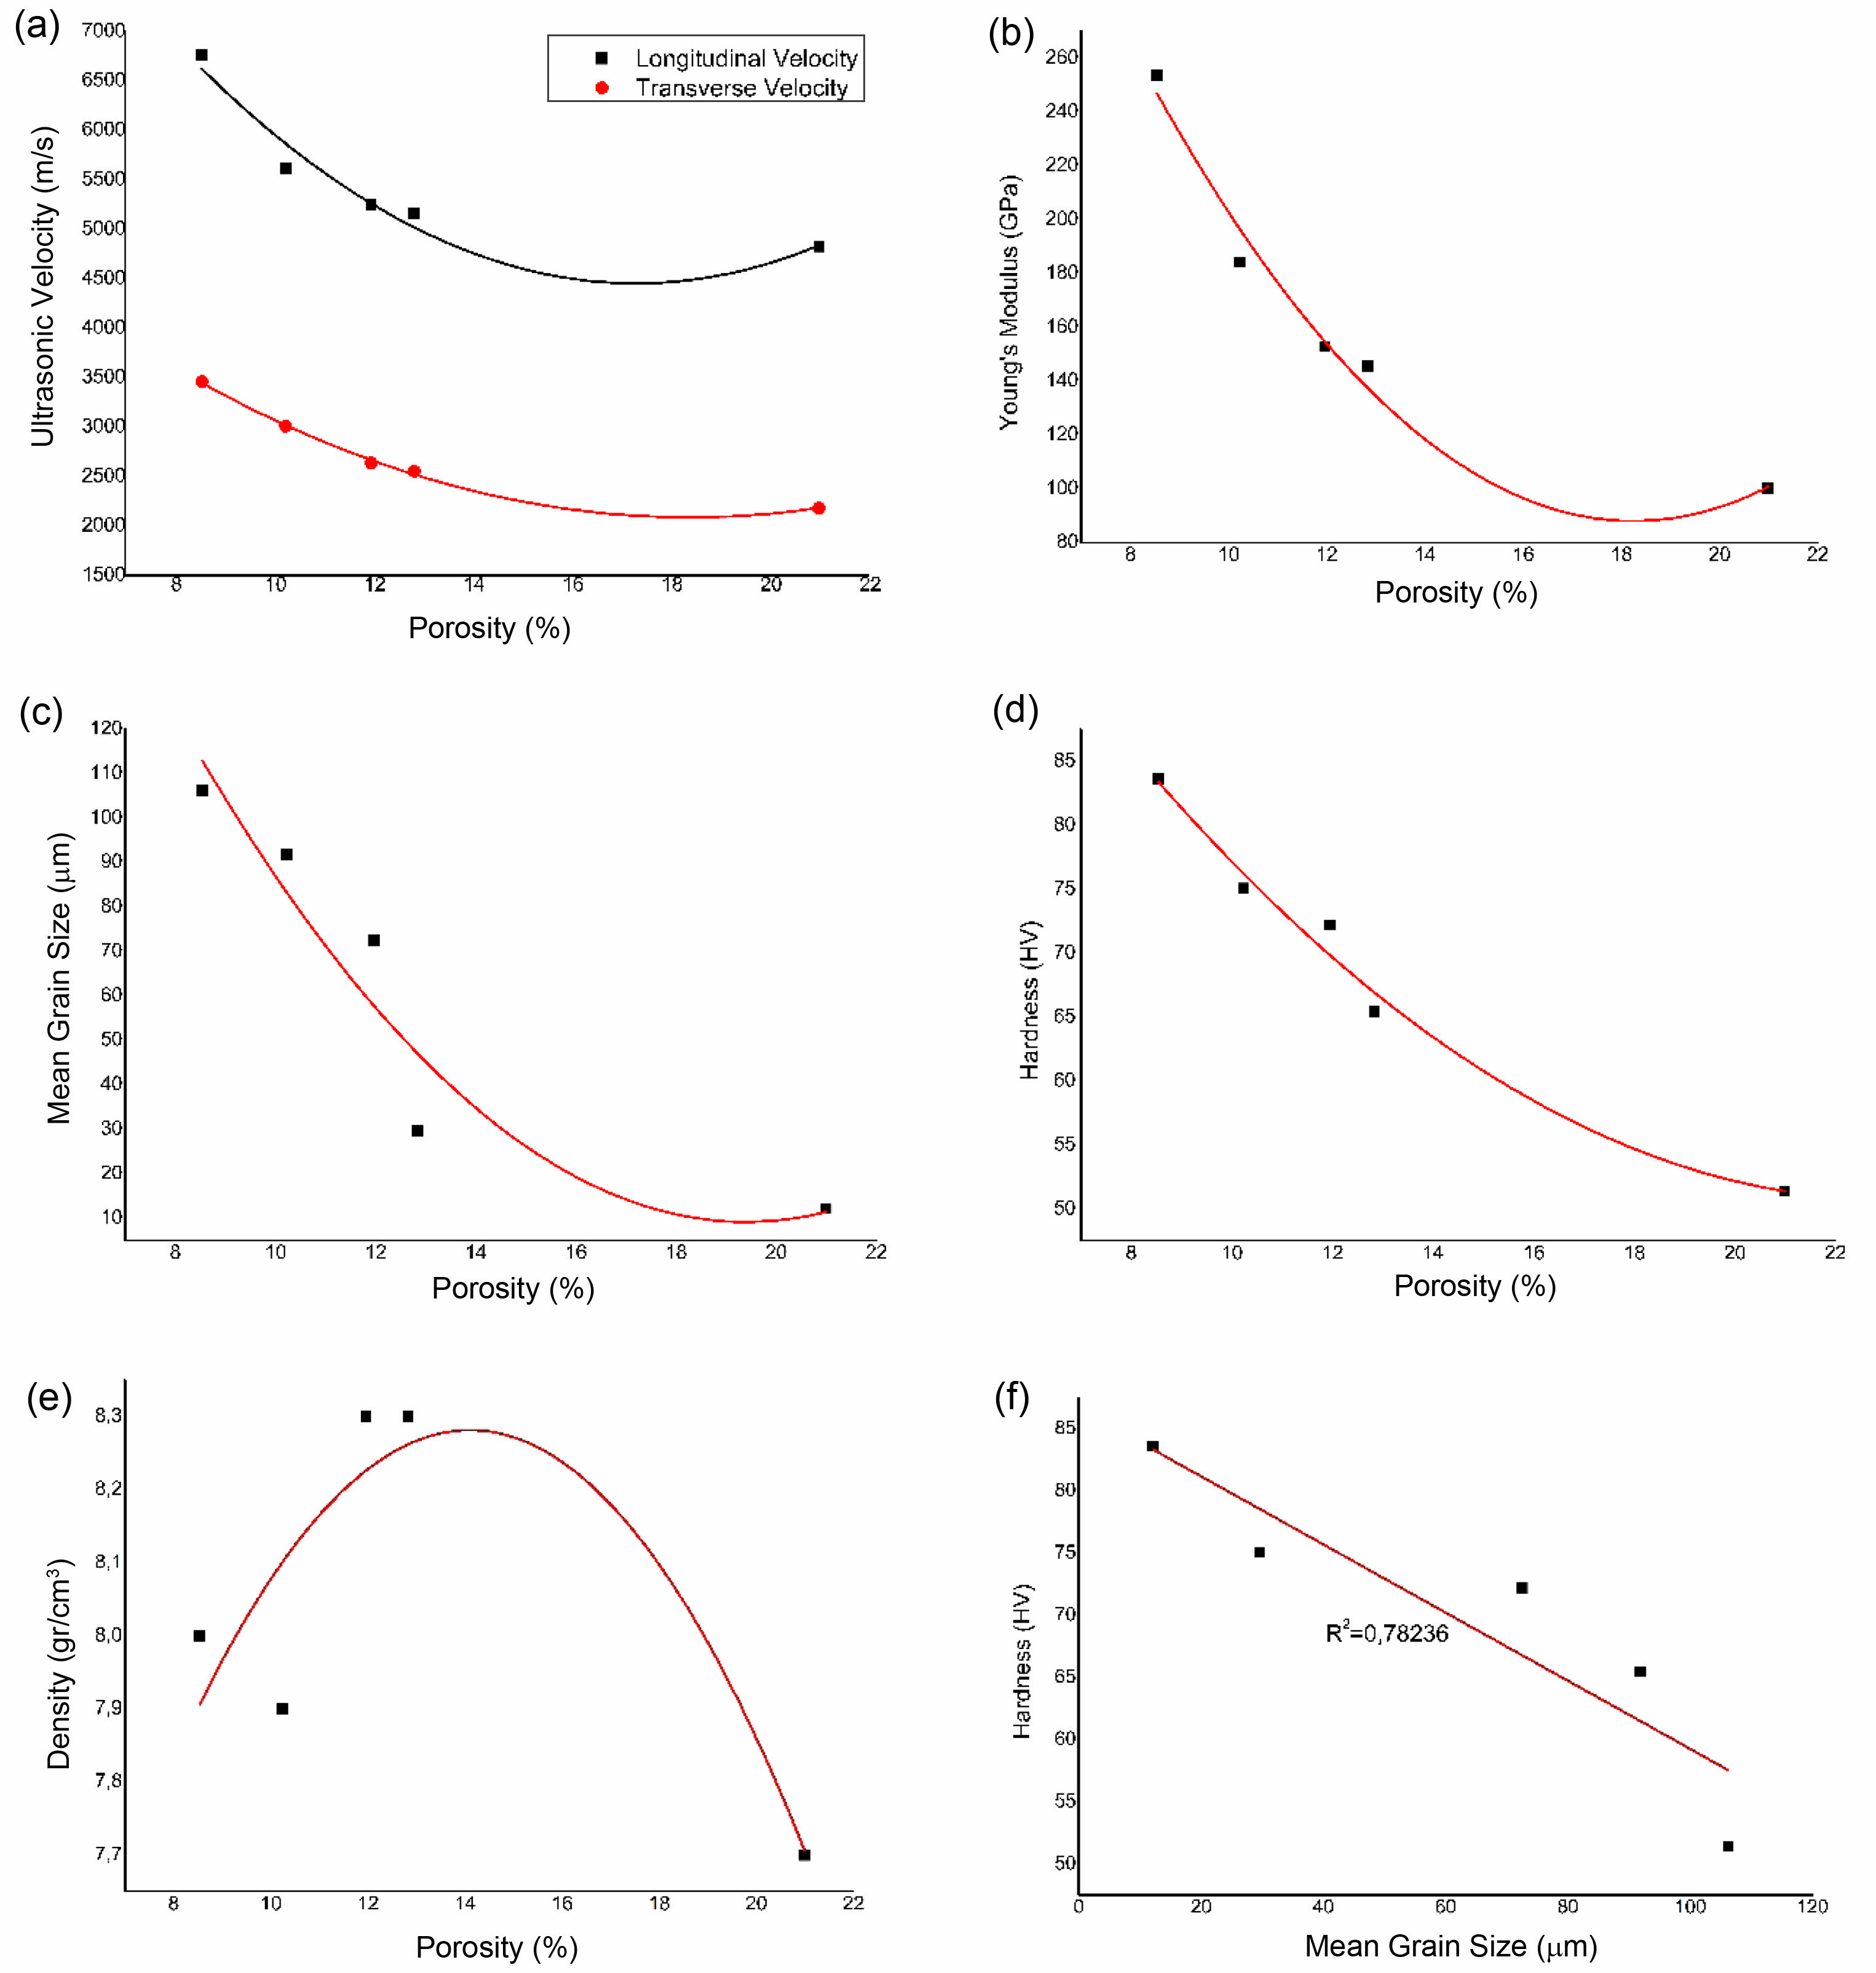
Porosity in Ni-Fe-WC composite samples produced with different amounts of reinforcement has been associated with ultrasonic and mechanical properties. These are the relationship between standard metallographic technique (mean grain size using SEM microscopic observation)-porosity, ultrasonic technique (ultrasonic wave velocity- and Young’s modulus)-porosity, mechanical properties (hardness- and density)-porosity (Fig. 5). In this study, the mean grain size, hardness, porosity and density values obtained for the material characterization of the ceramic-metal composite samples produced, as well as both longitudinal and transverse ultrasonic wave velocities and Young’s modulus values examined by ultrasound method, are shown in Table 3. The velocity of the ultrasonic wave propagating in the part depends on the microstructure, thus the material, pore rate, density, sintering temperature and time, powder type, sintering atmosphere and other variables. Increased porosity in Ni-Fe-WC composites, depending on the composition, generally leads to a decrease in mechanical properties such as Young’s modulus due to factors such as decreased density, stress concentration, interface weakness, and changes in microstructure. Understanding these mechanisms is crucial to optimize the performance of these composites in their application areas. It is seen that sintering is not fully realized depending on the composition in Ni-Fe-WC composites. It was determined that porosity was at its highest value with 20% in A samples. It is understood that the hardness value increased and a brittle structure was formed in A samples. It is also seen in X-ray analysis that WC ceramic particles and metal Fe-Ni particles do not form a new phase. SEM images also support this. In E samples, the formation of especially Fe-Ni and FeNi3 phases changed the microstructure.
Figure 5 shows the polynomial fit of Ni-Fe-WC composites based on porosity corresponding to ultrasonic wave velocity, Young’s modulus, mean grain size, hardness and density. As it is known, the polynomial regression method is used when the relationship between variables is not linear. In cases where linear regression is not sufficient, polynomial regression provides good modeling by interpreting the data obtained as a result of the analysis and ensuring a high level of perception of the predicted situations. It shows that the polynomial function provides a better fit than the linear function; hence, the polynomial function is used to characterize the relationship between Ni-Fe-WC composite samples and porosity with higher reliability. Fig. 5a shows the relationship between longitudinal and transverse sound velocity and porosity of Ni-Fe-WC samples at 2 and 4 MHz, while Fig. 5b represents the relationship between Young’s modulus and porosity calculated with ultrasonic sound velocities and intensity values. It can be easily seen that the velocity of sound is inversely proportional to the porosity of the sample; that is, the higher the porosity, the slower the sound wave propagates. Experimental results also show the linear variation of velocity with porosity content. The obtained numerical results also show changes in delay and amplitude depending on porosity content and pore size. In porous ceramic-metal composites, ultrasonic wave velocity varies depending on the amount, size and size distribution of pores [34]. It is stated that ultrasonic wave velocities and Young’s modulus decrease due to the increase in the amount of pores [35-37].
Graphs showing the relationship between grain size, hardness, density and porosity are shown in Figs. 5c, 5d, 5e and 5f. Porosity and grain size are important factors affecting hardness. Considering the same sintering temperature and sintering condition, we can say from the results and SEM images that there is an improved densification and a lower porosity appears. At the sintering temperature of 1400 °C and taking into account the changing composition ratios, it was concluded that grain boundary shifting and grain rotation along with the rearrangement of WC particles embedded in the iron and nickel metal matrix were the main densification mechanisms. It shows that porosity has a strong dependence on sintering temperature. An increase in the mean grain size with sintering temperature was accompanied by a decrease in the mean pore size, thus decreasing the porosity due to the process of sintering densification, which resulted in the gradual occupation of the pores by Ni and Fe grains. This is attributed to grain growth occurring at 1400 oC. At the same time, reinforcement of nickel is more effective in terms of interface stability and wetting. As the porosity within the structure decreased, the hardness values also decreased. As a result of the experimental study, in the materials produced by cold pressing, the density was higher, the porosity was lower, the pore size decreased thanks to the liquid phase formed with the increasing sintering temperature, and densification occurred faster and more effectively. Additionally, it was observed that there was a decrease in hardness depending on the amount of porosity remaining in the structure. When SEM images are examined at 1400 °C sintering temperature, it is seen that the most appropriate sintering occurred in samples D and E due to tungsten carbide and the grain boundaries are clear. Looking at the graph in Fig. 5f, there is a linear relationship between the variables (hardness and mean grain size). It explains how hardness and mean grain size are interconnected and what effect they have on each other. As it is known, increasing porosity also affects material density. In the light of research, it can be evaluated how the pore structure changes structurally as the density changes. In this study, micro photographs of Ni-Fe-WC ceramic-metal composites of different densities were used to determine the pore structure, and its dependence on porosity and the approximate increase in density that varies inversely with porosity were discussed (Fig. 5e).
Generally, Fig. 5 shows the variation in porosity of ceramic-metal composite according to the percentage of Ni, Fe, and WC powders. As seen from the figure, the porosity of Ni-Fe-WC ceramic-metal composite is about 8.54%-20.99%, which is linearly and positively related to the percentage of Ni, Fe and WC powders. In comparison, it is found that the distribution points cluster around the curve as the percentage of Ni and Fe powders increases and the percentage of WC powder decreases. The higher the degree of strength and hardness, the more pronounced is the positive correlation that exists between porosity and the percentage of Ni, Fe and WC powders, which is similar to the correspondence between ultrasonic wave velocities of the Ni-Fe-WC ceramic-metal composite and the percentage of Ni, Fe and WC powders (Fig. 5). This also shows that as the strength degree improves, its porosity within the structure decreases, and with the increase of the percentage value of Ni and Fe, their influence on the porosity of the ceramic-metal composite gradually becomes the dominant factor.
|
Fig. 5 Porosity dependencies of (a) ultrasonic wave velocities, (b) Young’s modulus, (c) mean grain size, (d) hardness, (e) densities in Ni-Fe-WC composite samples with different reinforcement particle contents and (f) the interdependence of hardness and mean grain size. |
|
Table 3 Density, porosity, hardness, means grain size, Young’s modulus, longitudinal and transverse velocity values for Ni-Fe-WC composite samples at the same sintering temperature. |

Ni-Fe-WC ceramic-metal composite samples were produced by sintering at a constant temperature using the direct mixing method, with different porosity values ranging from 8.54% to 20.99%. Ultrasonic induced longitudinal and transverse sound wave velocity, Young’s modulus, were used for porosity evaluation in a non-destructive manner. The conclusions can be drawn as follows:
(1) Ultrasonic wave velocity has a significant effect on porosity. The total number of pores and pore size show an almost linear increase in Ni-Fe-WC composite samples. Accordingly, as the porosity increases, the mean grain size, ultrasonic wave and Young’s modulus decrease, while the final hardness value also increases.
(2) Ultrasonic wave velocity is very sensitive to slight change of porosity due to the change of effective Young’s modulus. When a high-precision evaluation is expected, wave velocity and absorption modified by prior knowledge of the pore shape are needed.
(3) The effects of sintering temperature on the pore properties and mechanical behavior of Ni-Fe-WC composites were also clearly seen. As a result of the study, it was also supported by scanning electron microscopy that porosity changes depending on ultrasonic wave velocity, pore amount, size, size distribution, density, mean grain size and sintering temperature.
(4) Considering the number of correlations between hardness and mean grain size (R2=0.78236), it shows that it decreases linearly with increasing porosity. Therefore, ultrasonic sensing technology is suggested to be a promising candidate for the quantitative, non-destructive assessment of porosity of fabrication components in manufactured ceramic-metal composites.
There is no external funding to declare
The author declares no conflict of interest.
The processed data necessary to reproduce these findings are available upon request with permission.
The conducted research is not related to either human or animal use.
Raw data were generated at Afyon Kocatepe University Technology Research and Application Center (TUAM). Derived data supporting the findings of this study are available from the corresponding author Ahmet YONETKEN on request.
- 1. Q. Ren, Z. Yue, C. Soyarslan, Z. Tan, F. Yuan, and Z. Li, Compos B Eng. 272 (2024) 111229.
-

- 2. A.M. Sankhla, K. M. Patel, M. A. Makhesana, K. Giasin, D.Y. Pimenov, S. Wojciechowski, and N. Khanna, J Mater Res Technol. 18 (2022) 282-292.
-

- 3. A.B. Yönetken and A. Yönetken, J. Ceram. Process. Res. 25[1] (2024) 97-103.
-

- 4. E.C.P. Nidumolu, L. Yerra, and M. Baddepudi, Mater. Today Proc. 43[3] (2023) 673-677.
-

- 5. G. Gyawali, D.R. Dhakal, B. Joshi, J.-H. Choi, and S.W. Lee, J. Ceram. Process. Res. 20[1] (2019) 84-89.
-

- 6. W. Dong, Y. Liang, Q. Bao, X. Gu, and J.-W. Yang, J. Ceram. Process. Res. 22[3] (2021) 317-322.
-

- 7. K.H. Lee, S.-H. Ahn, and K.-W. Namc, J. Ceram. Process. Res. 19[3] (2018) 183-188.
-

- 8. S.C. Jeong, S.-H. Ahn, and K.-W. Nam, J. Ceram. Process. Res. 17[10] (2016) 1088-1094.
-

- 9. X. Wang, T. Yu, X. Sun, Z. Wang, and W. Wang, J. Ceram. Process. Res. 17[9] (2016) 969-973.
-

- 10. Q. Yang, Y. You, B. Cheng, L. Chen, J. Cheng, D. Lou, Y. Wang, and D. Liu, J. Ceram. Process. Res. 24[2] (2023) 230-236.
-

- 11. A. Rittidech, S. Wantrong, and S. Chommi, J. Ceram. Process. Res. 22[2] (2021) 221-225.
-

- 12. K.H. Lee and K.W. Nam, J. Ceram. Process. Res. 19[1] (2018) 54-64.
-

- 13. K.-W. Nam, J. Ceram. Process. Res. 17[6] (2016) 543-549.
-

- 14. E.R. Rangel and H.B. Ramíreza, J. Ceram. Process. Res. 5[1] (2004) 58-63.
- 15. P. Dong, Y. Ma, X. Zhang, Y. He, Z. Zhao, J. Ma, W. Li, and Y. Li, Compos. Struct. 316 (2023) 117051.
-

- 16. P.K. Liaw, D.K. Hsu, N. Yu, N. Miriyala, V. Saini, and H. Jeong, Acta Mater. 44[5] (1996) 2101-2113.
-

- 17. X.G. Chen, S. Engler, AFS. 92-94 (1993) 673-682.
- 18. S. Gornostayev, J. Heino, and T. Fabritius, Can. Metall. Q. 56[3] (2017) 252-258.
-

- 19. C. Tekmen, I. Özdemir, U. Cocen, and K. Onel, The mechanical response of Al–Si–Mg/SiCp composite: influence of porosity, Mater. Sci. Eng. A 360[1-2] (2003) 365-371.
-

- 20. R.K. Gupta, K.R. Ravi, V. Udhayabanu, and D.R. Peshwe, Mater. Chem. Phys. 281 (2022) 125905.
-

- 21. H. Güneyli, S. Karahan, A. Güneyli, N. Yapýcý, Russ. J. Nondestruct. Test. 53[2] (2017) 159-166.
-

- 22. H. Tanyýldýzý and A. Coþkun, Russ. J. Nondestruct. Test. 44[9] (2008) 639-646.
-

- 23. L.S. Changa, T.-H. Chuang, and W.J. Wei, Mater. Charact. 45 (2000) 221-226.
-

- 24. Y. Ishii, S. Biwa, and A. Kuraishi, Composite Structures 152 (2016) 645-653.
-

- 25. N.B. Podymova and A.A. Karabutov, Composites Part B 113 (2017) 138-143.
-

- 26. N.B. Podymova, I.E. Kalashnikov, L.K. Bolotova, and L.I. Kobeleva, Ultrasonics 99 (2019) 105959.
-

- 27. K. Nowacki, Metal 48[2] (2009) 113-115.
-

- 28. P.N. Bindumadhavan, H.K. Wah, and O. Prabhakar, Mater. Sci. Eng. A 323 (2002) 42-51.
-

- 29. J. Liu, H. Zhu, Z. Li, W. Cui, and Y. Shi, Opt. Laser Technol. 119 (2019) 105619.
-

- 30. A. Yönetken and A. Erol, Sci. Eng. Compos. Mater. 17[3] (2010) 191-198.
-

- 31. H. Carreon, M. Carreon-Garcidueñas, M.L. Carreon, and V. Almanza, Phys. Mesomech. 23[1] (2020) 32-38.
-

- 32. V.V. Murav’ev and E.V. Boyarkin, Russ. J. Nondestruct. Test. 39[3] (2003) 189-197.
-

- 33. M. Asmani, C. Kermel, A. Leriche, and M. Ourak, J. Eur. Ceram. Soc. 21[8] (2001) 1081-1086.
-

- 34. P. Šimonová and W. Pabst, J. Eur. Ceram. Soc. 43[4] (2023) 1597-1604.
-

- 35. J. Zhang, X. Zhao, B. Yang, J. Li, Y. Liu, G. Ma, S. Yuan, and J. Wu, Meas. 193 (2022).
-

- 36. L. Wang, Q. Zhang, J. Yi, and J. Zhang, J. Build. Eng. 80 (2023) 107935.
-

- 37. E. Ridengaoqier, S. Hatanaka, P. Palamy, and S. Kurita, Constr. Build Mater. 300 (2021) 123959.
-

- 38. K.N. Fatema, H.M. Lim, J.S. Hong, K.S. Lee, and I.J. Kim, J. Ceram. Process. Res. 24[1] (2023) 197-204.
-

- 39. B. Liu, M. Tang, X. Wei, and H. Li, J. Ceram. Process. Res. 23[6] (2022) 770-773.
-

- 40. M. Cao, X. Jin, L. Chen, L. Dong, B. Li, and X. Zhang, J. Ceram. Process. Res. 22[4] (2021) 377-385.
-

- 41. O.M. Sanusi, O.A. Oyelaran, and J.A. Badmus, J. Ceram. Process. Res. 21[4] (2020) 501-507.
-

- 42. J. Hu, Q. Huang, H. Peng, X. Tian, Z. Chen, and Y. Peng, J. Ceram. Process. Res. 19[3] (2018) 224-230.
-

 This Article
-
2024; 25(5): 805-813
Published on Oct 31, 2024
- 10.36410/jcpr.2024.25.5.805
- Received on Jun 25, 2024
- Revised on Jul 30, 2024
- Accepted on Aug 5, 2024
 Services
- Abstract
introduction
experimental procedures
analysis of microstructural properties
ultrasonic measurements of ni-fe-wc composite
results and discussion
conclusion
- Funding
- Conflict of Interest
- Data availability statement
- Ethical approval
- Declaration
- References
- Full Text PDF
Shared
 Correspondence to
- Ahmet Yonetken
-
Afyon Kocatepe University, Technology Faculty, Mechatronics Engineering Dept., 03200, Afyonkarahisar, Turkey
Tel : +90 272 218 2510 Fax: +90 272 218 2693 - E-mail: yonetken@aku.edu.tr


 Copyright 2019 International Orgranization for Ceramic Processing. All rights reserved.