- Investigation of microstructure and wear properties of AISI M2 high speed steel nozzles coated with different hard coatings (TiN, CrN, AlCrN, AlTiN and AlTiN) by PVD method
Hediye Aydina,* and M. Ahmet Söylerb,c
aDepartment of Metallurgy and Material Engineering, Kütahya Dumlupınar University, 43100 Kütahya, Turkey
bNG Machinery, Kütahya 1th. Organized Industrial Zone, 1th. Street No:13, Kütahya, Turkey
cDepartment of Mechanical Engineering Kütahya Dumlupınar University, 43100 Kütahya, TurkeyThis article is an open access article distributed under the terms of the Creative Commons Attribution Non-Commercial License (http://creativecommons.org/licenses/by-nc/4.0) which permits unrestricted non-commercial use, distribution, and reproduction in any medium, provided the original work is properly cited.
High-speed steels (HSS) have high hardness, toughness, shock resistance, and wear resistance at room and increased temperatures due to their high ratio of alloy elements. Even though the low wear resistance compared with cemented carbides is a significant disadvantage, recent advances in surface technologies have increased surface hardness and wear resistance. In the present study, the “cathodic arc vapor deposition” method from among the PVD coating methods was used for coating the sample surfaces of the glaze spray nozzles prepared using AISI M2 high-speed steel material prepared with TiN, AlCrN, AlCrTiN, and AlTiN. Scanning electron microscope (SEM) was used to identify that the coatings display a homogeneous and crack-free distribution. The micro-hardness of AISI M2 high-speed steel-coated ceramic coatings was also investigated. Accordingly, the highest hardness value was obtained for the TiN-coated sample, whereas the lowest hardness value was obtained for the AlCrTiN-coated sample. The ball-on-disc method was used to compare the wear characteristics of the samples, considering the distance from the coatings until fracture. When the wear resistance of the coated samples was examined, it was observed that the most significant increase was obtained in AlCrN coated sample compared with the original sample
Keywords: AISI M2 steel, Wear resistance, Ceramic based coatings, Physical Vapor Deposition Method (PVD).
High toughness and wear resistance because of its well-balanced alloy composition of AISI M2 high-speed steel, making it appropriate for a significant difference in applications. Also highly suitable for cold-forming tools, such as cold extrusion rams and dies, as well as for precision cutting tools, nozzles with elevated wear resistance, and screws [1, 2].
The current conditions in today’s industry render production rate-related improvements and the advancement of innovative technologies necessary. PVD surface coating methods are widely used among the different coating methods due to the necessity for materials with a combination of different properties which cannot be attained from a single material [3]. Industrial surface coating methods aim to improve the tribologic properties of substances and reduce corrosion losses [4]. Vapor deposition methods from among these methods hold significant importance among applications against wear. The physical vapor deposition (PVD) method is frequently preferred due to its various characteristics, such as low cost, the ability for thin coating and high purity, and good adhesion of the coated material to the substrate [5-8]. Hard ceramic coatings are among the most widely used substances for surface coating in recent years. The use of hard ceramic thin film coatings manufactured via PVD methods is effective for increasing the toughness of the materials subject to wear in the environments they are used in. The lifetime and commercial value of the product can be improved by the utilization of proper coating methods and coating material [9].
Previous studies and results of industrial applications have shown that the hard ceramic coatings synthesized from the nitride, carbide, and boride compounds of transition elements (Ti, Zr, Nb, Hf) increase the engineering properties of the substrate material they are applied on. TiN, CrN, TiCN, and AITiN are the hard ceramic components most frequently used in industrial applications [5, 10-15]. Various studies have been conducted on the tribological properties of the TiN, AlCrN, AlCrTiN, and AlTiN ceramic coatings to highlight the advantages of these coatings over uncoated surfaces of the mechanical components and tools. Since the 1980s, transition metal nitride coatings have been widely used as protective coatings against wear and corrosion due to their high hardness, low friction coefficient, high corrosion resistance, and intrinsic biocompatibility [16-19].
The addition of Al to increase the oxidation resistance and improve the wear and erosion resistances of TiN coating contributes to TiN and helps preserve hardness up to 1300-1500 °C. Aluminum creates an aluminum nitride and aluminum oxide layer on the surface. For this reason, Al-based ceramic coatings are preferred more in industry. It has been observed that AlTiN coatings display high protection against tribologic effects even under unstable impacts [20, 21]. AlCrTiN coating is used in working parts, cylinders, and forms thanks to its perfect wear resistance and toughness under excessive mechanical stress and high temperature. This type of coating is also preferred in processing materials that are difficult to cut [22-24].
As the most important and valuable among ceramic products, ceramic is a nonporous fine product with a unique opacity and whiteness. Porcelain is a product that requires significant attention at all stages of its production and firing [25-27]. Glaze increases the aesthetic value of the product by bringing color and texture properties to the ceramic products on which the glaze is applied and protects the decoration applied underneath, insulating and protecting it from external effects [28]. Deep glazing and spray glazing methods are conducted during the production of porcelain dishware [29]. Spray glazing method is preferred in the glazing of colored porcelain (stoneware or earthenware) in order to reduce the costs and due to the characteristics of the raw material. Glaze spray nozzles make up the most important part in spray glazing. The glaze spraying nozzles may wear out over time due to the high amount of silicate (SiO2) in the glaze composition. This leads to changes in nozzle diameter and form, thus making an adverse impact on homogeneous glazing. Hence, the nozzles should be replaced at intervals of about 60 hours, subject to production quantity. Each glazing machine has eight nozzles. The replacement and adjustment durations for eight nozzles are approximately one hour. About 900 porcelain products are not glazed when the glazing machine is stopped for one hour. Therefore, worn-out glaze spray nozzles significantly impact production quantity and cost in addition to harming glazing and related processes.
The aim of the present study was to utilize the PVD coating method for the application of TiN, AlCrN, AlCrTiN, and AlTiN hard ceramic coatings in order to improve the surface wear characteristics of glazing nozzles manufactured using AISI M2 high-speed steel and to examine the wear characteristics of nozzles subject to the aforementioned coatings.
AISI M2 high-speed steel with a thickness of 3.2 mm and diameter of 18.85 mm, the chemical composition presented in Table 1, was used in the experiments. Vacuum hardening, austenization, and tempering thermal processes were applied to the samples, as a result of which the hardness level of the samples was brought up to 743-773 HV. Table 2 presents the applied hardening and tempering parameters.
The samples were first subjected to alkaline cleaning via an ultrasonic method to remove oxide, oil, and contaminations that may disrupt the coating quality. Afterward, the sample surfaces were coated with TiN, AlCrN, AlCrTiN, and AlTiN using the Novatec31 brand device via the “cathodic arc vapor deposition method” from among the PVD coating methods. The parameters for each of the applied coatings are presented in Table 3.
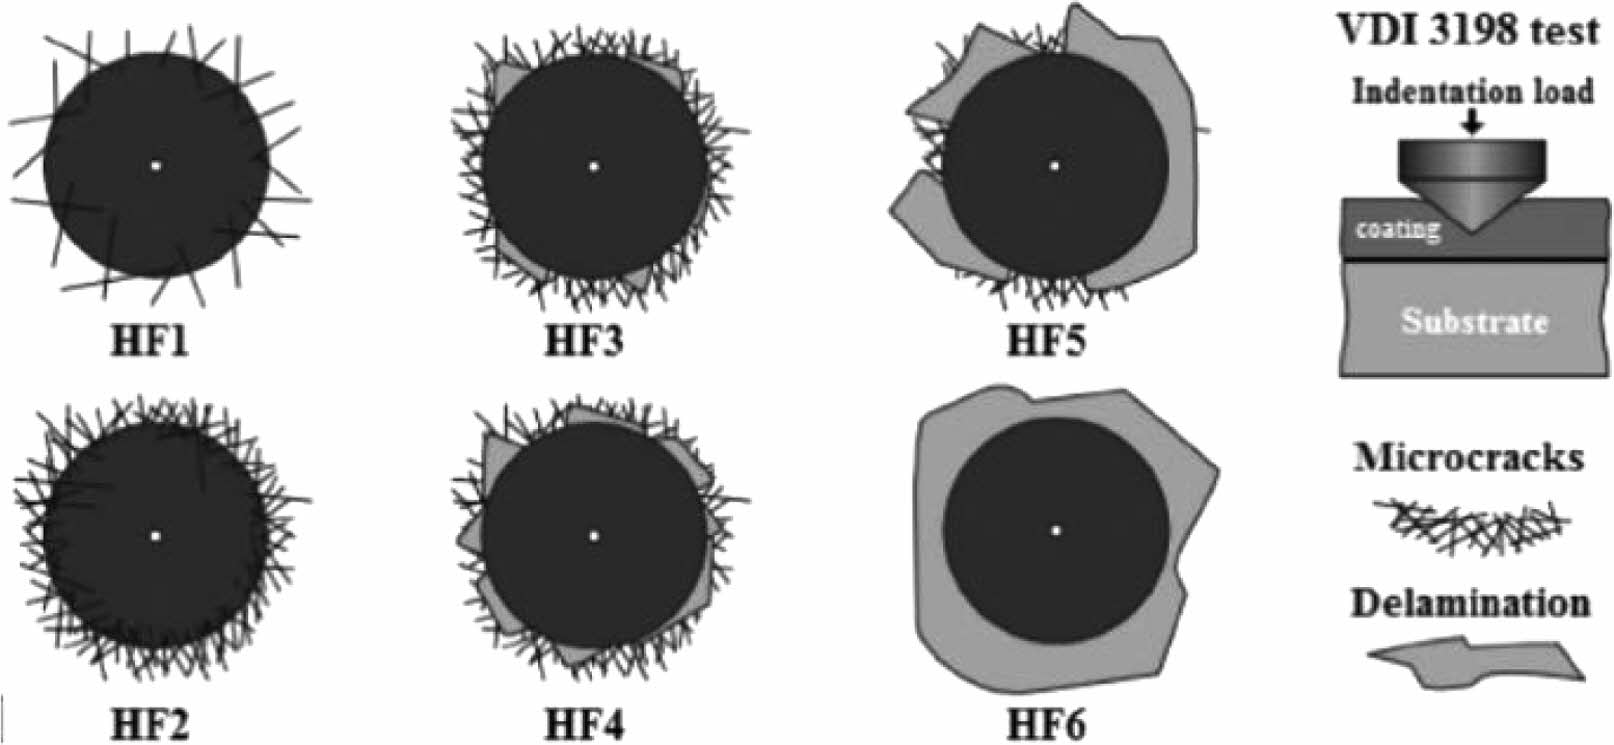
The samples' coating thickness and elemental analyses were conducted using a Jeol JSM-7000F model scanning electron microscope. Microhardness measurements were carried out using the Future-Tech FM-700 model microhardness testing machine and the application of a 50 gr load for 10 seconds. The Daimler-Benz Rockwell-C indentation test was carried out by VDI 3198 standards to characterize the adhesion behavior of the coatings on the substrate. The tests were carried out by applying a load of 1471 N (150 kg). The sample surfaces were examined via an optical microscope after indentation,and assessments were made on whether the adhesion strength values were acceptable or not. Figure 1 presents the maps for the damaged views subject to the VDI 3198 standard. Accordingly, figures between HF 1-4 are considered acceptable, whereas HF 5-6 is unacceptable [30].
Wear experiments were conducted using a CSM tribometer using the ball-on-disc method. An aluminum ball with a diameter of 3 mm was used as the counter object. Wear experiments were performed at room temperature, dry conditions, under 10 N load, with a diameter of 1.5 mm and at 500 rpm linear speed. The wear characteristics of the samples were examined by taking into account the path followed by the coatings until fracture.

|
Fig. 1 Maps of the damage views according to the VDI 3198 standard [29]. |
Microstructural Analysis
Figure 2 shows the fractured surface microstructure images for samples coated with TiN, AlCrN, AlCrTiN, and AlTiN. It was observed as a result of a general examination that the coatings display a homogeneous distribution without cracks. Based on the analysis, coating thicknesses of TiN, AlCrN, AlCrTiN, and AlTiN coatings obtained were 0.76, 0.62, 0.48, and 0.50 µm, respectively.
Table 4 shows the EDS analysis results obtained from the coating surfaces. No other element other than those taking part in the process were identified as a result of the analysis.
Hardness Experiment Results
Figure 3 presents the hardness values measured from the TiN, AlCrN, AlCrTiN, and AlTiN-coated AISI M2 high-speed steel nozzle samples. Accordingly, hardness values were obtained as 1557 HV50 for TiN, 1249 HV50 for AlTiN, 1529 HV50 for AlCrN, and 1458 HV50 for AlCrTiN. An increase of about 2-2.5 times was observed in the hardness values of coated samples compared with the AISI M2 steel subject to heat treatment. Based on the related literature, hardness values are about 2200 HV for TiN coating, 2900 HV for AlCrN coating, 3800 HV for AlCrTiN coating, and 3000 HV for AlTiN coating [14, 23]. It is considered that the differences in the results between the samples may be related to coating thickness, and process parameters [31, 32].
Daimler-Benz Rockwell-C Indentation Test Results
Figure 4 shows the indentation marks obtained from the Daimler-Benz Rockwell-C test applied on samples coated with TiN, CrN, AlCrN, AlCrTiN, and AlTiN. It was observed in Fig. 4 that there was no delamination on the samples. When the damage maps were examined subject to the VDI 3198 standard, it was concluded that the coatings display HF 1 group adhesion and thus adhere firmly to the substrate.
Wear Experiment Results
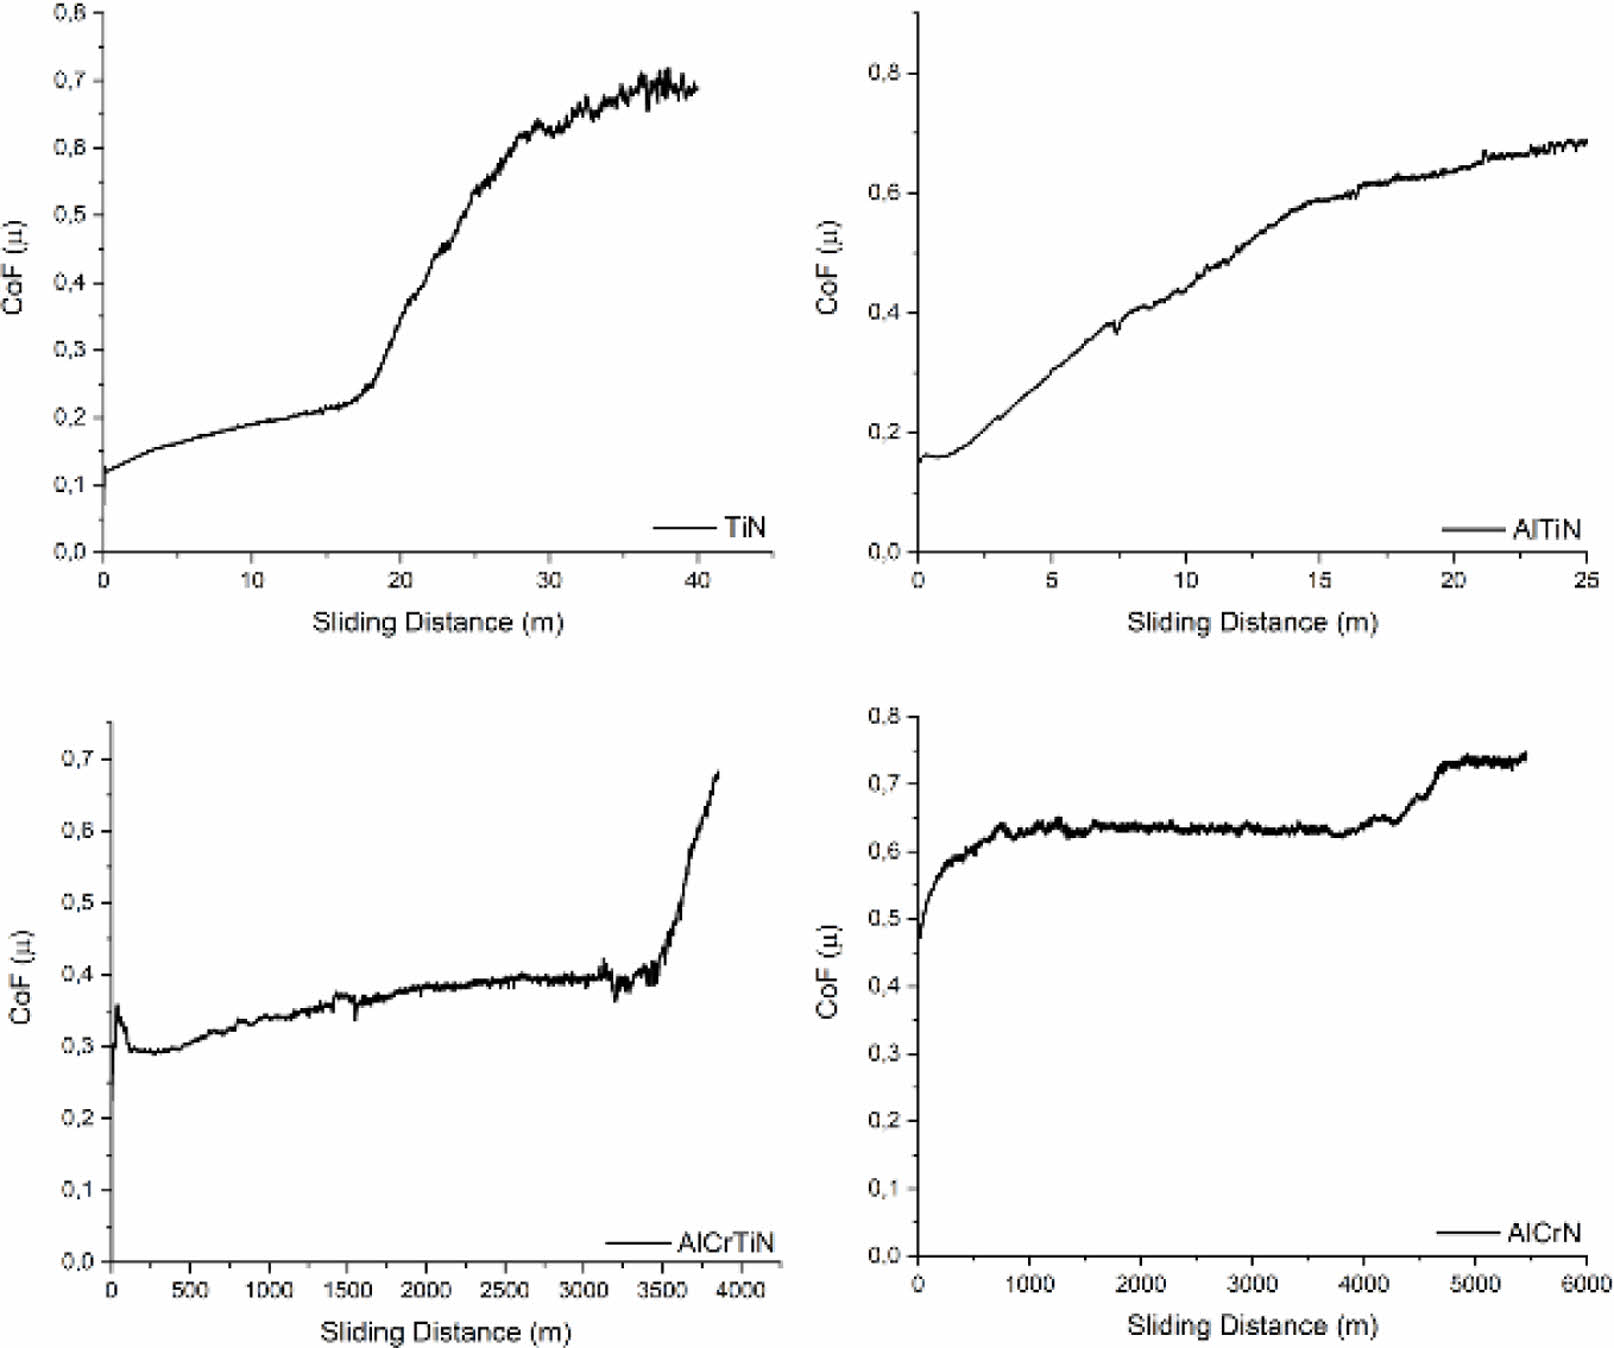
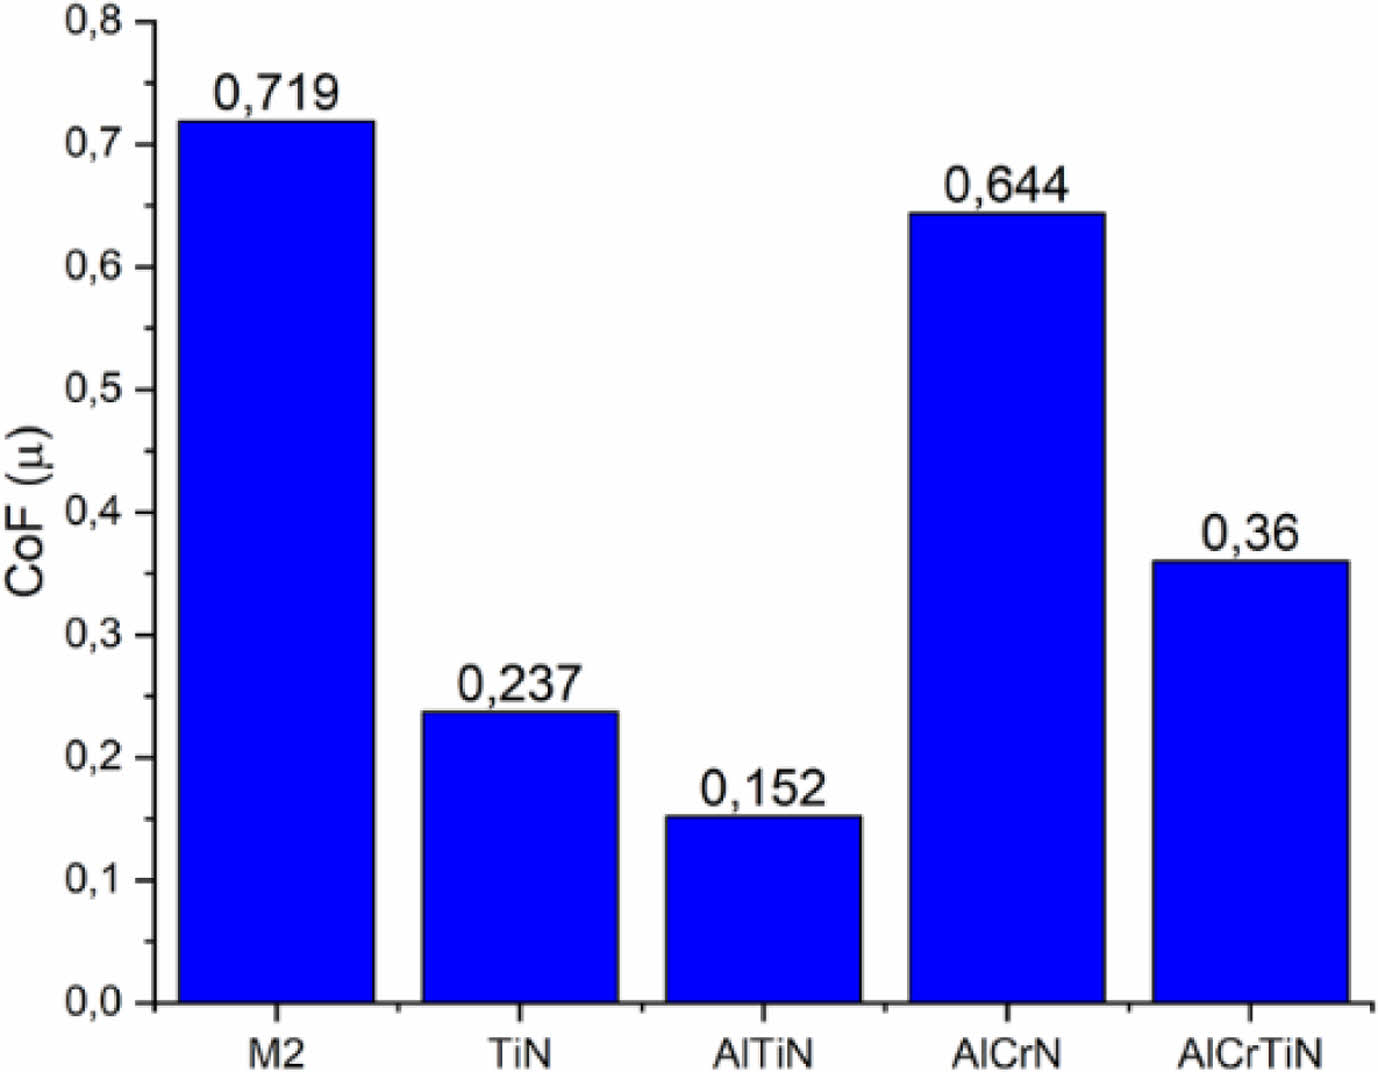
Figure 5 presents the friction coefficient-sliding distance for the samples, whereas the mean friction coefficient graph is shown in Fig. 6. The experiments were carried out with the same parameters for each sample, and the distances until the fracturing of the coating were compared. In conclusion, the distances covered were 16.7 m with TiN coating, 3760 m with AlCrN coating, 3210 m with AlCrTiN coating, and 1.6 m with AlTiN coating. The mean friction coefficients (µ) were obtained respectively as M2 > AlCrN > AlCrTiN > TiN > AlTiN.
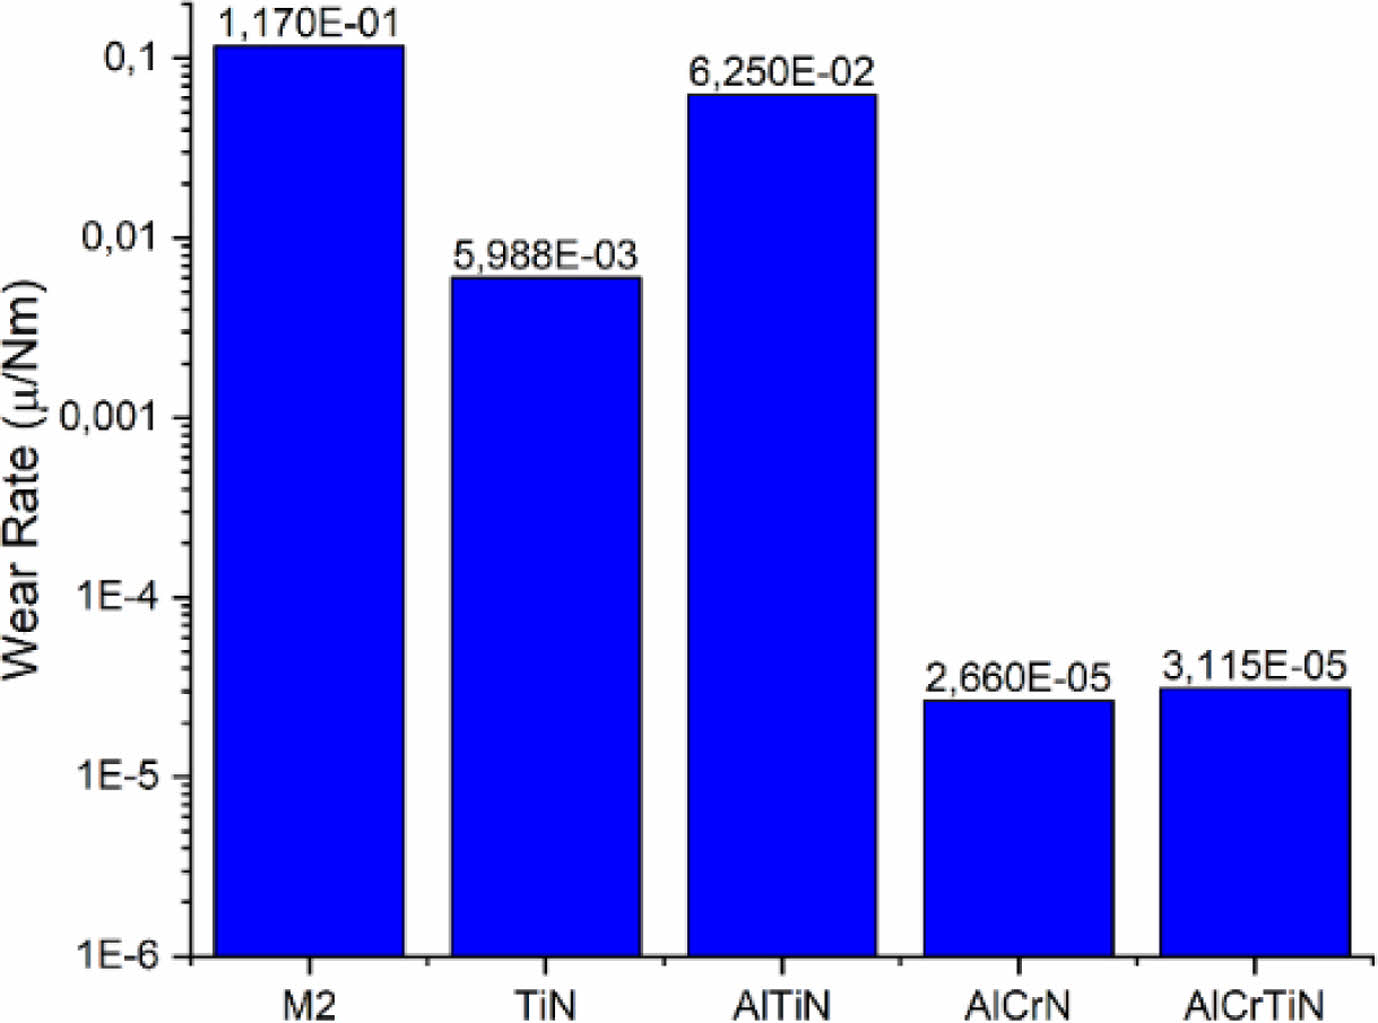
The specific wear ratios of the coatings are presented in Fig. 7. It can be observed when the specific wear ratios are examined that adding the Cr element to the coating increases wear resistance. In contrast, the addition of the Ti element reduces wear resistance. Hence, the lowest wear ratio was observed for AlCrN coating. AlCrN coating exhibited better wear resistance than AlTiN coating; this result is thought to be because the tribochemically formed Cr2O3 exhibits better tribological properties than the TiO2 of the AlTiN coating. It was concluded when AlCrN and AlCrTiN coatings with the lowest specific wear ratio were compared, even though they have similar wear ratios, the Ti element included in the coating increases the wear ratio. Similarly, the impact of the Ti element on the wear ratio when added to the coating can be seen clearly as a result of the comparison of AlCrN and AlTiN coatings. Local temperature increases during wear test lead to coating oxidation and the formation of tribo-oxide films [33]. The tribo-oxide films most likely form on the samples are TiO2, Al2O3, and Cr2O3. In addition, it is known that Al2O3 and Cr2O3 oxide films improve wear resistance due to their high thermal stability [34, 35]. The higher specific wear ratio of AlTiN coating compared with TiN coating can be explained by the decrease in the hardness of the coating due to the addition of the Al element to the coating. On the other hand, the lower coating thickness of AlTiN coating compared with TiN coating may also be associated with this. Adesina et al. reported that [36] factors such as the roughness of the coatings, and the material transfer between the sliding interfaces influence the (coefficient of friction) COF. Similarly, it was concluded as a result of the present study that the Al element inside the TiAlN and TiN coating reduces the hardness of the coating as well as wear resistance [37]. The wear behavior of ceramic coatings is related to coating thickness, hardness, and the surface roughness of the coating [38]. Also, aluminum is a very reactive metal, and hence its aluminum content causes an increase in chemical reactivity in the coating. As a result, at the high temperature caused by the high shear rate, the probability of forming strong interfacial bonds between slip surfaces increases. In addition, aluminum oxides formed during the sliding process can increase the brittleness of the coating and cause brittle fractures [39].

|
Fig. 2 Fractured surface micrographs samples coated with TiN, AlTiN, AlCrN and AlCrTiN. |

|
Fig. 3 Vickers hardness values for AISI M2 steel nozzles coated with different ceramic materials. |

|
Fig. 4 Indentation marks following the Daimler-Benz RockwellC adhesion test applied on samples coated with TiN, AlTiN, AlCrN and AlCrTiN. |

|
Fig. 5 Friction coefficient-sliding distance graphs for the samples. |

|
Fig. 6 Mean friction coefficient graph for the substrate material and coatings. |

|
Fig. 7 Specific wear ratios of coatings. |
In the present study, the cathodic arc vapor deposition method was used to apply TiN, AlCrN, AlCrTiN, and AlTiN coatings on the glaze spray nozzles prepared using AISI M2 steel, after which their wear characteristics were examined comparatively. The acquired results are summarized below:
1. Coating thickness values of 0.76, 0.62, 0.48, 0.50 µm were obtained for TiN, AlCrN, AlCrTiN, and AlTiN coatings, respectively. The obtained coatings display a homogeneous and crack-free distribution.
2. Substrate hardness values of 743, 1557, 1249, 1529, and 1458 HV were obtained for TiN, AlCrN, AlCrTiN, and AlTiN coatings, respectively. An increase of about 2-2.5 was observed in the coated samples compared with the substrate material. The highest hardness value was obtained for TiN, whereas the lowest hardness value was obtained for AlCrTiN. The difference in the acquired results from the literature findings may be related to the difference in coating thickness and the variability of the process parameters.
3. Even though delamination was not observed on any of the samples as a result of the Daimler-Benz indentation test applied on coated samples, it was concluded when the damage maps were examined that HF-1 class strong adhesion is observed.
4. It was observed when the friction coefficient-sliding distance graphs were examined that the coating on TiN, AlCrN, AlCrTiN, and AlTiN moved about 16.7, 3760, 3210, and 1.6 m, respectively. The highest distance was obtained with AlCrN coating, whereas the lowest was obtained with AlTiN coating. The mean friction coefficients of the samples were M2 > AlCrN > AlCrTiN > TiN > AlTiN.
5. The highest increase in the wear resistance of coated samples was observed in the sample coated with AlCrN compared with the substrate material. It was concluded that the Ti element reduces wear resistance and that the Cr element increases wear resistance. This was associated with the formation of tribo oxide films during the wear experiments.
We declare that there is no known conflict of interest or common interest with any institution/organization or person that may affect the evaluation process of the study.
- 1. Din 1.3343 High Speed Tool Steel, accessed 17 December 2020.
- 2. M. Stoicanescu, E. Ene, A. Zara, I. Giacomelli, and A. Crisan, Proc. Technol. 22 (2016) 161-166.
-

- 3. F. Klocke and A. Kuchle, in “Fundamentals of Cutting” (Manuf. Process. 1, 2011) p. 39-94.
-

- 4. K. Wang, Y.J. Kim, Y. Hayashi, C.G. Lee, and B.H. Koo, J. Ceram. Process. Res. 10[4] (2009) 562-566.
-

- 5. S.C. Santos, W.F. Sales, F.J. da Silva, S.D. Franco, and M.B. da Silva, Surf. Coat. Technol. 184[2-3] (2004) 141-148.
-

- 6. G.M. Uddin, A.A. Khan, M. Ghufran, Z.-R. Tahir, M. Asim, M. Sagheer, M. Jawad, J. Ahmad, M. Irfan, and B. Waseem, Adv. Mech. Eng. 10[9] (2018) 1-10.
-

- 7. Q. An, C. Wang, J. Xu, P. Liu, and M. Chen, Int. J. Refract. Met. Hard Mater. 43 (2014) 94-101.
-

- 8. K. Murai, Y. Watanabe, Y. Saito, T. Nakayama, H. Suematsu, W. Jiang, and K. Niihara, J. Ceram. Process. Res. 8[2] (2007) 114.
-

- 9. J.H. Huang, C.Y. Hsu, S.S. Chen, and G.P. Yu, Mater. Chem. Phys. 77[1] (2003) 14-21.
-

- 10. Y. Kayali, Prot. Met. Phys. Chem. Surf. 50[3] (2014) 412-419.
-

- 11. G. Zheng, G. Zhao, X. Cheng, R. Xu, J. Zhao, and H. Zhang, Ceram. Int. 44[6] (2018) 6878-6885.
-

- 12. K. Zhang, J. Deng, X. Guo, L. Sun, and S. Lei, Int. J. Refract. Met. Hard Mater.72 (2018) 292-305.
-

- 13. J.L. Mo and M.H. Zhu, Wear. 267[5-8] (2009) 874-881.
-

- 14. A. Liu, J. Deng, H. Cui, Y. Chen, and J. Zhao, Int. J. Refract. Met. Hard Mater.31 (2012) 82-88.
- 15. S.M.M. Shafieia, M. Divandarib, S.M.A. Boutorabic, and R. Naghizadehd, J. Ceram. Process. Res. 15[5] (2014) 308-311.
-

- 16. Z. Sagdoldina, B. Rakhadilov, M. Skakov, and O. Stepanova, Mater. Test.61[4] (2019) 304-308.
-

- 17. W. Yongqiang, Z. Xiaoya, J. Zhiqiang, and T. Xiubo, Int. J. Adv. Manuf. Technol.96 (2018) 1677-1683.
-

- 18. T. Hryniewicz, R. Rokicki, and K. Rokosz, Surf. Coat. Technol. 203[10-11] (2009) 1508-1515.
-

- 19. M.S. Kang, J. Ceram. Process. Res. 13[S1] (2012) 52-58.
-

- 20. P.H. Mayrhofer, C. Mitterer, L. Hultman, and H. Clemens, Prog. Mater. Sci. 51[8] (2006) 1032-1114.
-

- 21. R.D. Torres, P.C. Soares, C. Schmitz, and C.J.M. Siqueira, Surf. Coat. Technol. 205[5] (2010) 1381-1385.
-

- 22. F. Cai, Q. Yang, X. Huang, and R. Wei, J. Mater. Eng. Perform. 19 (2010) 721-727.
-

- 23. A. Gilewicz, R. Jedrzejewski, P. Myslinski, and B. Warcholinski, J. Mater. Eng. Perform. 28 (2019) 1522-1531.
-

- 24. T. Polcar and A. Cavaleiro, Surf. Coat. Technol. 205[2] (2011) 107-110.
-

- 25. J. Doherty, “Ceramic Handbooks: “Porcelain” (University of Pennsylvania Press, 2002) p. 17-95.
- 26. S.Y.R. Lopez, J.S. Rodriguez, and S.S. Sueyoshi, J. Ceram. Process. Res. 12[3] (2011) 228-232.
-

- 27. T. Boyraz and A. Akkuş, J. Ceram. Process. Res. 22[2] (2021) 226-231.
-

- 28. H.X. Lu, M. He, Y.Y. Liu, J.F. Guo, L.W. Zhang, D.L. Chen, and R. Zhang, J. Ceram. Process. Res. 12[5] (2011) 588-591.
-

- 29. P. Rado, “An Introduction to the Technology of “Pottery” (Second Edition, Pergamon Press, 1988) p. 95.
- 30. N. Vidakis, A. Antoniadis, and N. Bilalis, J. Mater. Process. Technol. 143-144 (2003) 481-485.
-

- 31. M. Öteyaka, in “Investigation of Microstructural Characteristics and Cutting Performance of Hardened Cutting Tools from DIN 115CrV3 Steel Coated With TiN And CrN”, (Ph.D. thesis submitted to Dumlupınar University Journal of the Institute of Science, 2013.)
- 32. M. Skakov, B. Rakhadilov, M. Scheffler, and E. Batyrbekov, Mater. Test. 57[4] (2015) 360-364.
-

- 33. B. Navinšek and P. Panjan, Surf. Coat. Technol. 59[1-3] (1993) 244-248.
-

- 34. A.Y. Adesina, Z. Iqbal, F.A. Al-Badour, and Z.M. Gasem, J. Mater. Res. Technol. 8[1] (2019) 436-446.
-

- 35. A.Y. Adesina, G. Zuhair, and A.M. Kumar, Mater. Corros. 70[9] (2019) 1601-1616.
-

- 36. A.Y. Adesina, Z.M. Gasem, and A.S. Mohammed, Arab. J. Sci. Eng. 44 (2019) 10355-10371.
-

- 37. S.C. Vettivel, R. Jegan, J. Vignesh, and S. Suresh, Surf. Interfaces 6 (2017) 1-10.
-

- 38. G. Rasool and M.M. Stack, Tribol. Int. 74 (2014) 93-102.
-

- 39. L. Aihua, D. Jianxin, C. Haibing, C. Yangyang, and Z. Jun, Int. J. Refract. Met. Hard Mater.31 (2012) 82-88.
-

 This Article
-
2023; 24(5): 796-801
Published on Oct 31, 2023
- 10.36410/jcpr.2023.24.5.796
- Received on May 24, 2023
- Revised on Aug 2, 2023
- Accepted on Aug 3, 2023
 Services
- Abstract
introduction
experimental procedures
results and discussion
conclusions
- Conflict of Interest
- References
- Full Text PDF
Shared
 Correspondence to
- Hediye Aydin
-
Department of Metallurgy and Material Engineering, Kütahya Dumlupınar University, 43100 Kütahya, Turkey
Tel : +90 274 443 4272 - E-mail: hediye.aydin@dpu.edu.tr


 Copyright 2019 International Orgranization for Ceramic Processing. All rights reserved.