- Investigations into microstructure and mechanical properties of Al 6061/SiCp metal matrix composite spur gear produced via powder metallurgy
V. Vijayakumara,*, Pradeep Johnsonb, Ruban Whenishc, A. John Rajand and Vincent H Wilsone
aAssistant Professor, Department of Mechanical Engineering, PSG college of Technology, Coimbatore 641004, India
bAssistant Professor, Department of Mechatronics Engineering, Hindusthan College of Engineering and Technology, Coimbatore 641032, India
cApplication Engineer, Manna Chemicals & Drugs Private Limited, Chennai 600037, India
dProfessor, Department of Manufacturing Engineering, School of Mechanical Engineering, Vellore Institute of Technology, Vellore 632014, India
eProfessor, Department of Technology Management, School of Mechanical Engineering, Vellore Institute of Technology, Vellore 632014, IndiaThis article is an open access article distributed under the terms of the Creative Commons Attribution Non-Commercial License (http://creativecommons.org/licenses/by-nc/4.0) which permits unrestricted non-commercial use, distribution, and reproduction in any medium, provided the original work is properly cited.
The characteristics of Al 6061/SiCp Metal Matrix Composite (MMC) have been established for checking the suitability of lightweight spur gear using Powder Metallurgy (P/M) technique. Aluminium powder reinforced with SiCp particle with various weight.% (0, 5, 10 & 15) and particle sizes (35 µm and 65 µm). The smaller sized spur gears of 4 mm module, 48 mm pitch circle diameter and 22 mm face width were chosen. The complex gear profiled compaction die assembly was manufactured for making net shaped gear without any machining operation. The H frame hydraulic press was used to compact gear samples with compaction pressures of 132 MPa and 165 MPa. Then gear samples were sintered using muffle furnace at 570 ºC. The prepared gear samples were used for density measurement, bending strength test, hardness measurement and microstructure analysis. The research work leads to the observation of Al 6061 with 10 wt.% & 35 µm size of (SiCp) P/M gear exhibiting a greater enhancement of mechanical properties than the unreinforced Al alloy. Thus the effect of adding ceramic particles SiCp with Al 6061 enhanced the mechanical properties and enabling Al 6061/SiCp composite spur gear suitable for lightweight applications
Keywords: SiCp ceramic reinforcement, Lightweight Aluminium MMC Spur gear, Particle size & weight %, Powder Metallurgy, mechanical & microstructural analysis
Metal Matrix Composites (MMC) have a combination of matrix and reinforced with altered properties such as enhanced strength, higher elastic modulus, good thermal conductivity, good wear and corrosion resistance and high vacuum environmental resistance. These properties can be obtained with matrix material and proper selection of reinforcements. Because of the above advantages of MMCs, researchers are working for the development of MMC fabrication techniques [1]. Some of the MMC fabrication techniques are Stir casting, Spray Deposition, Powder Metallurgy (P/M), Chemical Vapor Deposition, etc. Among the variety of manufacturing processes available for MMCs, powder metallurgy technique is accepted as a promising route over other techniques which offers composite of insoluble material can be made, near net shape product is formed, number of operation required is relatively less, composite of high melting point material can be fabricated, porosity can be controlled and self-lubricating material can be produced [2]. Because of the above advantages of powder metallurgy, it covers a wide range of applications in the areas of automotive and aerospace industry [3]. P/M offers greater precision, rapid, economical and high volume production, eliminating most or all of the finish machining operations required for castings. It avoids casting defects such as blow holes, shrinkage and inclusions [4]. The multiphase composites, non-equilibrium materials such as amorphous, microcrystal- line or metastable alloys are also processed by P/M technique. The desired chemical composition of the final product is controllable in Powder Metallurgy [5]. Conventional [P/M] process routings for gear manu- facturing are adequately advanced and already utilized in standard gear applications. Some of the examples in series production are applied in pump drives, balancer and engines. When performance requirements increase e.g. In higher-loaded applications for differential and transmission gears [6].
The workability study of Al – Glass composites produced by P/M and glass particle of grain size kept around 60 μm used from 0% to 8% The experiment results shows that increment of glass reinforcement, increases the workability behaviour of composites under different triaxial stress conditions [7]. Aluminium alloy 6061 metal matrix is a highly used 6000 series in aluminium alloy, in view of typical properties such as medium to high strength, high toughness, excellent in machinability and workability. The pure 99% and more aluminium series 1xxx were not selected for structural application because of low strength in strain hardening condition. The good affinity between aluminium and silicon carbide has led to a higher concentration in the development of Al/SiCp based metal matrix composites. The advantages of Al/SiC composites such as high wear resistance, good strength and high heat conduction, resulted in their practical application as discs of car brakes made by A359 aluminium alloy reinforced with 20 vol.% of SiCp [8, 9]. The failure behaviour of Al-SiC MMC was investigated by Scanning Electron Microscopy (SEM), X-Ray Diffraction (XRD) for the P/M processed sintered composites. The strength is increased with increase in the temperature and ductile, brittle features of the composites were also observed [10]. Porosity of sintered compacts affects the mechanical properties and wear behaviour of the components [11]. Aluminium based MMC reinforced with 1% wt of Mg and with/without adding 1% of lubricant Acrawac shows that the addition of lubricant Acrawac provides reasonable green density of compaction of the specimens [12].
Ball indentation Brinell hardness testing is used in most cases to measure the hardness of cast iron, steel and aluminium. In general, increase in the hardness of the gear produces increase in the strength of the gear. As per AGMA (American Gear Manufacturers Association) standards, the steel gear with hardness of 400 BHN, which has a design life cycle of 107 cycles, can handle 20% much more load than the 300 BHN steel gears [13]. The tooth bending strength was established in gear production sector. This could be used as production acceptance criteria. Statistical limit is calculated using tooth bending strength and that can be used as a gear material tooth strength acceptance in future. This test was performed to check at which load the tooth break. Normally the stress induced at the root is very much higher, since the root area of the gear is considered as high critical area than the tip [14]. Most of the earlier investigations had concentrated on fiber reinforced polymer composites characterization, gear manufacturing and performance testing. A few researchers had shown interest in developing a specimen based mechanical property characterization of aluminium matrix composites. Among these researchers, even very few further developed aluminium based composites for automotive applications, heat sink, aerospace applications through powder metallurgy technique. This research work focuses on the development and mechanical testing of Al/SiCp spur gear using powder metallurgy technique. The main objective of this research work is to investigate the effect of the addition of silicon carbide particle reinforcement with base aluminium alloy for the suitability of light weight spur gear production for low torque and low load transmitting applications such as in printing machineries and textile machineries.
Materials
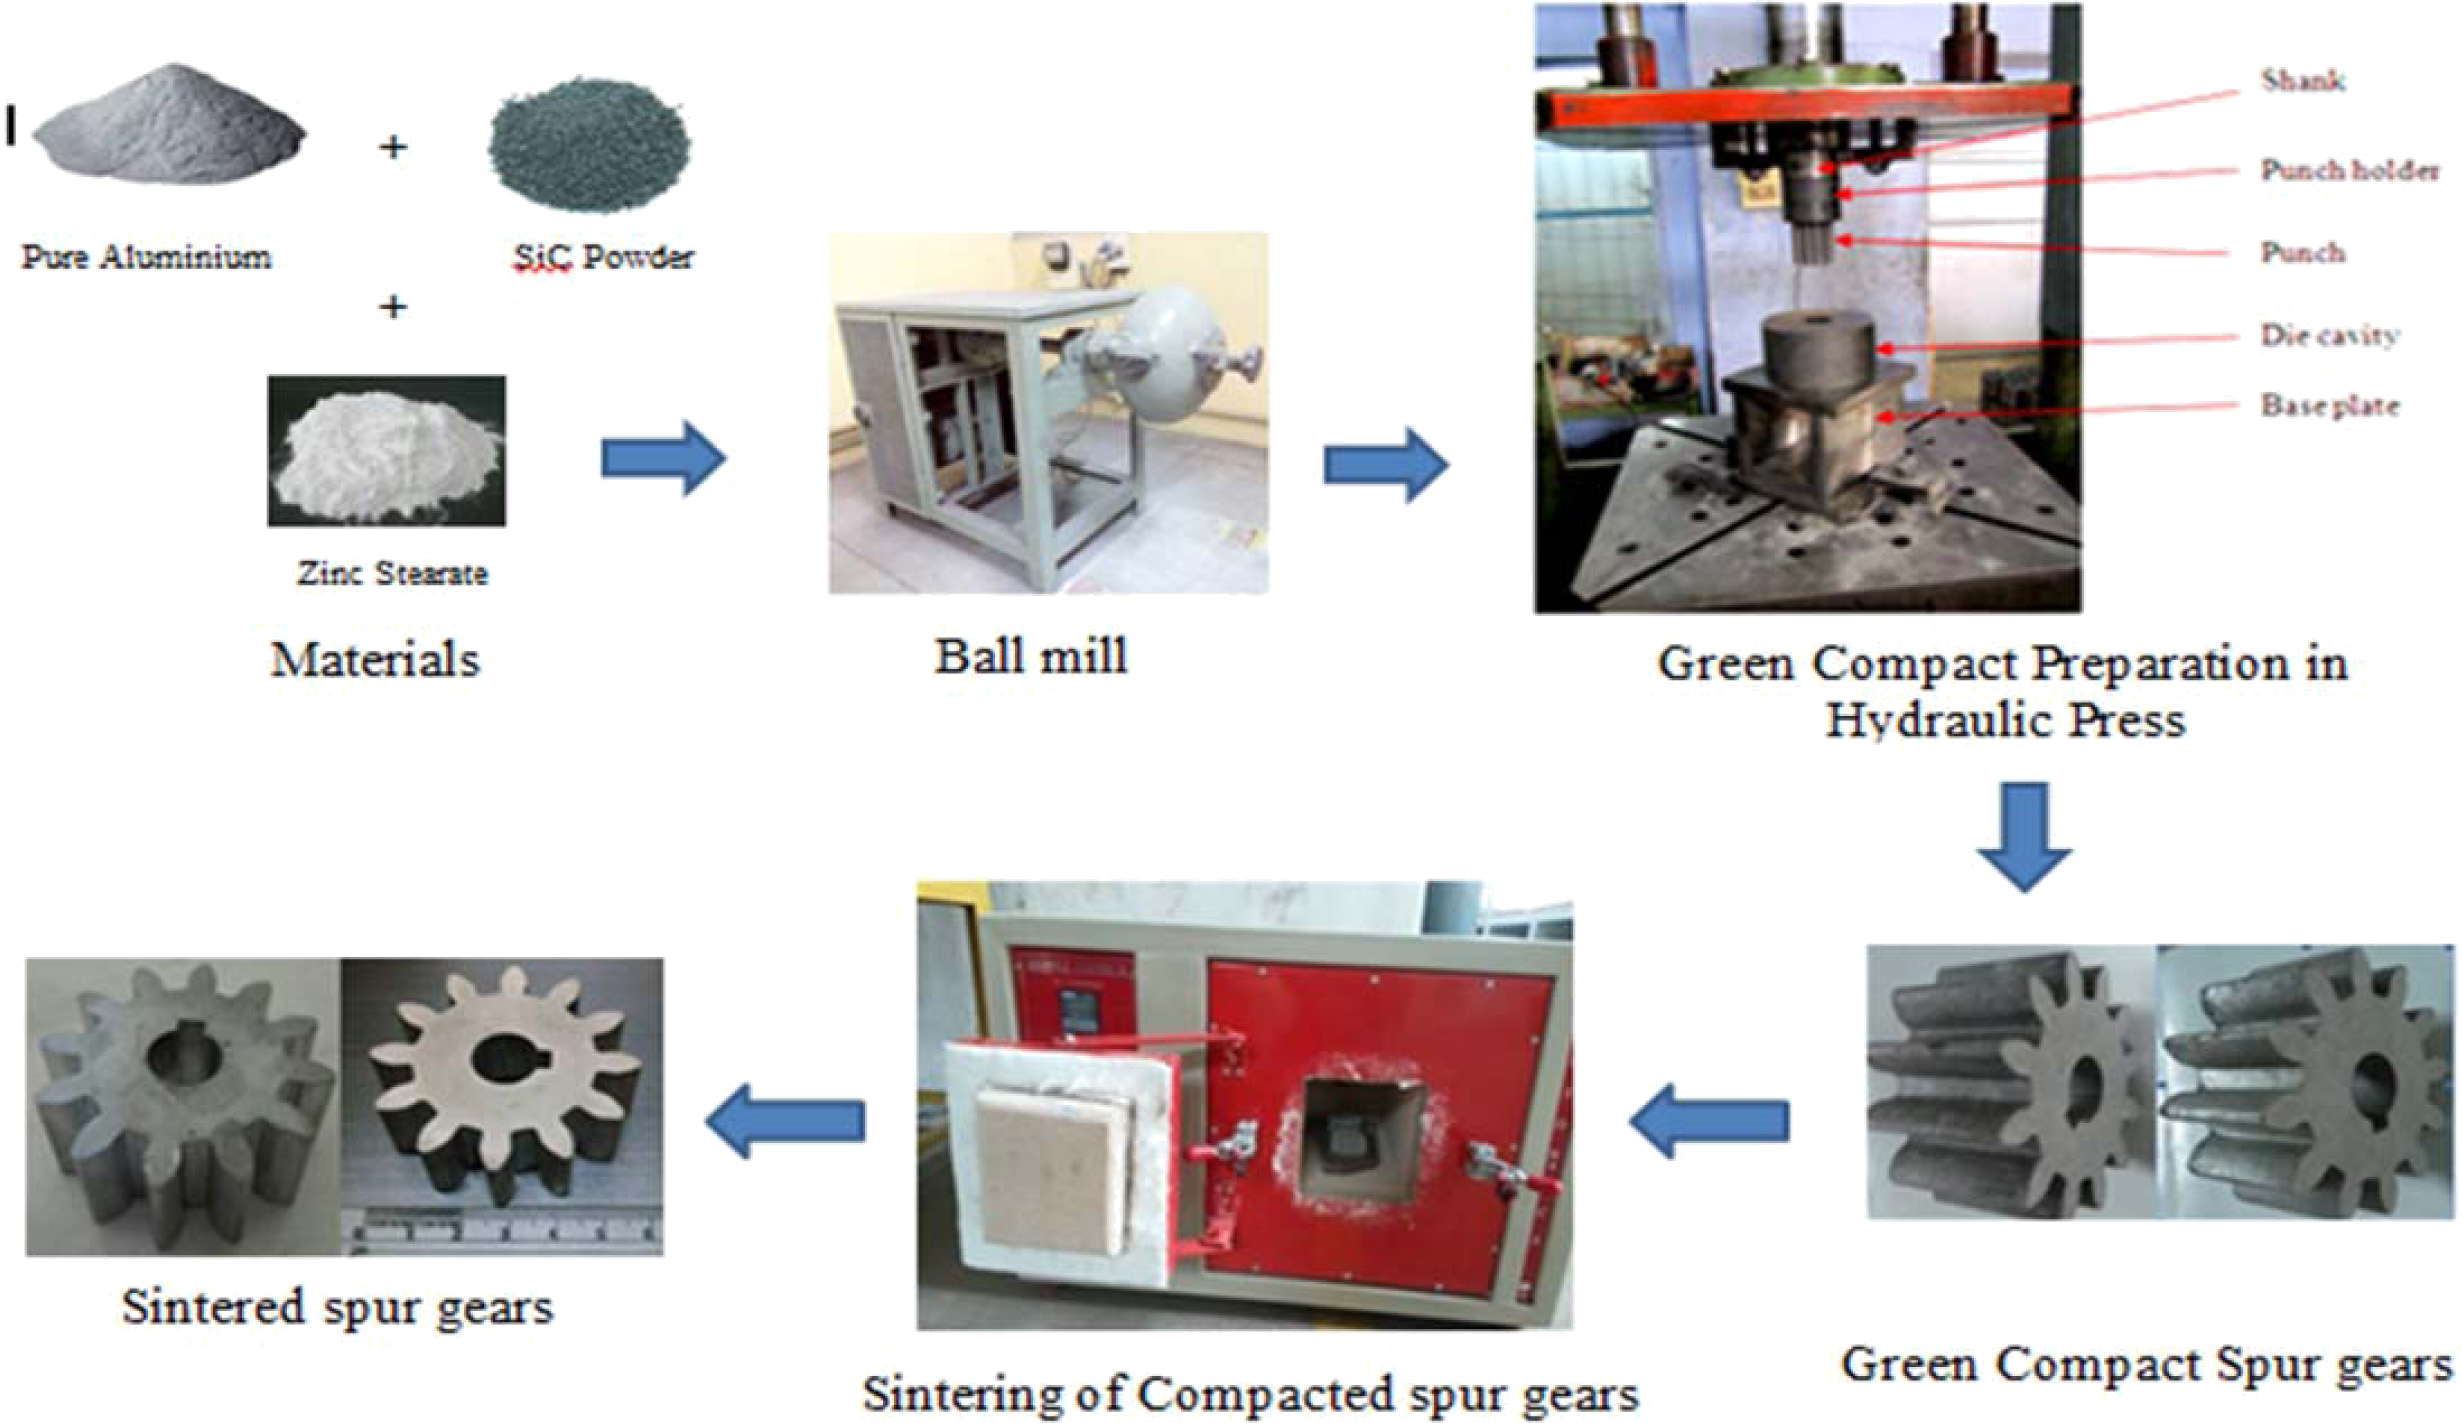
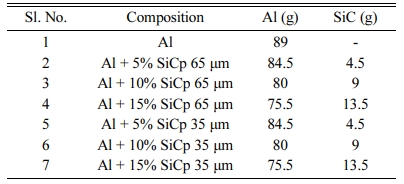
MMC spur gear was fabricated using and silicon carbide particle reinforced with Aluminium metal powder (99.7 wt.% of Al, 0.17 wt.% of Fe and 0.1313 wt.% of Si). SiCp was added with various wt.% such as 0% 5%, 10% and 15% with two grain sizes of 35 μm and 65 μm. The properties of aluminium powder and silicon carbide powder used in experiments are shown in Table 1. Zinc stearate was applied as lubricant for improving bonding between the powders. Zinc stearate is frequently used metallic lubricants for minimising compaction tool wear through the reduction of ejection force. Zinc stearate properties are given in Table 2. The materials were homogeneously blended in a rotary speed ball mill. The rotary speed ball mill contains 3 steel balls with different shapes. The rotational time has kept 3 hours with every 15 min once 1 min break. Rotational speed was kept 200-250 rpm. The required weights of powders were computed as per the gear volume to weight conversion and given in Table 3. The selected spur gear is used in printing machineries and textile machineries and the specification is given in Table 4.
Methodology
The blended metal powders were cold pressed at 132 MPa, 165 MPa using the EN24 net shape gear die and hydraulic press. The compacted gears were brought for sintering, which was carried out in a front loading box-type muffle furnace. Nitrogen sintering environment was selected and provision was made for feeding the nitrogen gas inside the furnace chamber. The muffle furnace was switched on and temperature setting was done using a PID controller. A preliminary experimentation was carried out at 520 oC, 570 oC and 620 oC for selecting the sintering temperature. Sintering temperature has been as influencing the dimensional stability of the gear [15]. At 620 oC, matrix material got melting with some deformation in its shape whereas, at 570 oC and 520 oC, sintered component had perfect dimensional geometry. After the preliminary test, the higher temperature in good performance i.e., 570 oC was selected and sintered by 30 min. The production of P/M AMC spur gears are given in Fig. 1.
Gear testing
The mechanical behaviour of Al/SiCp spur gear evaluated by tooth bending strength, density measurement and hardness as per ASTM standards.
Density measurement
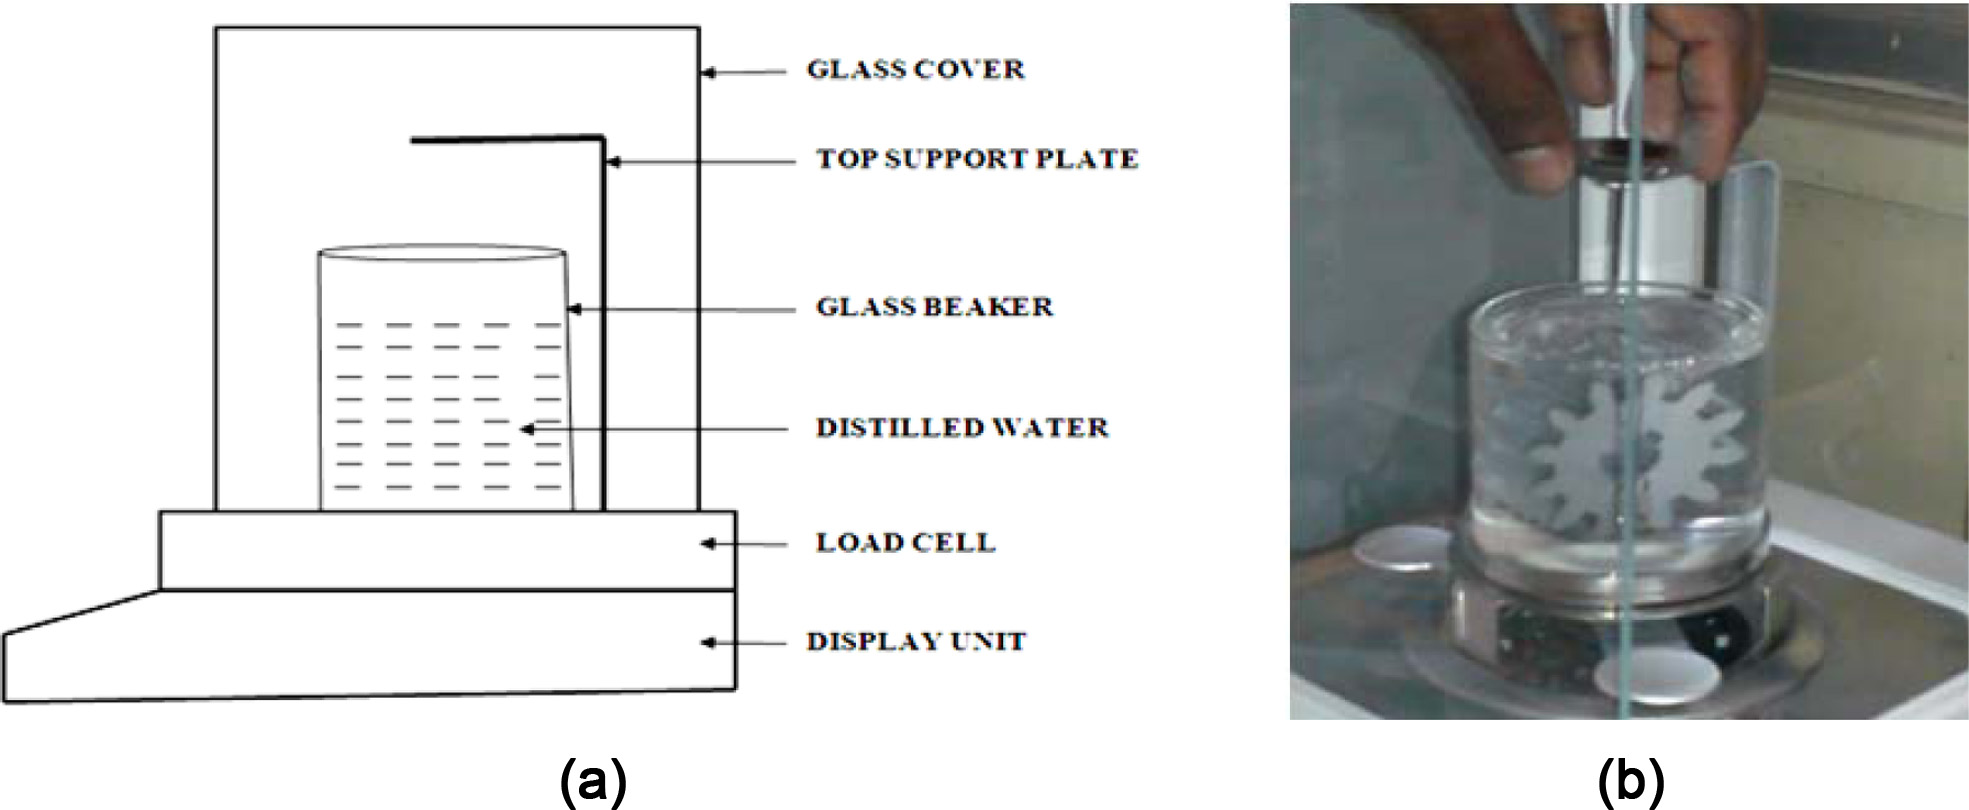
The theoretical density of pure aluminium spur gear as lower than the remaining six composition spur gears, since the SiCp particle has density greater than aluminium. Powder metallurgy spur gear density has a greater affinity with compaction pressure, material composition, grain distribution and friction between powders and die tool surfaces. Mettler Toledo electronic weighing with density measurement used in this measurement. The spur gear of aluminium and 15 wt.% of SiCp have a higher theoretical density of 2.758 g/cm3. The particles were packed together by pressing; with chance for reduction in porosity when packed with different grain size. Therefore, the density of the gear was increased. The green compact spur gear density had a similar trend for a compact pressure of 132 MPa and 165 MPa. The green compact spur gear density depended on the pressure applied. As the compacting pressure increased from 132 MPa to 165 MPa, the density of gears approached that of the theoretical density. The strength of gear also increased, because the higher the density, the higher would be the amount of solid metal in the same volume. Hence, its resistance to external force is greater. There could be considerable variations in the density, depending on the friction between the metal particles and the friction between the punches and die cavity surfaces. These density variations can be minimized by an appropriate punch, die and core rod clearance design and effective usage of lubricant during blending and compaction. The gear density is measured using water displacement approach (ASTM B311-08) and shown in Fig. 2.
Table 5
Hardness measurement
The Rockwell hardness number was evaluated (ASTM E18) using sintered Al/SiCp spur gear samples. The testing results are given in Table 6. The Rockwell hardness test is a measurement based on the net increase in the depth of impression as a load is applied. In the Rockwell method of hardness testing, the depth of penetration of an indenter following application of a minor load and a major load is measured. The indenter may either be a tungsten carbide ball of some specified diameter or a spherical diamond-tipped cone of 120 angle and 0.2 mm tip radius, called a Brale indenter. The type of indenter and the test load determine the hardness scale which are expressed in letters such as A, B, C, and so forth.
Tooth bending strength measurement
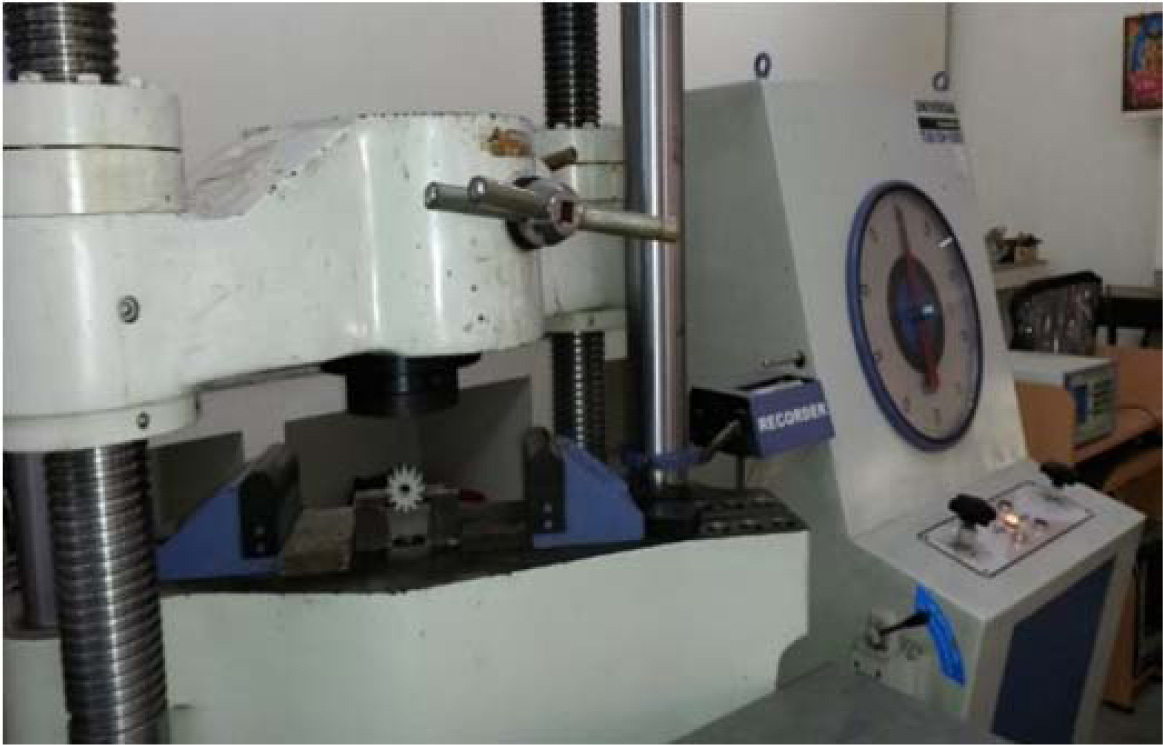
The bending strength of the spur gear tooth was determined by conducting a three point bending test up to the tooth fracture using UTM machine (Fig. 3). The testing results are given in Table 6. The density of the gears had a predominant influence on the load carrying capacity and strength. The presence of pores, cracking lamination and blowouts contributed more to the reduction in strength. The forces accounted for 165 MPa were greater than 132 MPa. This was due to the higher compaction pressure leading to produce high densification gear. The densed P/M parts could be obtained by repressing, high pressure pressing and infiltration with a material of higher strength.
|
Fig. 1 Production of P/M AMC spur gears. |
|
Fig. 2 Density Measurement: (a) Schematic Representation, (b) weight of the gear in water. |
|
Fig. 3 Tooth bending strength test |
Effect of compaction pressure on density
Fig. 4 shown the increase in density of the gear after sintering the green compact spur gear, due to filling up of the voids between particles with diffused aluminium. The compaction spur gear prior to sintering was seen as very brittle with low strength. The particle diffusion, plastic flow, evaporation of volatile materials in the green compact, recrystallization, grain growth and pore shrinkage decide the density and the strength of the sintered gear. Dislocation climb was also closely associated with sintering densification. However, porosity could not be eliminated as the voids remained after compaction and gases evolved during the sintering. An increase in density was observed in each grain size with increase in the SiC weight percentage. This can be attributed to the addition of higher density of SiC. The density increased up to 10 weight percentage of SiCp then it is decreased.
Fig. 4, show the green density and sintered density for 132 MPa and 165 MPa exhibiting different trends respectively. For 132 MPa compaction pressure, the increase in SiCp raised the green compact and sintered density. Whereas, for 165 MPa compaction pressure, increase in SiCp raised the density, then a sudden fall of density was observed for 15 wt.% of 35 μm SiC material. The sintered gear compacted with 165 MPa of 35 μm SiCp and 10 % of weight fraction was seen having more density. The increase in compact pressure and decrease in grain size had a tendency to increase the density. Sintering densities are higher than the compaction densities, indicating the effectiveness of sintering. The density also increases with increase in the compaction pressure. The 63% of densification factor was obtained in P/M process.
Effect of compaction pressure and addition of SiC on hardness
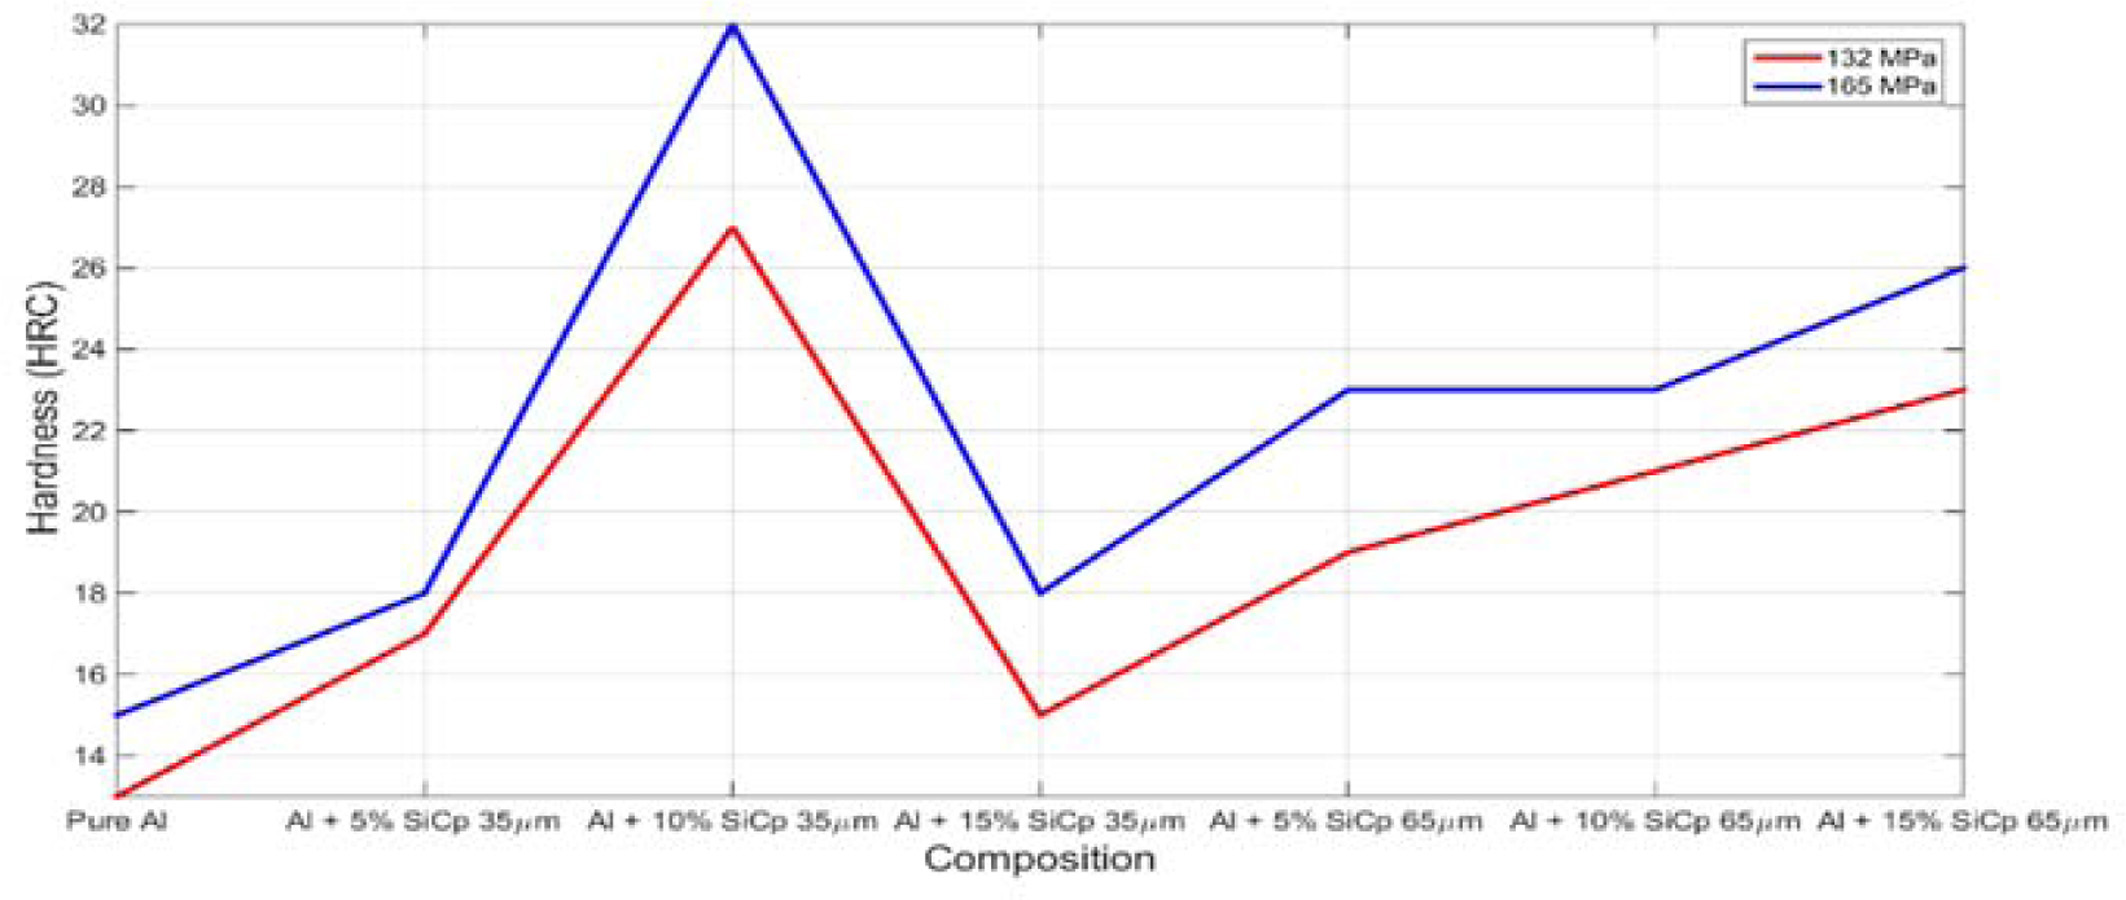
The improvement in compaction pressure enhanced the hardness value directly. The increase in compaction pressure developed the closely packed and high den- sification material during pressing. This resulted in high diffusion bonding and higher vacancy emission from the pore due to dislocation climb during the controlled sintering. The addition of SiC content with base aluminium also contributed to the improvement in hardness to some extent [16]. Fig. 5 shown the effect of the compaction pressure and the addition of SiCp content on Rockwell hardness value. The result shows similar variations in the hardness of 132 MPa and 165 MPa compaction pressure. The grain refinement effect on hardness value can be observed from the Fig. 5. The finer grain size builds up the higher hardness material composition [17]. The Al/SiCp of 10 wt.% and 35 μm size SiCp compacted by 165 MPa had the highest the hardness of 32HRc which was 113% higher than that of pure Al P/M processed spur gear.
Effect of compaction pressure and addition of SiC on bending strength
Fig. 6 revealed pure aluminium P/M gear having a lower load carrying capacity than the reinforced one. The sintered gear compacted with 165 MPa of 35 μm SiCp and 10% of weight fraction has a higher tangential force as 1350 N. The tangential force carried by the P/M MMC gears was lower than the gears machined from wrought stock. Low densed parts have an advantage of self lubrication as in sintered gears in order to reduce the coefficient of friction and wear during the gear messing. Fig. 6 shown the influence of the particle size of SiC on load carrying capacity. Finer grain size (35 μm) material composition transmits the more load than the other one (65 μm). The dislocation pile up and driving force for dislocation are closely associated with the grain size of the packed powders [19]. Due to the Hall petch strengthening effect, fine grain size material provides a higher resistance to dislocation slip than the larger grain size material. Thus, the larger grain size material leads to higher driving for dislocation slip and exhibits lower load carrying capacity. The conclusion from the bending test result is that increase in compaction pressure and usage of finer grain size material direct the gear to withstand more load before fracture.
Microstructural analysis of P/M processed Al-SiCp composites
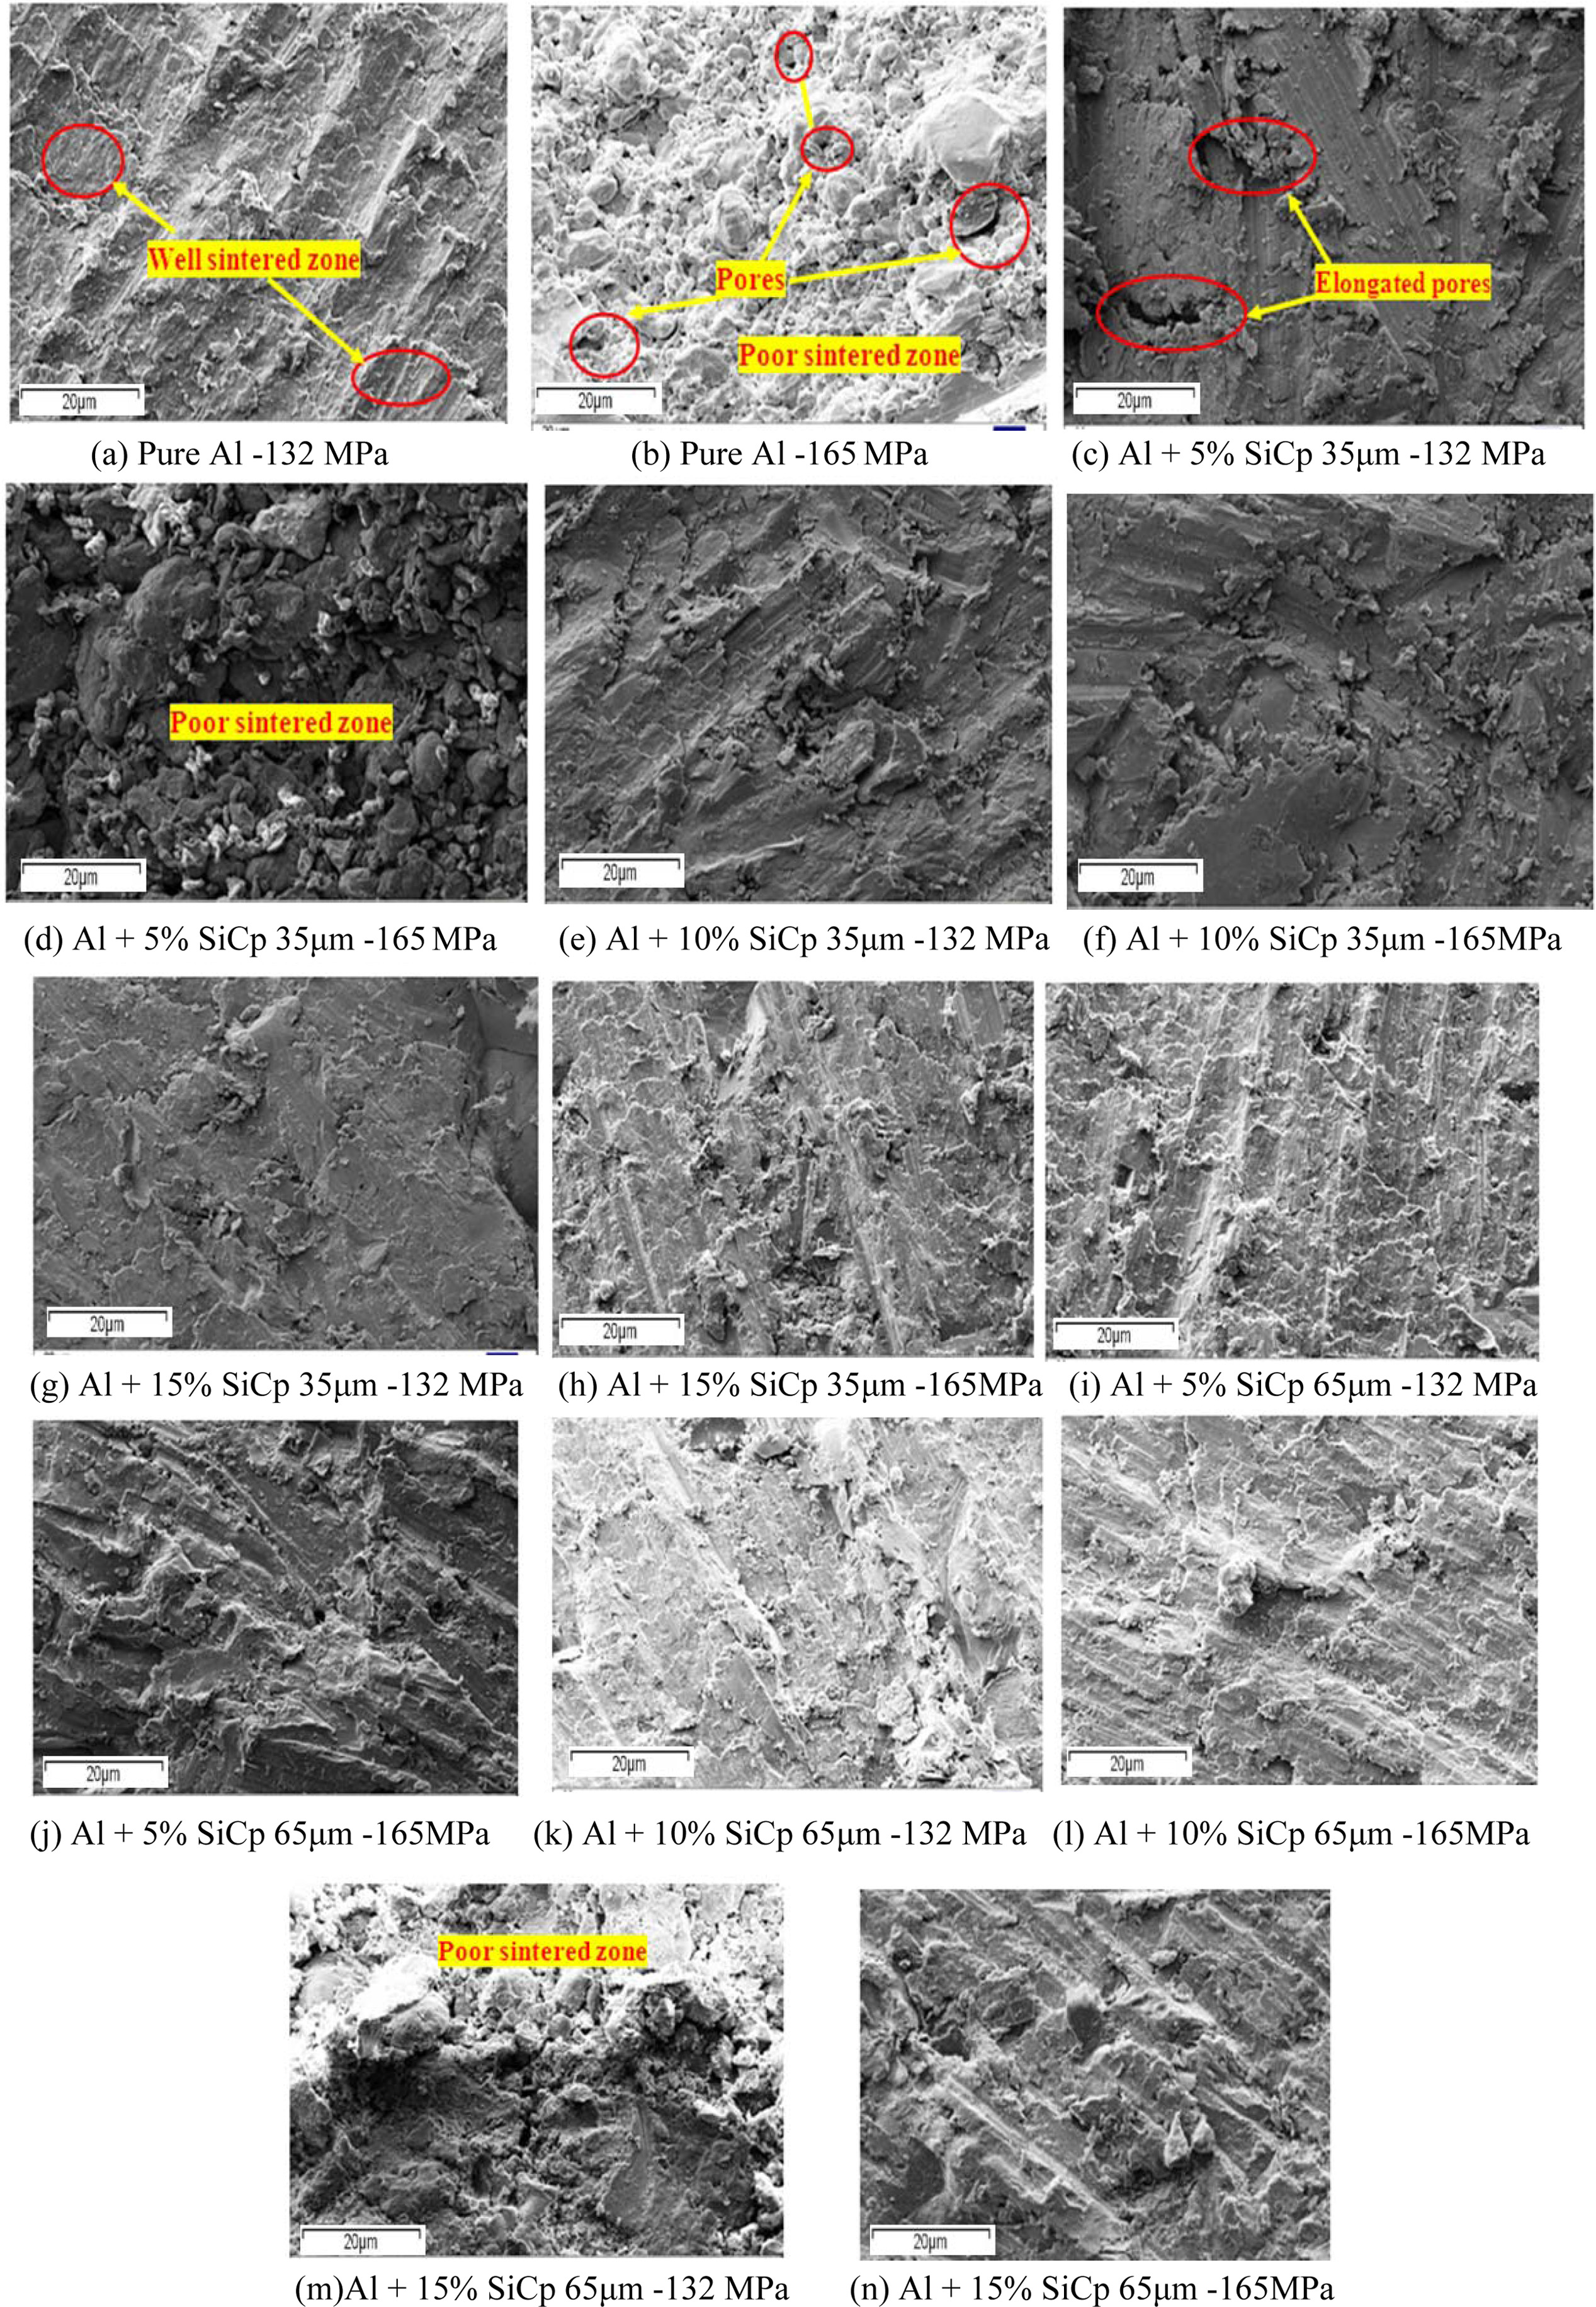
The fracture tooth piece of spur gear was cut in to small size (10´10 mm) specimens for capturing the SEM image. Then, the samples were polished using an emery sheet and cleaned in a disc polishing machine. After that, the samples were etched with 0.5% HF etching solution to reveal the microstructure. These are shown in Fig. 7. These micrographs clearly depict the presence of pores and cracks in composites with various wt.% of silicon carbide particle content. The degree of sintering can be seen from the presence of well bonded particles and well bonded particle zone due to well effective sintering. Few samples show cluster of separated particles as a result of incomplete sintering. Sintering effect and the presence of pores are closely related to the strength of the gear tooth. Microstructure analysis revealed the effectiveness of sintering as excellent and micrographs provided in the Fig. 7(b), (d) & (m) be evidence for incomplete sintering. Very few pores are present in the structure, which are highlighted in the micrograph. A comparison of the sintered unreinforced alloy and composites show that unreinforced alloy shows predominantly ductile behaviour. All the composite specimens show mixed (ductile + brittle) behaviour due to the presence of porosity as well incomplete sintering. Examination of fractured surfaces micrographs revealed that the particle damage occurs due to the localized fracture of discontinuous SiCp with void formation away from the SiCp fractured region. SiC particle cracking occurred due to development of local stresses resulting from the restriction of plastic deformation and the brittleness of SiCp [18]. Incomplete sintering promoted in debonding of reinforced SiC particle from the Al matrix which reduces the bonding strength (Fig. 7b, d & m). These factors in turn influence density, hardness and bending strength (Fig. 7e & f)). Presence of porosity causes a reduction of mechanical properties (Fig. 7c & d). Thus it can be concluded from SEM analysis, the well sintered composite of Al + 10% SiCp 35 μm compacted at 165 MPa (Fig. 7f).

|
Fig. 4 Influence of compaction pressure on gear density: (a) Green Compaction Spur gear, (b) Sintered Spur gear. |
|
Fig. 5 Effect of compaction pressure on gear material hardness. |

|
Fig. 6 Effect of compaction pressure on gear: (a) Tangential Force, (b) Bending Strength. |
|
Fig. 7 Microstructures of sintered Al/SiCp composites. |
The Al/SiCp MMC net shaped spur gear using the P/M technique had been produced with minimum material loss. Aluminium powder reinforced with SiCp particle with various weight % (0, 5, 10 & 15) and particle sizes (35 µm and 65 µm). The physical and mechanical properties of spur gears were analysed using density measurement, hardness test and tooth bending strength test as per ASTM standards. The increase in compaction pressure showed a tendency to enhance density and strength. The quality of P/M product was found to have close association with density. The result obtained from the P/M process indicates the influences on the improvement in physical and mechanical properties of Al/SiCp spur gears from the addition and grain refinement of SiCp [20-22]. The reinforced gear actual density is higher than the base Al powder metal spur gear. The density of Al+10 wt.%, 35 µm SiCp 165 MPa compaction pressure spur gear was 2.564 g/cm3 being the highest among all other AMCs. The Al/SiCp of 10 wt.% and 35 μm size SiCp compacted by 165 MPa had the highest the hardness of 32HRc. The Al/SiCp of 10 wt.% and 35 μm size SiCp compacted by 165 MPa has higher tangential force as 1350 N. The presence of SiC was not seen clearly in the micrographs for Al + 10% SiCp 35 μm compacted at 165 MPa, and merged with entire material composition. Most of the micrographs represent the well bonded particle zone due to satisfactory effect of sintering process. Only a few micrographs show the cluster of separated particles as representing poor sintering. Hence, the conclusion is that Al/ SiCp P/M spur gear can be used for low torque and low load transmitting applications such as in printing machineries and textile machineries.
- 1. A. Slipenyuk, V.Kuprin, Y. Milman, V. Goncharuk, and J. Eckert, Acta Materi 54[1] (2006) 157-166.
-

- 2. H.M. Zakaria, Ain Shams Eng. Jour. 5[3] (2014) 831-838.
-

- 3. H. Wang, R. Zhang, X. Hu, C.-A. Wang, and Y. Huang, J. Mater. Proc. Tech. 197[1-3] (2008) 43-48.
-

- 4. V. Jeevan, C.S.P. Rao, and Selvaraj, Inter. J. Mech. Eng. and Tech. 3[3] (2012) 565-573.
- 5. S. Scudino, K.B. Surreddi, S. Sager, M. Sakaliyska, J.S. Kim, W. Löser, and J. Eckert. J. Mater. Sci. 43[13] (2008) 4518-4526.
-

- 6. B. Kianian and C. Andersson, in Proceedings of the International Conference on Gears, (VDI Verlag GMBH, 2017) p. 1251.
-

- 7. D.R. Kumar, C. Loganathan, and R. Narayanasamy, Mater. Des. 32[4] (2011) 2413-2422.
-

- 8. V. Vijayakumar and S. Mouleeswaran, Adv. Nat. Appl. Sci. 10[7] (2016) 130.
- 9. V. Vijayakumar and M.S. Kumar, Adv. Nat. Appl. Sci. 10[7] (2016) 141.
- 10. B. Leszczynska-Madej, Archi. Metal. Mater. 58[1] (2013) 43-48.
-

- 11. P. Ravindran, K. Manisekar, P. Rathika, and P. Narayanasamy, Mater. Des. 45 (2013) 561-570.
-

- 12. A. Gokce and F. Findik, J. Achie, Mater. Manuf. Eng. 30[2] (2008) 157-164.
- 13. P.B. Pawar and A. Abhay Utpat, Mate. Today: Procee. 2[4-5] (2015) 2968-2974.
-

- 14. Sánchez, B Miryam, Miguel Pleguezuelos, and Jos I. Pedrero, Mechanism and Machi. Theo, 95 (2016) 102-113.
-

- 15. Y.-G. Yang, J.-Y. Kwak, H. Kong, and S.-J. Lee, J. Ceram. Process. Res. 21[4] (2020) 450-455.
-

- 16. A. Noviyanto, A. Wibowo, G. Sukmarani, R. Kusumaningrum, F. Fauzi, A.M. Habie, M.I. Amal, and N.T. Rochman, J. Ceram. Process. Res. 21[3] (2020) 326-330.
-

- 17. R. Whenish, B. Sureshbabu, A. Johnrajan, R. Srinivasan, S.N. Kumar, A. Kavitharan, C. Pandikrishna, and S. Ragupathi, IOP Conf. Ser.: Mater. Sci. Eng. 988 (2020) 012063.
-

- 18. J. Hua, Q. Huanga, H. Penga, X. Tian, Z. Chen, and Y. Peng, J. Ceram. Process. Res. 19[3] (2018) 224-230.
-

- 19. K.K. Alaneme and E.A. Okotete, J. Sci.: Ad. Mat. Dev. 4[1] (2019) 19-33.
-

- 20. M. Meignanamoorthy and M. Ravichandran, Mech. Engineering 22[1] (2020) 65-76.
-

- 21. Kumar, S.J. Niteesh, R. Keshavamurthy, M.R. Haseebuddin, and P.G. Koppad, Trans. Ind. Inst. Met. 70[3] (2017) 605-613.
-

- 22. R. Srinivasan, B.S. Babu, P. Prathap, R. Whenish, R. Soundararajan, and G. Chandramohan, J. Ceram. Process. Res. 22[1] (2021) 16-24.
-

 This Article
-
2021; 22(4): 401-408
Published on Aug 31, 2021
- 10.36410/jcpr.2021.22.4.401
- Received on Oct 23, 2020
- Revised on Jan 1, 2021
- Accepted on Feb 5, 2021
 Services
Shared
 Correspondence to
- V. Vijayakumar
-
Assistant Professor, Department of Mechanical Engineering, PSG college of Technology, Coimbatore 641004, India
Tel : +91-9842576766 - E-mail: mechviji2010@gmail.com




 Copyright 2019 International Orgranization for Ceramic Processing. All rights reserved.