- Experimental investigation on mechanical properties of Multi Wall Carbon Nanotubes (MWCNT) reinforced aluminium metal matrix composites
İsmail Topcua, Muhammet Ceylanb,,* and Elif Burcu Yilmazc
aDepartment of Metallurgy and Materials Engineering, Alanya Alaaddin Keykubat University, Antalya, Turkey
bDepartment of Mechatronics Engineering, Istanbul Commerce University, Istanbul, Turkey
cDepartment of Jewellry Engineering, Istanbul Commerce University, Istanbul, Turkey
The aim of this research is to
obtain better micrographs and to perform the mechanical characterization of
Multi Wall Carbon Nanotubes (MWCNT) consolidated aluminum matrix composite
(AMC). This research is focused on the mechanical behavior and microstructure
characteristics in MWCNT consolidated aluminum matrix composites. The
composites of MWCNT/Al were successfully fabricated using powder metallurgy
(PM) mechanical alloying (MA) sintering. X-ray diffraction (XRD) and Scanning
electron microscopy (SEM) micrographs were utilized in order to determine the
porosity, density and hardness characteristics to observe if they are affected
or not concerning the performance of composites in different reinforced % MWCNT
rate conditions. Along with SEM and XRD studies, this study details the
homogeneous distribution of nanotubes which showed no evidence of
decomposition; this was supported by a successive increase in hardness and
abrasion resistance. This increase in abrasion resistance and hardness can be
accredited to the further activation of the slip system due to the presence of
MWCNTs. Based on the conclusions of this study, the authors determined that the
mechanical alloying sintering method provides promising results for the
mechanical alloying fabrication of MWCNT/Al composites, especially due to the
different % rate reinforced up capabilities.
Keywords: Powder metallurgy, Multi Wall Carbon Nanotubes, Mechanical behaviour
Powder Metallurgy (PM) is a significantly important but
also an easy method of fabrication combining shaping of elemental and/or pre
alloyed powders after mixing and pressing, then sintering in an atmosphere
under control, thus rendering metallurgical bonding of compact powders possible
by a cost effective way [1, 2]. Metal Matrix Composites (MMC), which are a
combination of reinforcement material(s) and partly metal(s), present superior
properties compared to that of a single material could offer.
Upgraded mechanical and physical properties such as wear
resistance and thermal expansion coefficients at higher temperatures have
attracted attention for several decades, particularly in case of the
utilization of particles or whiskers that can be produced by
standard metal forming processes [3-7].
Due to their thermal and electrical conductivity, wear resistance
and high impact, elevated melting point, chemical corrosion resistance carbon
nanotubes are used in various applications, such as sensors, nanocomposites,
and transparent electrodes [8-11].
Aluminum MMC, which is part of the new advanced materials,
combines high strength with low density, plus exhibits a low thermal expansion
coefficient and good wear resistance [12]. Despite these improved features,
the application of their use is limited to aerospace and military areas, which
could be attributed to their higher processing cost [13-16].
Powder metallurgy production methods are designed to
produce qualified engineering materials using aluminum material
powder. In this research, CNT and Aluminum materials are chosen as
reinforcement and matrix materials
respectively. This study aimed to examine and improve the mechanical properties
of AMC and identified different
process conditions such as temperature, sintering condition, time and atmosphere, production with Al/CNT type
composite material.
Matrix powder and an additional powder wasmixed by
attrition milling with the help of a mechanical alloying
method. The amount of added powder depended on experimental results and
studies. According to the International American Society of Tests and Materials
(ASTM) standards and MPIF powder mixture shaped by using uniaxial pressing
technique. After the critical temperature determined by
Differential Thermal Analysis (DTA), formed
wet specimens density were measured in different
sintering condition. Then the sintered specimens were
examined in terms of their microstructure, chemical and physical properties,
size change, XRD and SEM analysis, density, hardness and wear
resistance tests one by one.
The pure aluminum and composite made in this research
strengthened the MWCNT particles by 2.5% to 7.5% by weight. The materials were
manufactured by using a PM technique (Alfa Aesar, Johnson Matthey GmbH &
Co. KG). The material used as raw material in this research was atomized
aluminum powders with values of 10 µm (99.99% purity, density 2,699 g /cm3).
The material used as the matrix material was trading naive
aluminum (Al) powder and MWCNT. Alfa Aesar, Johnson
Matthey GmbH & Co. MWCNT reinforcing material purchased by KG (USA) has a
density of 2.31 g/cm3. The mean particle dimension of MWCNTs powders
were about 10-30 nanometers. The variable weights of the MWCNTs were
distributed over the Al matrices using a turbula ball mill (Turbula Ch PM 400
MA, Switzerland). The as-received Al powders and the pre-determined weight
percentage of MWCNTs were charged into glass vials (100 ml capacity and 40 mm
inner diameter) along with stainless steel balls of the same
sizes (diameter (Ø) = 20 mm, combined in a weight
ratio of 2:1). The same size of grinding balls was used to ensure that
sufficient powder energy was provided to the powder particles during the
dispersion process. [17, 18]. All materials used in this research were bought
without being purified and replaced.
In the course of the manufacturing composites, the 2.5% to
7.5% by weight MWCNT was strengthened to aluminum by wear
milling. Milling time was five hours. Ball / powder
weight had a ratio of 2:1. It has a grinding speed of 450
rpm. The ball diameter was 10 mm diameter stainless steel ball. After the
produced material was dried at 60 C, 0.5% (wt.) of
acrowax was appended to the medium as a duration check agent. Powdered
materials were easily pressed with a single axis press at 250 MPa. The selected
sintering atmosphere is a high purity argon. This is due to the fact that other
sintering atmospheres can result in decarbonisation of the material
at operating temperature. Due to the small atomic size of carbon, sintering of
the specimens was performed at 620 oC and 640 oC
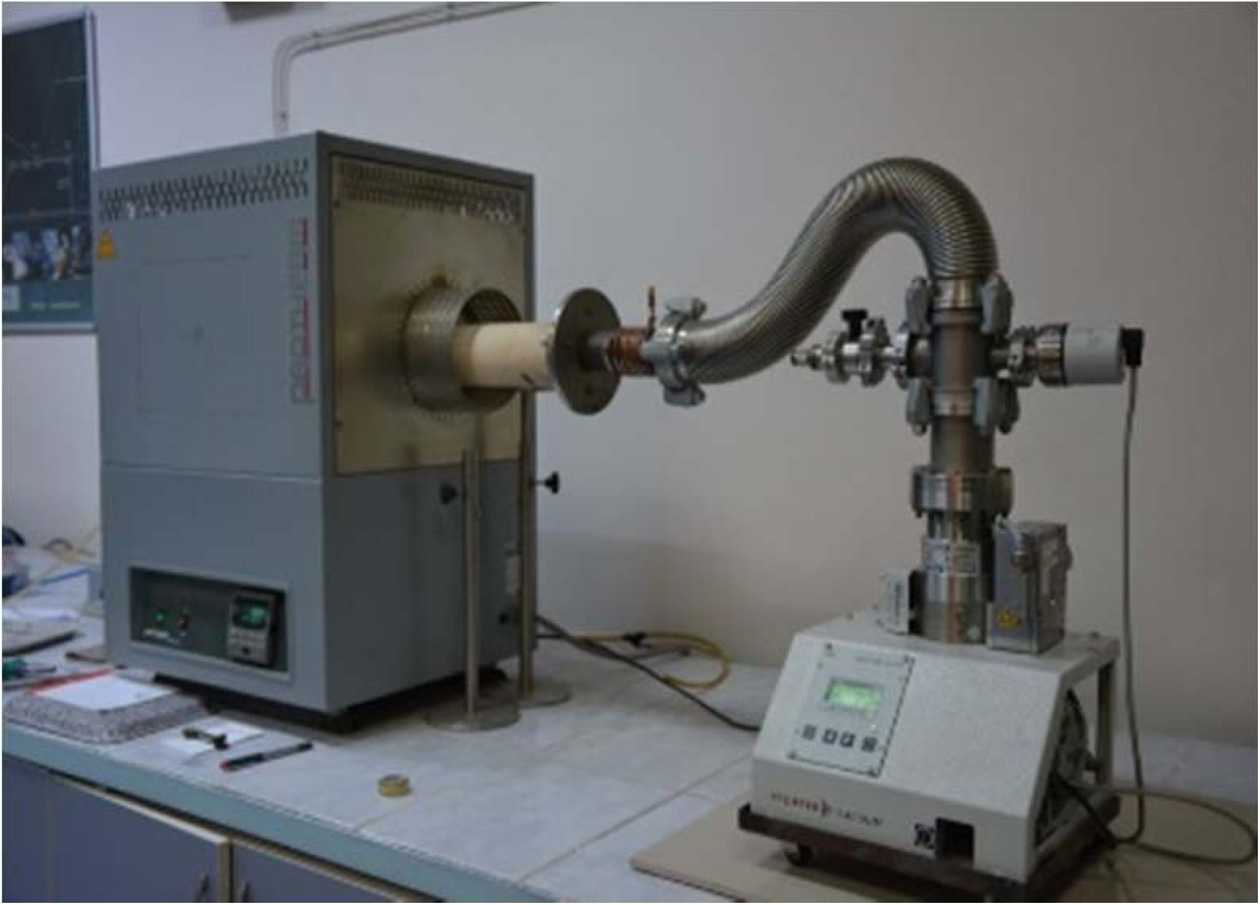
[19]. The horizontal pipe furnace arrangement of the sintering process is as in
Fig. 1.
The longitudinal sections of the specimens were prepared
metallographically. In the next step, the microstructures of the composites
were evaluated with a LEICA optical microscope. The SEM images were obtained by
the specimens surface by scanning it with a high-energy beam of electrons [20,
21]. The powder morphologies and microstructures of sintered
specimens were examined using a SEM (JEOL Ltd.,
JSM-5910LV).
Phase detections of pure Al and MWCNT powders, also
composites of different powder compositions were carried out using a Rigaku X
Ray diffractometer. There is a Cu / Kα radiation with a beam
angle of 2o. The angle of refraction has a value
between 5o-105o. The step increase is
0.02o and the count time is 2 seconds. Energy Dispersive
Spectrometer (EDS, OXFORD Industries INCAx-sight 7274, (133-eV resolution) and Al and
MWCNT powders was analyzed.
The hardness measurement of specimens is indeed a means of
determination for mechanical properties of the
specimens. In this research, Instron Universal Hardness Tester
Machine, with the help of Vickers 136o diamond indenter, was used.
The testing load used for every specimen was 100 g. The
hardness value of the material refers to the bulk hardness of the composite.
This is because both the matrix and the reinforcing material of the recess
track are coated. The results of the hardness test were
evaluated with approximately 5 consecutive
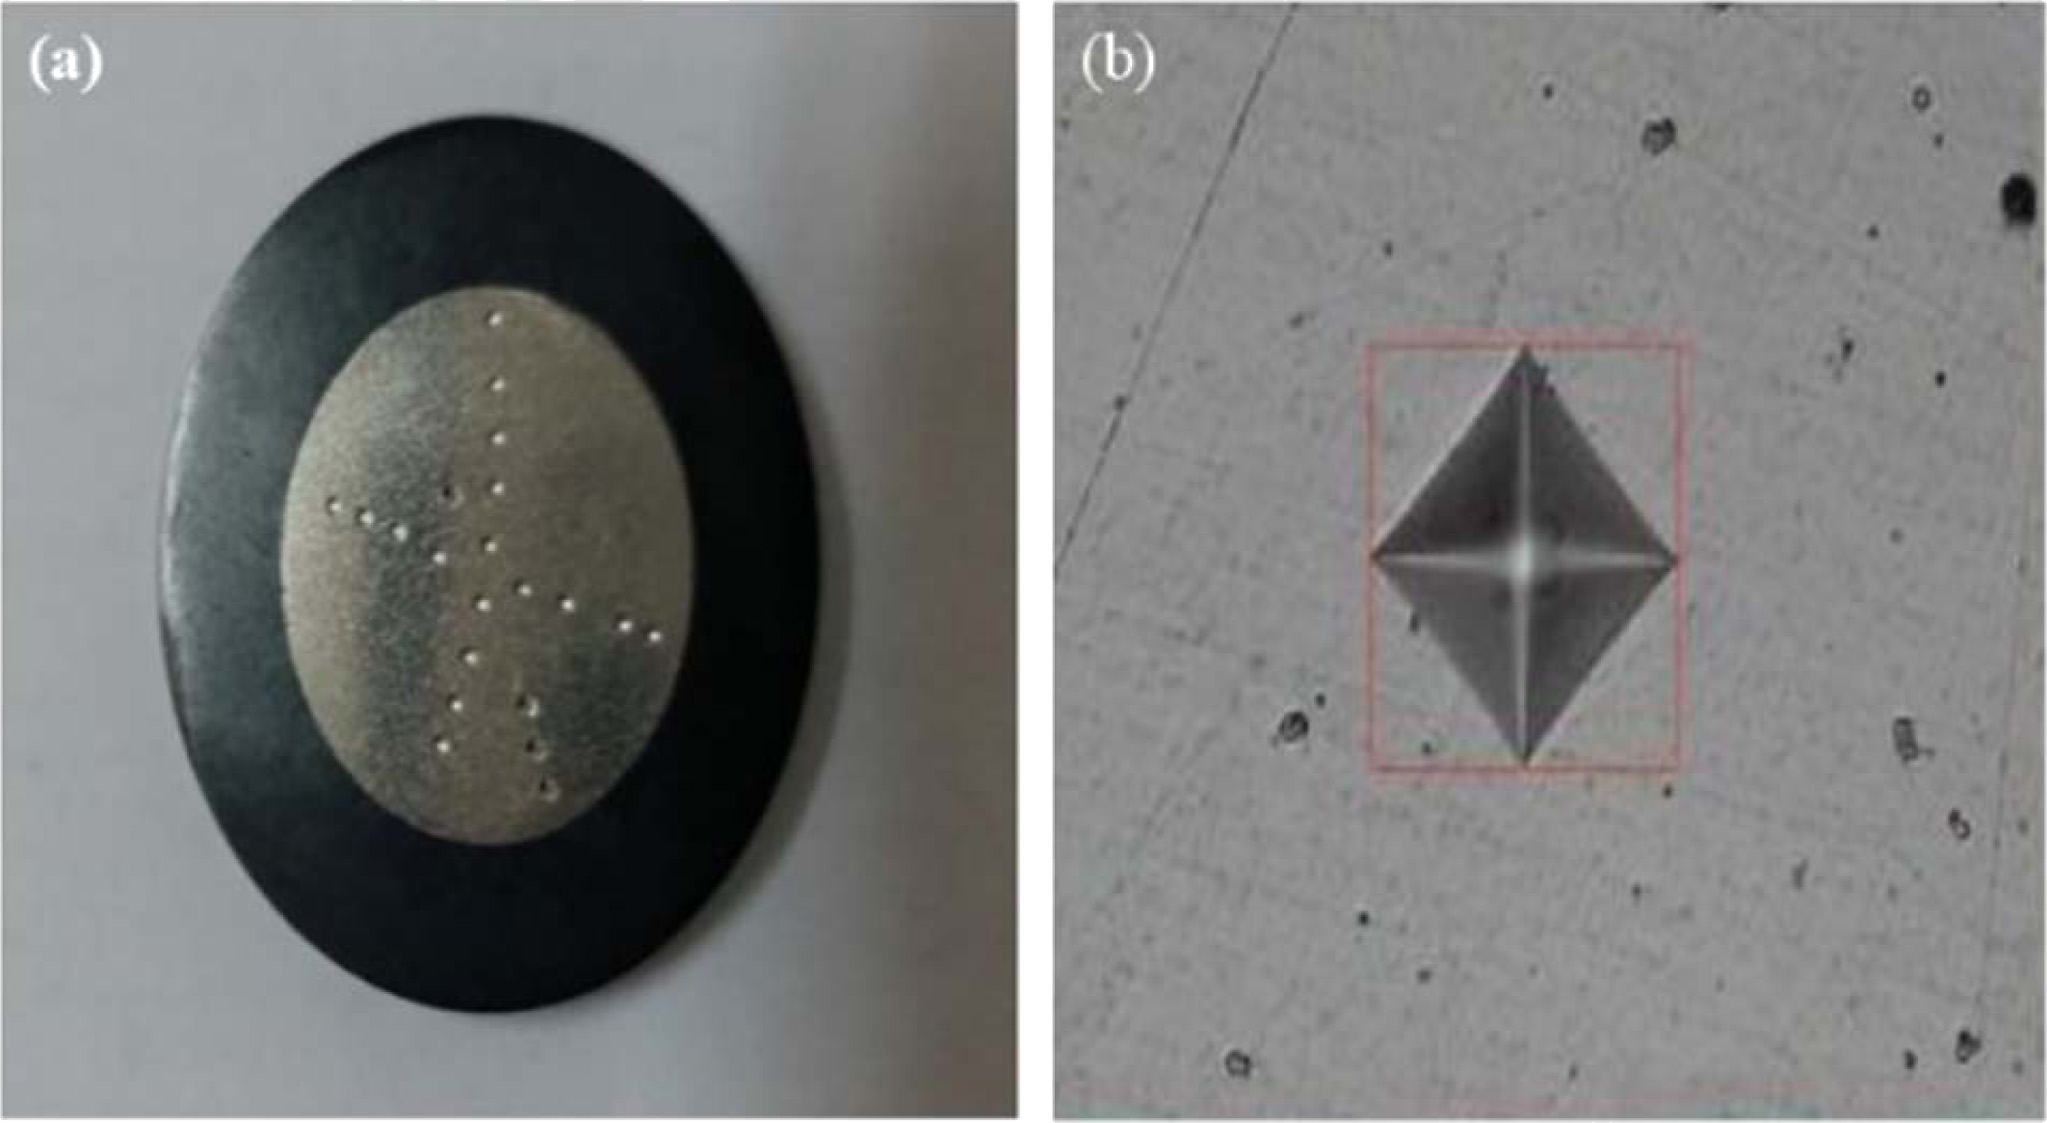
measurements. Display of the hardness measurement
specimens as shown in Fig. 2. Vickers images produced at
the specimens surface as a result of the measurement made by the
hardness measurement method.
Abrasion testing is used to test the abrasive resistance
of solid materials. The dimensions of the composite specimens were 16 mm in
diameter and 35-45 mm of length. The abrasion testing wheel
has a 60 mm diameter and 550 rev/min. It performed that abrasion
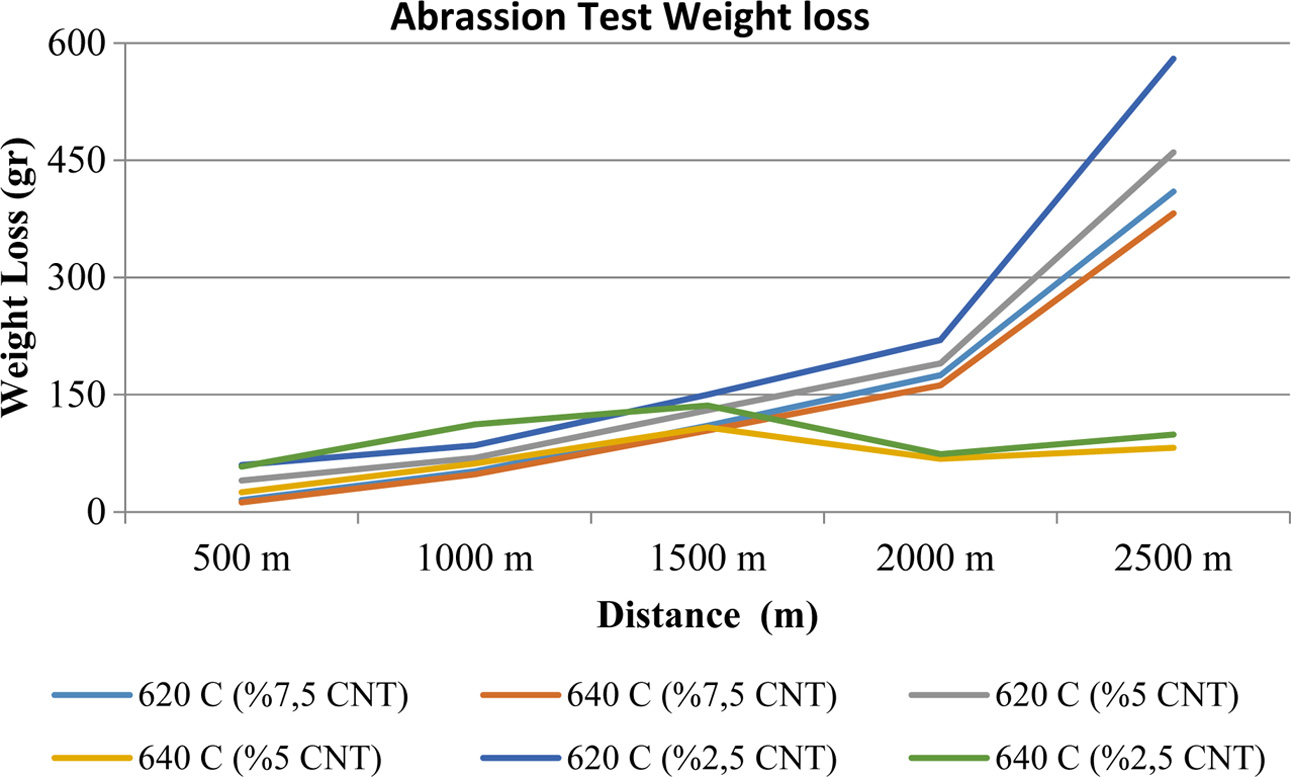
resistance under dynamic load which different distance used as illustrated in
Fig. 3.
|
Fig. 1 Sintering process for horizontal pipe furnace system |
|
Fig. 2 (a) images formed on the specimens surface and (b) magnified view of the specimens surface. |
|
Fig. 3 Abrasion test results of the specimens in different
temperatures and CNT ratios. |
The powder morphologies and microstructures of sintered
specimens were examined using a SEM (JEOL Ltd., JSM-5910LV). The
microstructural analysis of pure aluminum and 7,5% strengthened Al / MWCNT
composite material are shown in Figs. 4(a) and 4(b).
In these studies, the alpha and beta shows the structure
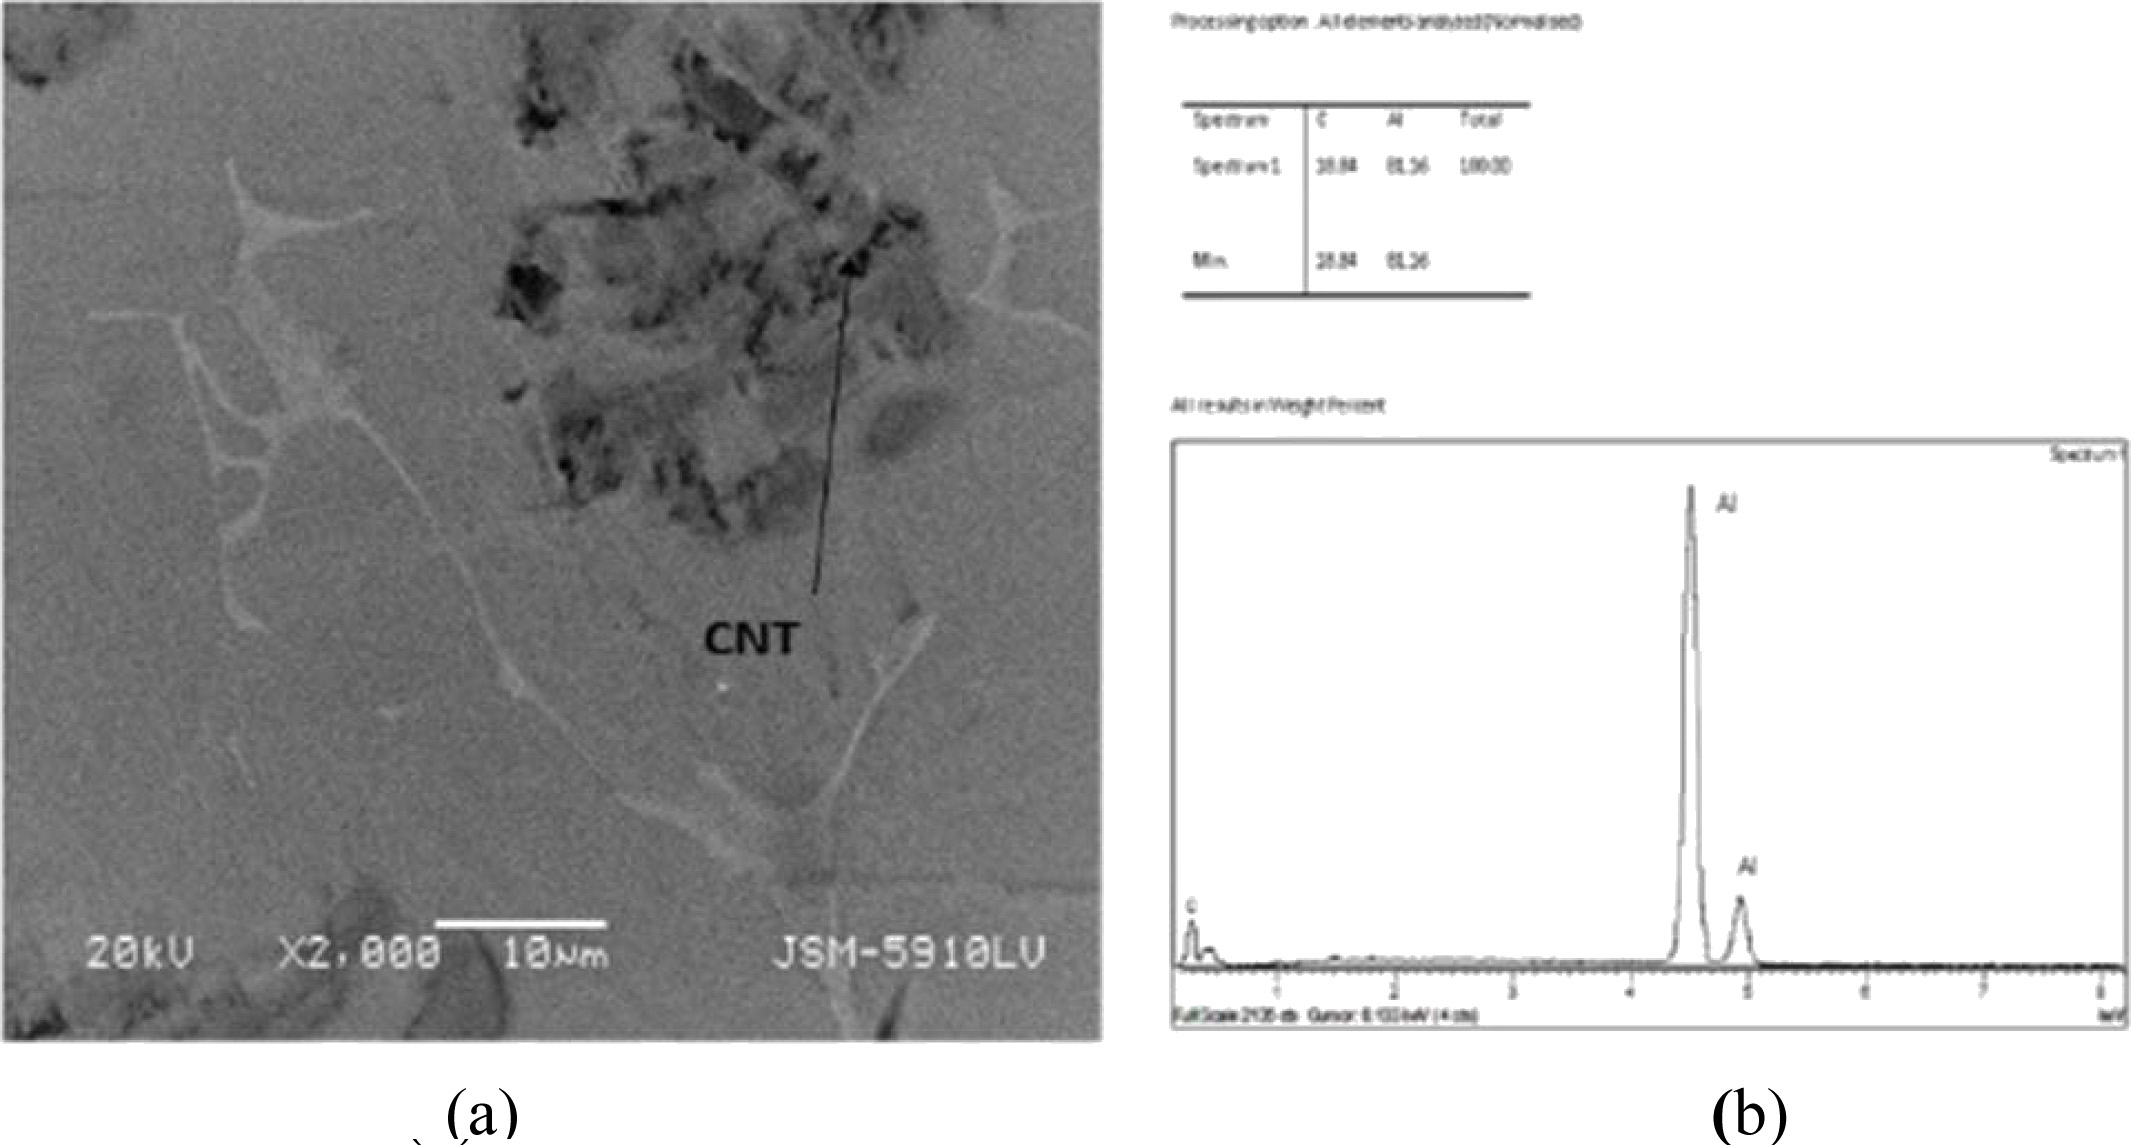
of Al powder which can be seen in Fig. 5(a) and (b). As can be seen by the
black and gray areas of the MWCNT structures. Black and gray
areas increased as the ratio of the MWCNT % increased [22]. EDS
analysis of phases are shown in Fig. 5(a) and Fig. 5(b).
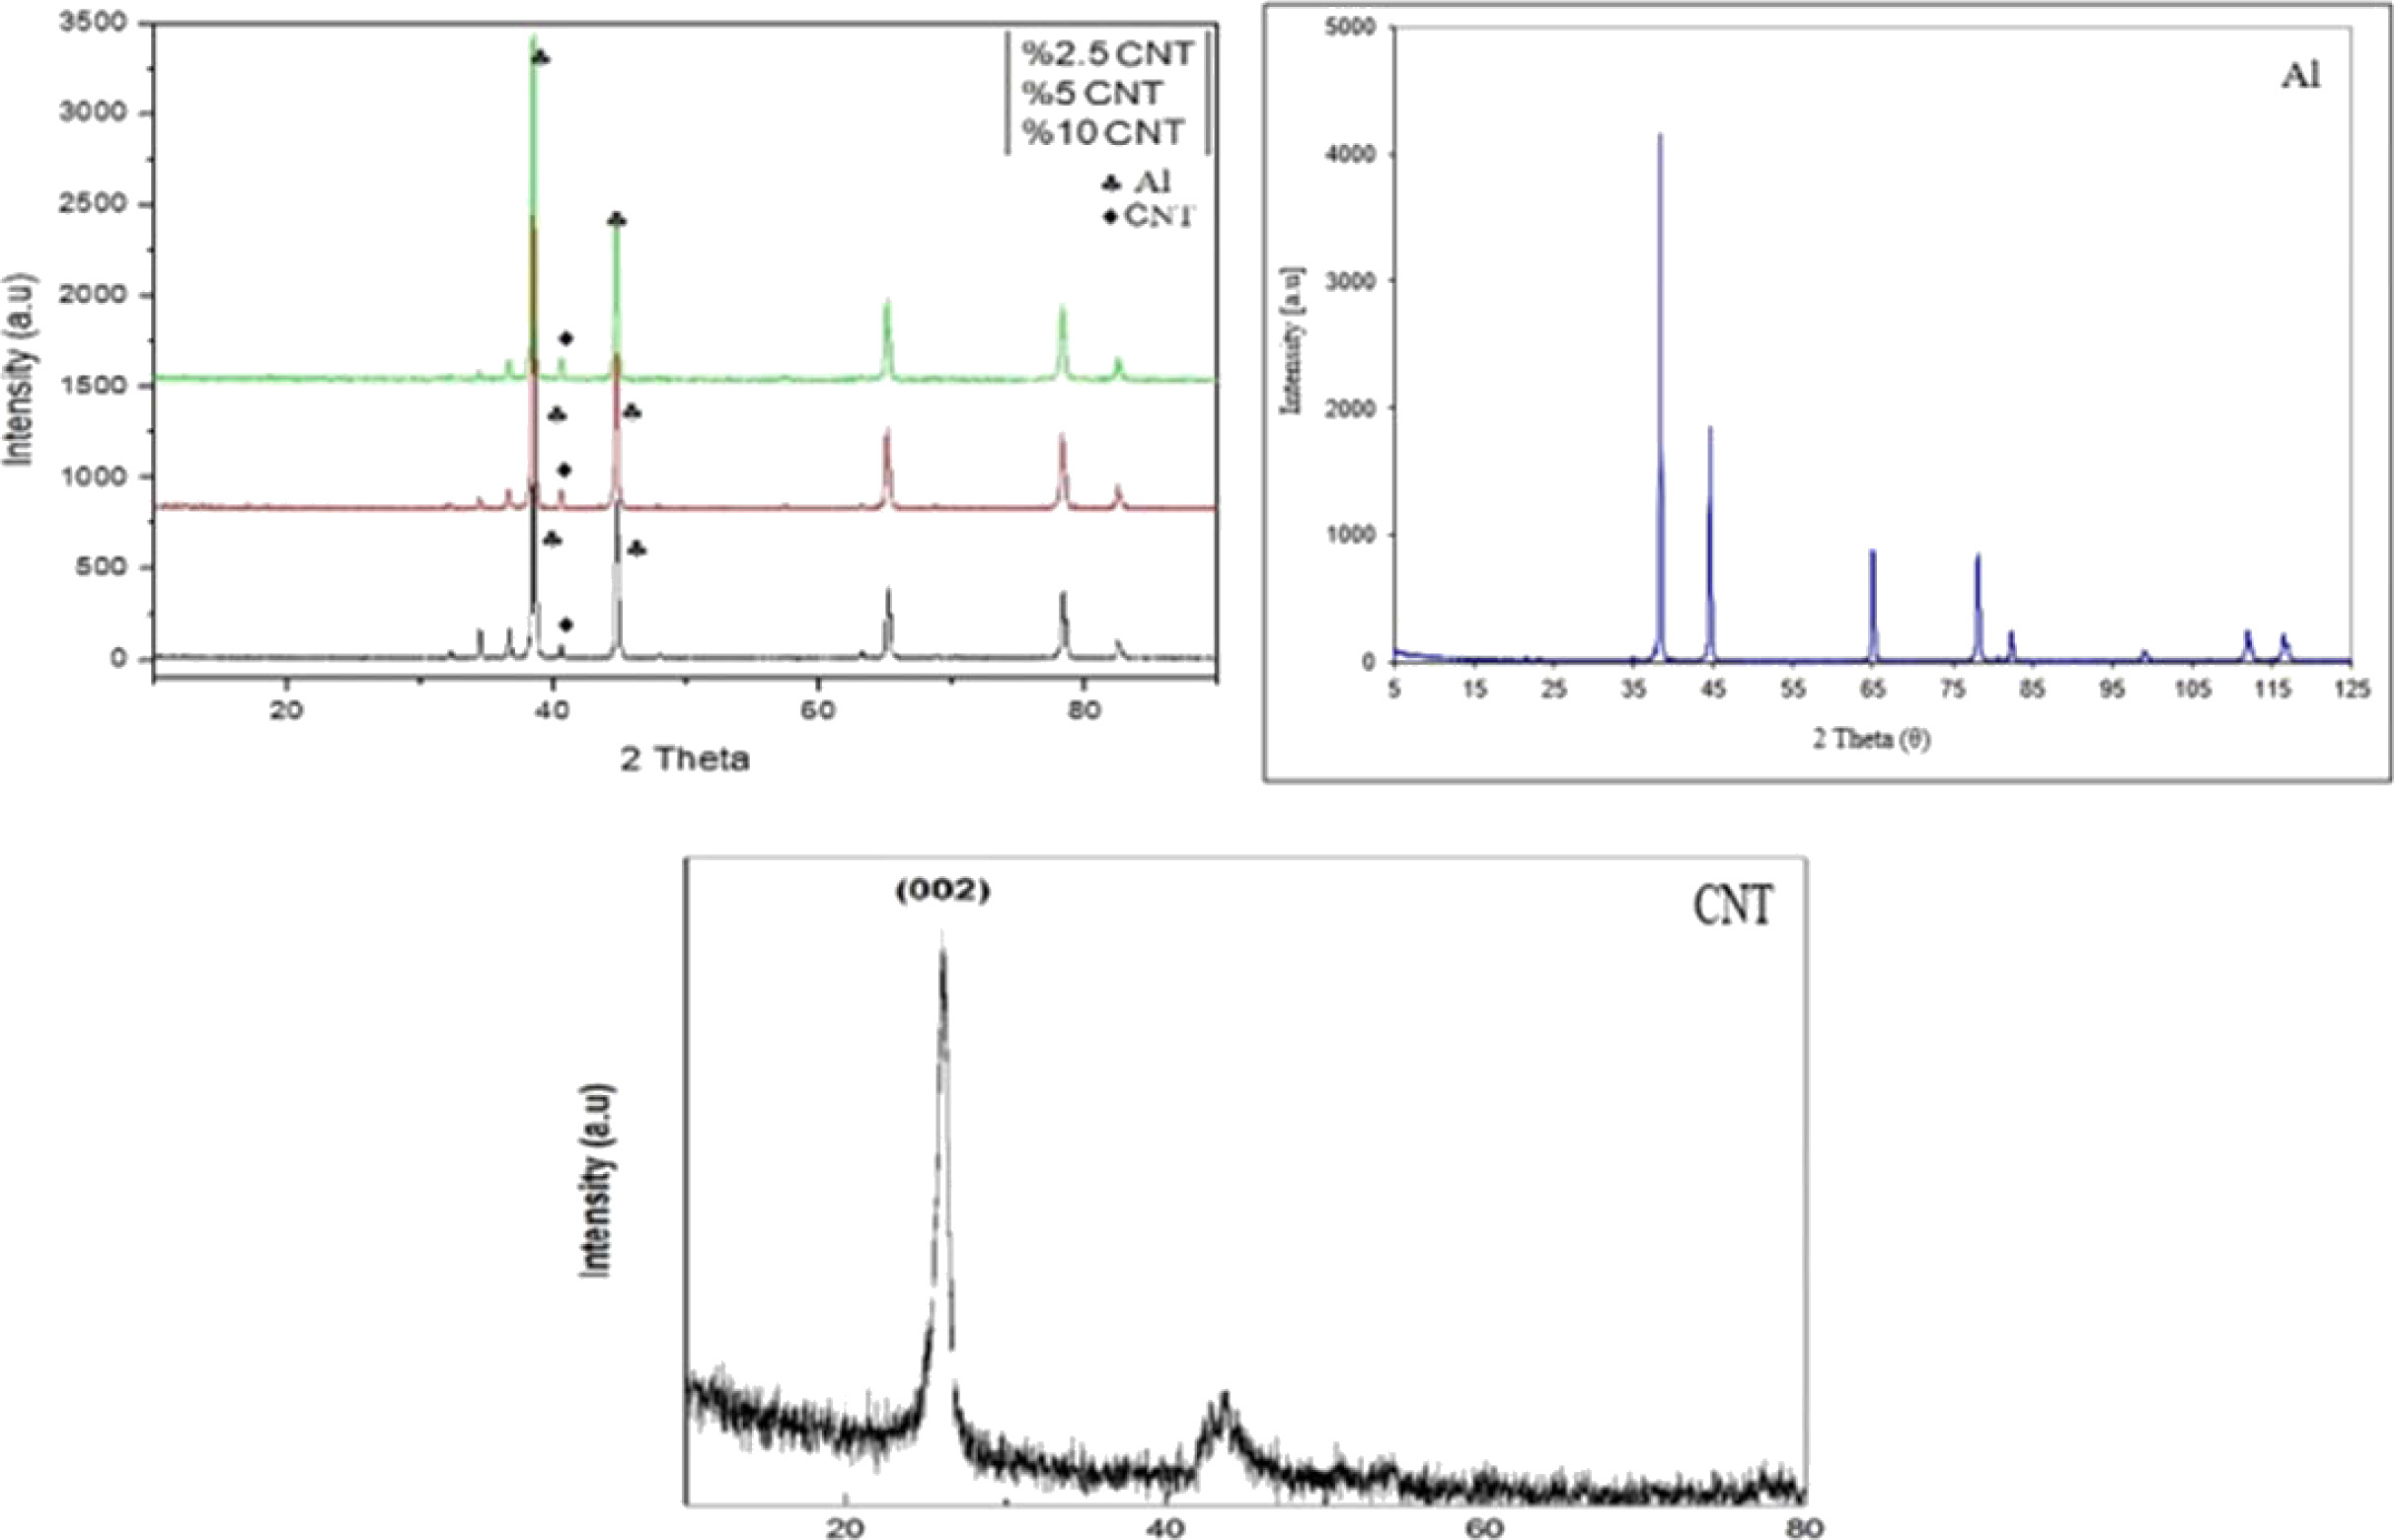
XRD analysis of phases are shown in Fig. 6.
The X-ray diffraction of specimens with several MWCNT
contents, CNT and Al alone is displayed in Fig. 6. Fig. 6 demonstrates the peak
sat 2q of 36,
38.44, 44.7 and 65 belongs to the Al, and, CNT alone peaks are observed at 26.
Moreover, the intensity of the peaks showed an obvious enhancement depending on
the MWCNT ratio. All this suggests that increased MWCNT contents lead to an
increase in the main peaks of the MWCNT. The selected specimens are
MWCNT-reinforced Al powder manufactured by powder metallurgy.
The features and information of these powders are
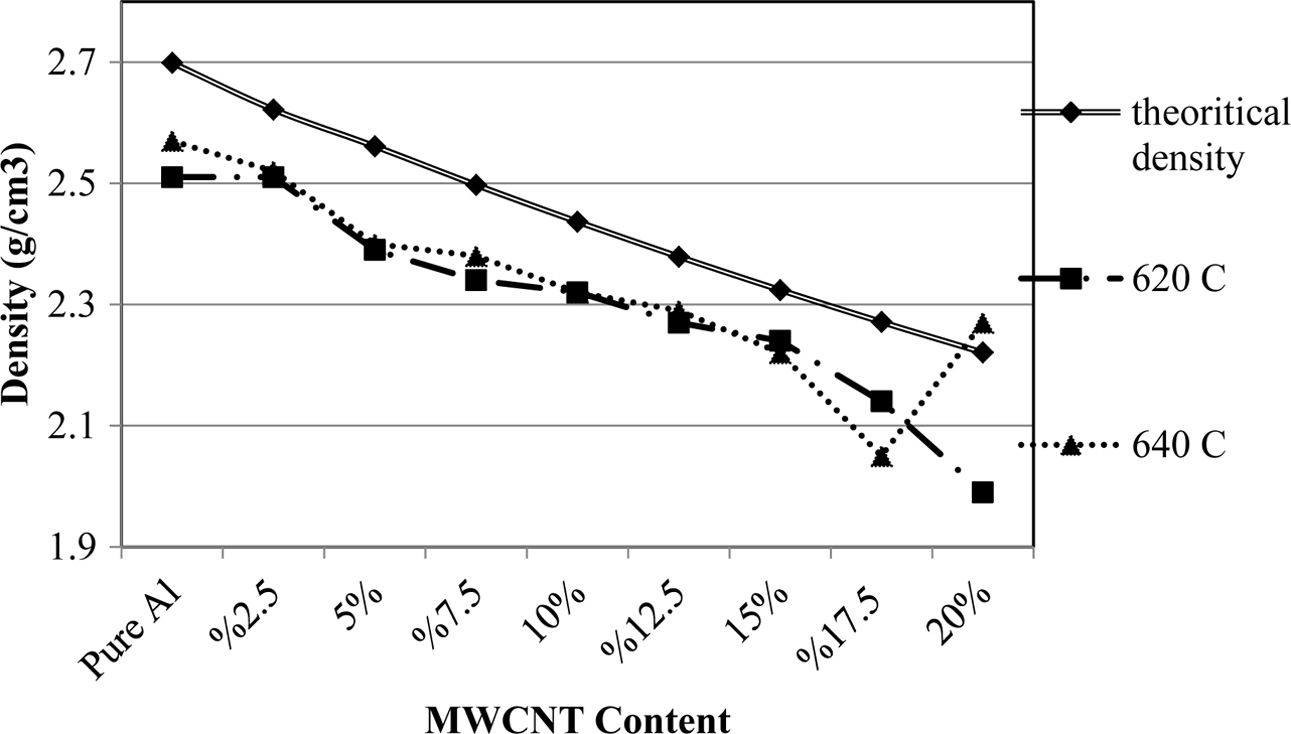
mentioned in the previous section. In addition, the mean density worth of
composites including dissimilar amounts of MWCNT is given as shown in Fig. 7.
As the temperature of the sintering process increased, the density of the
specimens approached the densities in theory [22].
Theoretic densities of the samples were calculated with
the help of the following equation [23].

Where subscripts c, f, and m,
represent the terms composite, fiber (or in the more general case,
reinforcement), and matrix respectively.
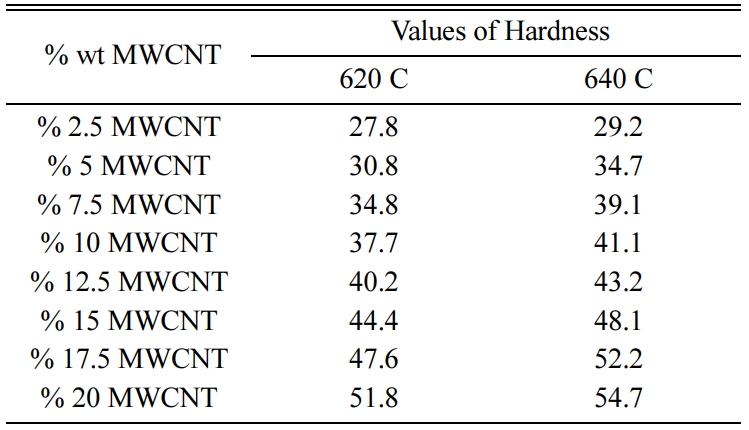
It is the increasing weight percentage of the MWCNT
and the sintering temperature that causes the composite to increase its
hardness. With the addition of MWCNT, the distribution of the rise in stiffness
of the composites can be correlated to the reinforcing effect.
The results of the abrasion test are as shown in Fig. 3.
It is localized as a function of MWCNT, meaning about changing sintering temperatures.
Even though the rise in MWCNT meaning and sintering temperature in the matrix
causes an increase in wear resistance, there is little difference between the
2.5% and 5% reinforced MWCNT at 640 C. Fig. 3 shows the weight loss for all
specimens as calculated using Eq. (2) and abrasion resistance for all specimens
calculated with Eq. (3) [24].

Wa: Percantage of Abrassion, ΔG:
Weight Loss, M: Force, S: Distance, d: Density
Aluminum density, wear properties and hardness of the
aluminum reinforced MWCNT specimens were examined by a mission of temperature
and time.
The results of this research are; the density of the
specimens approaches the theoretic density with the rise in
sintering temperatures for all dissimilar MWCNT means.
Microscopic images displayed that the MWCNT particles
were particularly homogeneously dispersed in the matrix, the MWCNT did not
dissociate. However, the asset of porosity at the ends of
the MWCNT particles is present. Microscopic pictures of the experiments
in which MWCNT reinforced aluminum particles are present
showed that MWCNT particles is not distributed
homogenously. Carbon may have a negative effect with aluminum matrix [25].
Increasing the weight percentage of the MWCNT and the
sintering temperature leads to an increase in the hardness of the composite
demonstrated in Fig. 8. Increasing the hardness with extra MWCNT may be
connected to the distribution reinforcement effect. The increase in the weight
percentage of MWCNT and the sintering temperature resulted in an increase in
the wear resistance of the composites. Content of composite
has much more effective than the sintering temperature. However, some
differences were observed between specimens, 2.5% and 5% MWCNT content which
had a 640 oC sintering temperature. The 7.5% MWCNT content
specimens have lower abrasion resistance than the others. 2.5% and 5% MWCNT
content may be more homogeneously distributed compared to 7.5% MWCNT content.
All values are shown in Table 1.

|
Fig. 4 The MWCNTs reinforced matrix Al SEM images of the composite material. (a): Spherical Al particulate, (b): 1. Al/MWCNT phase
and 2. Al composite materials. |
|
Fig. 5 The composite material's (7.5 % content Al/MWCNT) of (a) SEM image, (b) EDS analysis. |
|
Fig. 6 XRD pattern of 2.5-7.5 % content MWCNTs particles in Al matrix, Aluminum and CNT. |
|
Fig. 7 Density at different % MWCNT content sintering
temperatures. |
|
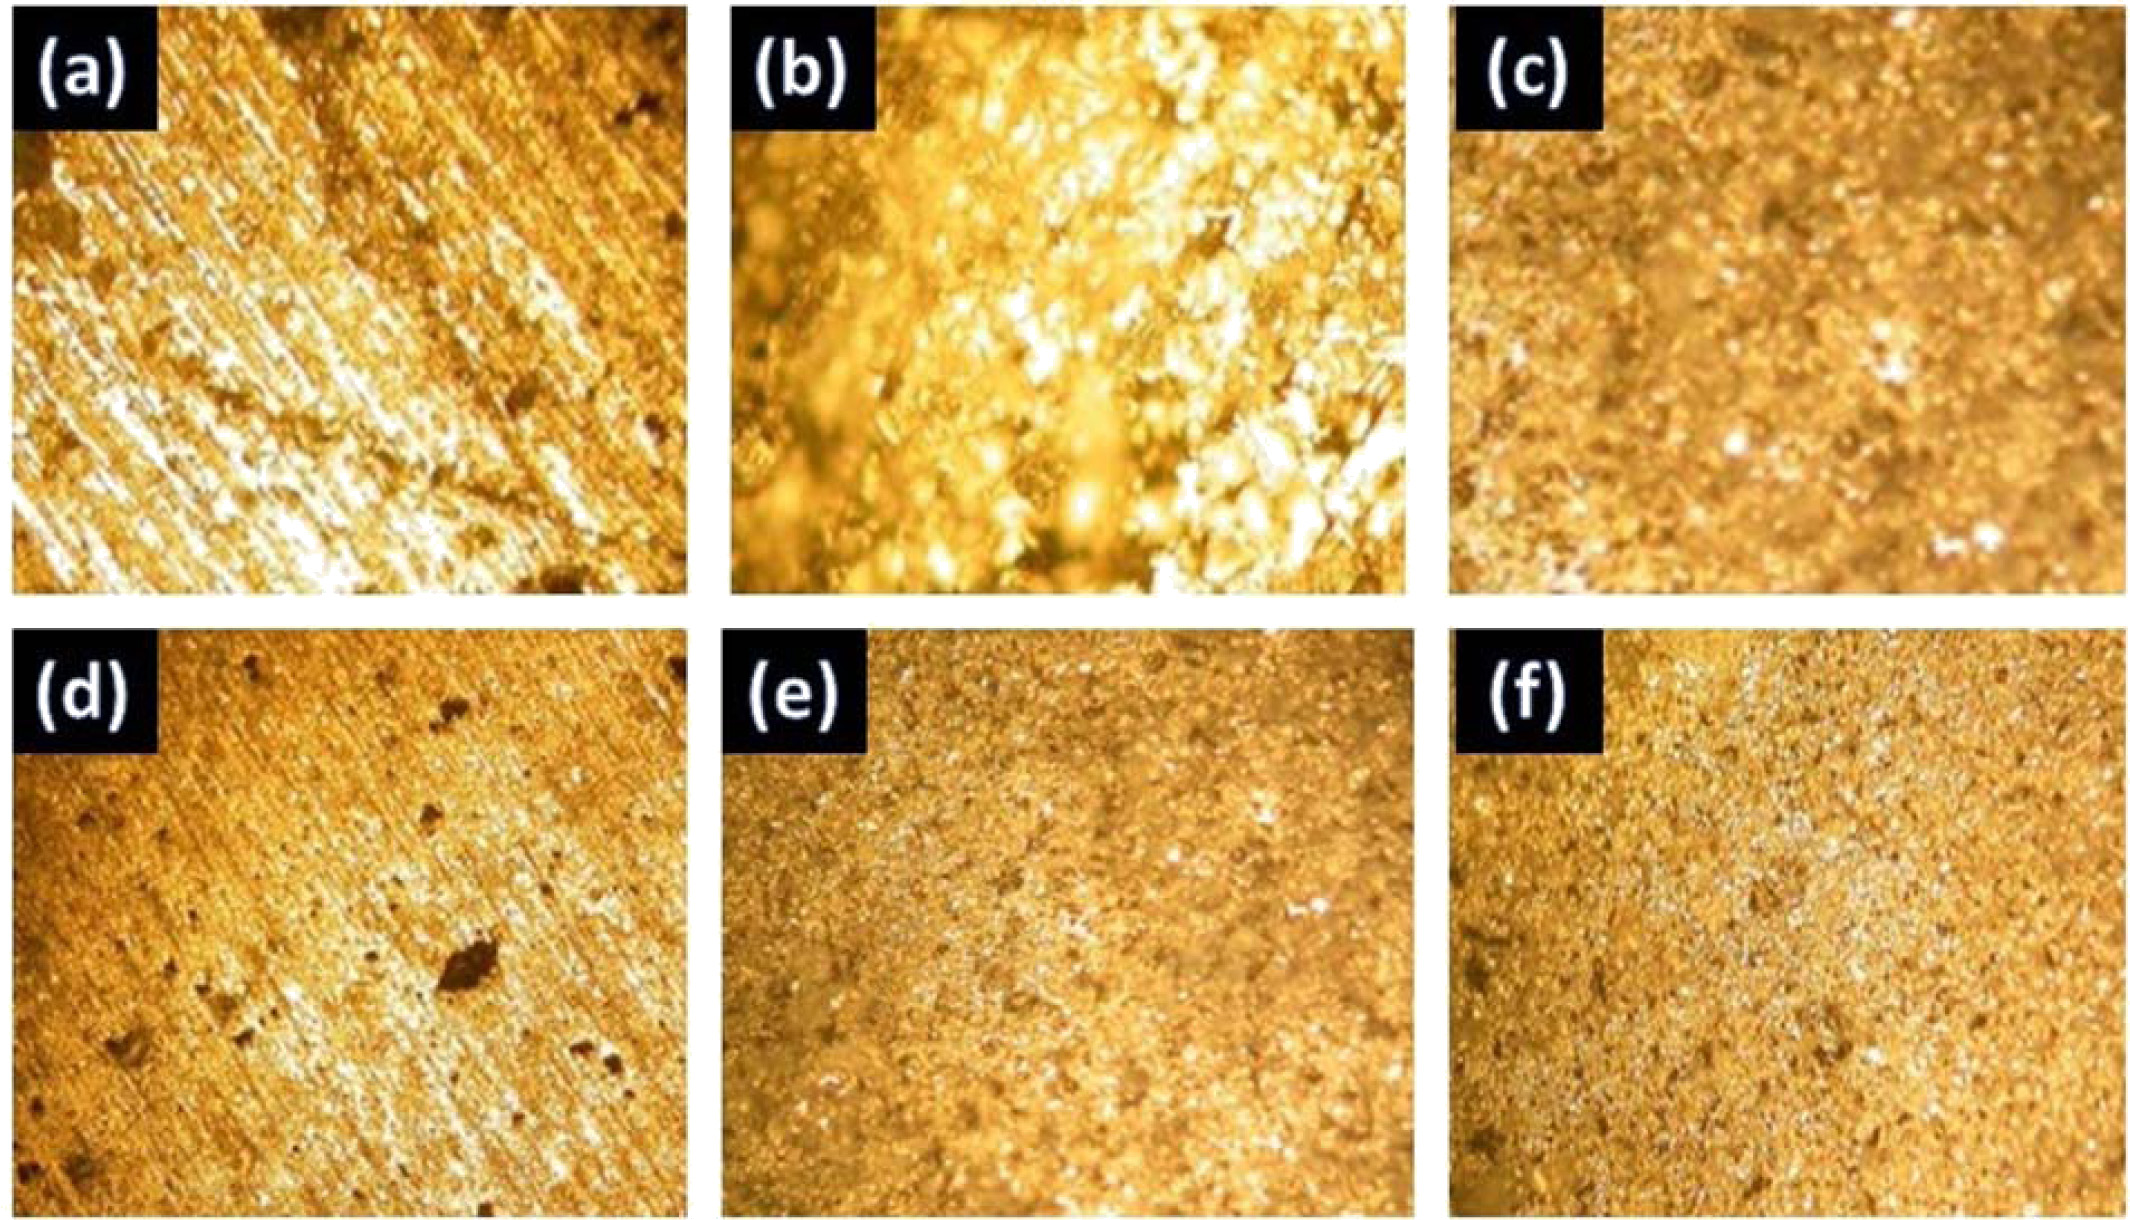
Fig. 8 Wear-tested MWCNT reinforced Al/MWCNT composites. (a) 620 C % 2,5 MWCNT, (b) 620 C % 5 MWCNT, (c) 620 C % 7,5
MWCNT, (d) 640 C % 2,5 MWCNT, (e) 640 C % 5 MWCNT, (f) 640 C % 7,5 MWCNT. |
In this study, density, hardness and abrassion properties
of aluminum specimens reinforced with different MWCNT ratios were
investigated as a function of temperature and time.The results
of this research may be expressed as follows; The composites of MWCNT/Al were successfully
fabricated using a PM sintering process. Approaches the theoretical density
with the effect of increasing specimens density and increased sintering
temperature with all different MWCNT contents. Microstructural analysis showed
the homogeneous distribution of MWCNT
particles in the matrix.
In addition, the presence of porosity is present at the
ends of the MWCNT particles. The studies carried out in SEM and
XRD detailed the homogeneous distribution of
nanotubes. As a result of this research, no evidence of
decomposition was found. This was further supported by a
simultaneous increase in forces, stiffness and ductility. The results showed
increased wear resistance in all composites having high nanotube concentration
of 5% by weight due to the homogeneous MWCNT distribution
in the matrix phases [26]. The simultaneous increase in
hardness and wear resistance can be attributed to the activation of more slip
systems due to the presence of CINs. Due to the effects on the mechanical
features of carbides and composites formed on the surface of MWCNTs, MWCNTs
should be evaluated further as they can improve load transfer ability and
strength.
- 1. R.M. German, in Powder Metallurgy and Particulate Materials Processing (Metal Powder Industry, 2005) p.331-333.
-

- 2. I. Topcu, H.. Gulsoy, N. Kadıoglu, and A.N. Gulluoglu, J. Alloys Compd. 482[1-2] (2009) 516-521.
-

- 3. M.D. Huda and M.S. Hashmi. Key Eng. Mater. 104-107 (1995) 37-64.
-

- 4. I. Topcu, Tehnicki glasnik 14[1] (2020) 7-14.
-

- 5. G.M. Dieter, in Mechanical Metallurgy, Second Edition (McGraw-Hill Education, 1988) p.139-362.
- 6. T.-W. Chou, in Microstructural Design of Fiber Composites (Cambridge University Press, 1992) p. 589-592.
-

- 7. S. Iijima, Nature 354 (1991) 56-58.
-

- 8. H.W. Kroto, J.R. Heath, S.C. O'Brien, R.F. Curl, and R.E. Smalley, Nature 318 (1985) 162-163.
-

- 9. M.M. Schwartz, in Composites Materials Handbook (Mc Graw-Hill Book Company, 1984) p. 651.
- 10. J.M. Berthelot and J.M. Cole, in Composite Materials, Mechanical Behavior and Structural Analysis (Springer, 1999) p.620.
- 11. S. Park, S.W. Choi, C. Jin. J. Ceram. Process. Res. 20[5] (2019) 464-496.
-

- 12. F.F Komarov, A.M. Mironov, Phys. Chem. Solid. State. 5[3] (2004) 411-429.
- 13. Y. Feng, Hai Long Yuan, Min Zhang, Mater. Charact. 55[3] (2005) 211-218.
-

- 14. H. Kwon, M. Estili, K. Takagi, T. Miyazaki, A. Kawasaki, Carbon 47[3] (2009) 570-577.
-

- 15. R. George, K.T. Kashyap, R. Rahul, S. Yamdagni, Scripta. Mater. 53[10] (2005) 1159-1163.
-

- 16. S. Jain, in Nano -Scale Events with Macroscopic Effects in Polypropylene / Silica (University of Twente, 2005) p.2-4.
-

- 17. D. Gavrilov, O. Vinogradov, and W. Shaw, in Tenth International Conference on Composite Materials. III. Processing and Manufacturing (Woodhead Publishing, 1995) p.11-17.
- 18. X. Feng, J. Sui, W. Cai, and A. Liu, Scr. Mater. 64[9] (2011) 824-827.
-

- 19. İ. Topcu, A.N. Güllüoğlu, M.K. Bilici, H.Ö. Gülsoy, J. Fac. Eng. Arch. Gazi Univ. 34[3] (2019) 1441-1449.
-

- 20. S. Panigrahi, S. Praharaj, S.Basu, S.K. Ghosh, S. Jaha, S. Pande, T. Vo-Dinh, H. Jiang, and T. Pal, J. Phys. Chem. B 110[27] (2006) 13436-13444.
-

- 21. G.. Gül and F. Kurtulmuş, Mater. Sci (Mezıagotyra) 24[1] (2018) 104-111.
-

- 22. K. Dvorak, D. Dolak, D. Paşousek, L. Čelko, and D. Jech. Mater. Sci (Mezıagotyra) 24[1] (2018) 29-34.
-

- 23. F. Huang and L. Shangguan, Mater. Sci (Mezıagotyra). 23[2] (2017) 129-132.
-

- 24. I. Topcu, B.. Nilgün, A.N. Güllüoglu, and H. Gülsoy, J. Chem. Soc. Pakistan 42[1] (2020) 70-80.
- 25. R. Wu, Q. Li, L. Guo, and Y.M. Taiyuan, Mater. Sci (Mezıagotyra) 23[4] (2017) 317-321.
-

- 26. M.K. Esawi Amal and A. El Borady Mostafa, Compos. Sci. Technol. 68 (2008) 486-492.
-

 This Article
-
2020; 21(5): 596-601
Published on Oct 31, 2020
- 10.36410/jcpr.2020.21.5.596
- Received on May 26, 2020
- Revised on Jul 25, 2020
- Accepted on Aug 14, 2020
 Services
Shared
 Correspondence to
- Muhammet Ceylan
-
Department of Mechatronics Engineering, Istanbul Commerce University, Istanbul, Turkey
Tel : +90 4440413-3311
Fax: +90 (216) 489 02 69 - E-mail: mceylan@ticaret.edu.tr


 Copyright 2019 International Orgranization for Ceramic Processing. All rights reserved.